 In this tutorial I’m going to discuss the long-haired black rabbit. I’m not going to go into great detail in the blog because I think the video does a better job explaining things. Mostly this blog is a way to give you the free pattern and reference photo. I do want to mention that the techniques used to create the clumps or locks of fur can be applied to any animal with longer fur. This includes humans with long hair. At first this project might seem a little intimidating, but I think once things are broken down into smaller pieces, you will be amazed that it is fairly manageable. I won’t say easy, because that depends on your experience level.
 Click on the image to the left to watch a YouTube video version of the tutorial. If you prefer, click on the hyper link to open the same video: https://youtu.be/ImYtGB-yIFU
 Here’s the reference photo for this artwork.
Now, let’s get started.
MATERIALS NEEDED:
- Writing tip
- Shading tip
- 8 x 10 inch (20.3 x 25.4 cm) piece of wood
- Rabbit pattern (Black Rabbit pattern)
- Sharp tipped knife (optional)
- White Charcoal (optional)
I used General’s brand of white charcoal. Here’s an Amazon affiliate link to white charcoal: https://amzn.to/3a3GFfq
Videos that might be helpful.
I use the zigzag burn stroke to create the short fur on the face. I have a video that goes into detail on how to use the zigzag burn stroke to create short fur texture. https://youtu.be/KYxpEhYopIM
If you are interested in the bubble background, I created a video that explains it. I will not be covering the background in this blog. https://youtu.be/gVvIT0HS5yE
STEP 1 – PREP THE WOOD
 Wood burning is much easier if you take the time to prepare the wood surface. Always smooth the wood surface by sanding it with at least 220 grit sandpaper.
 Then thoroughly wet the board by misting it with water or running it quickly under the sink faucet.
The board should be damp to the touch, but not soaking wet.
Let the board dry and then sand again.
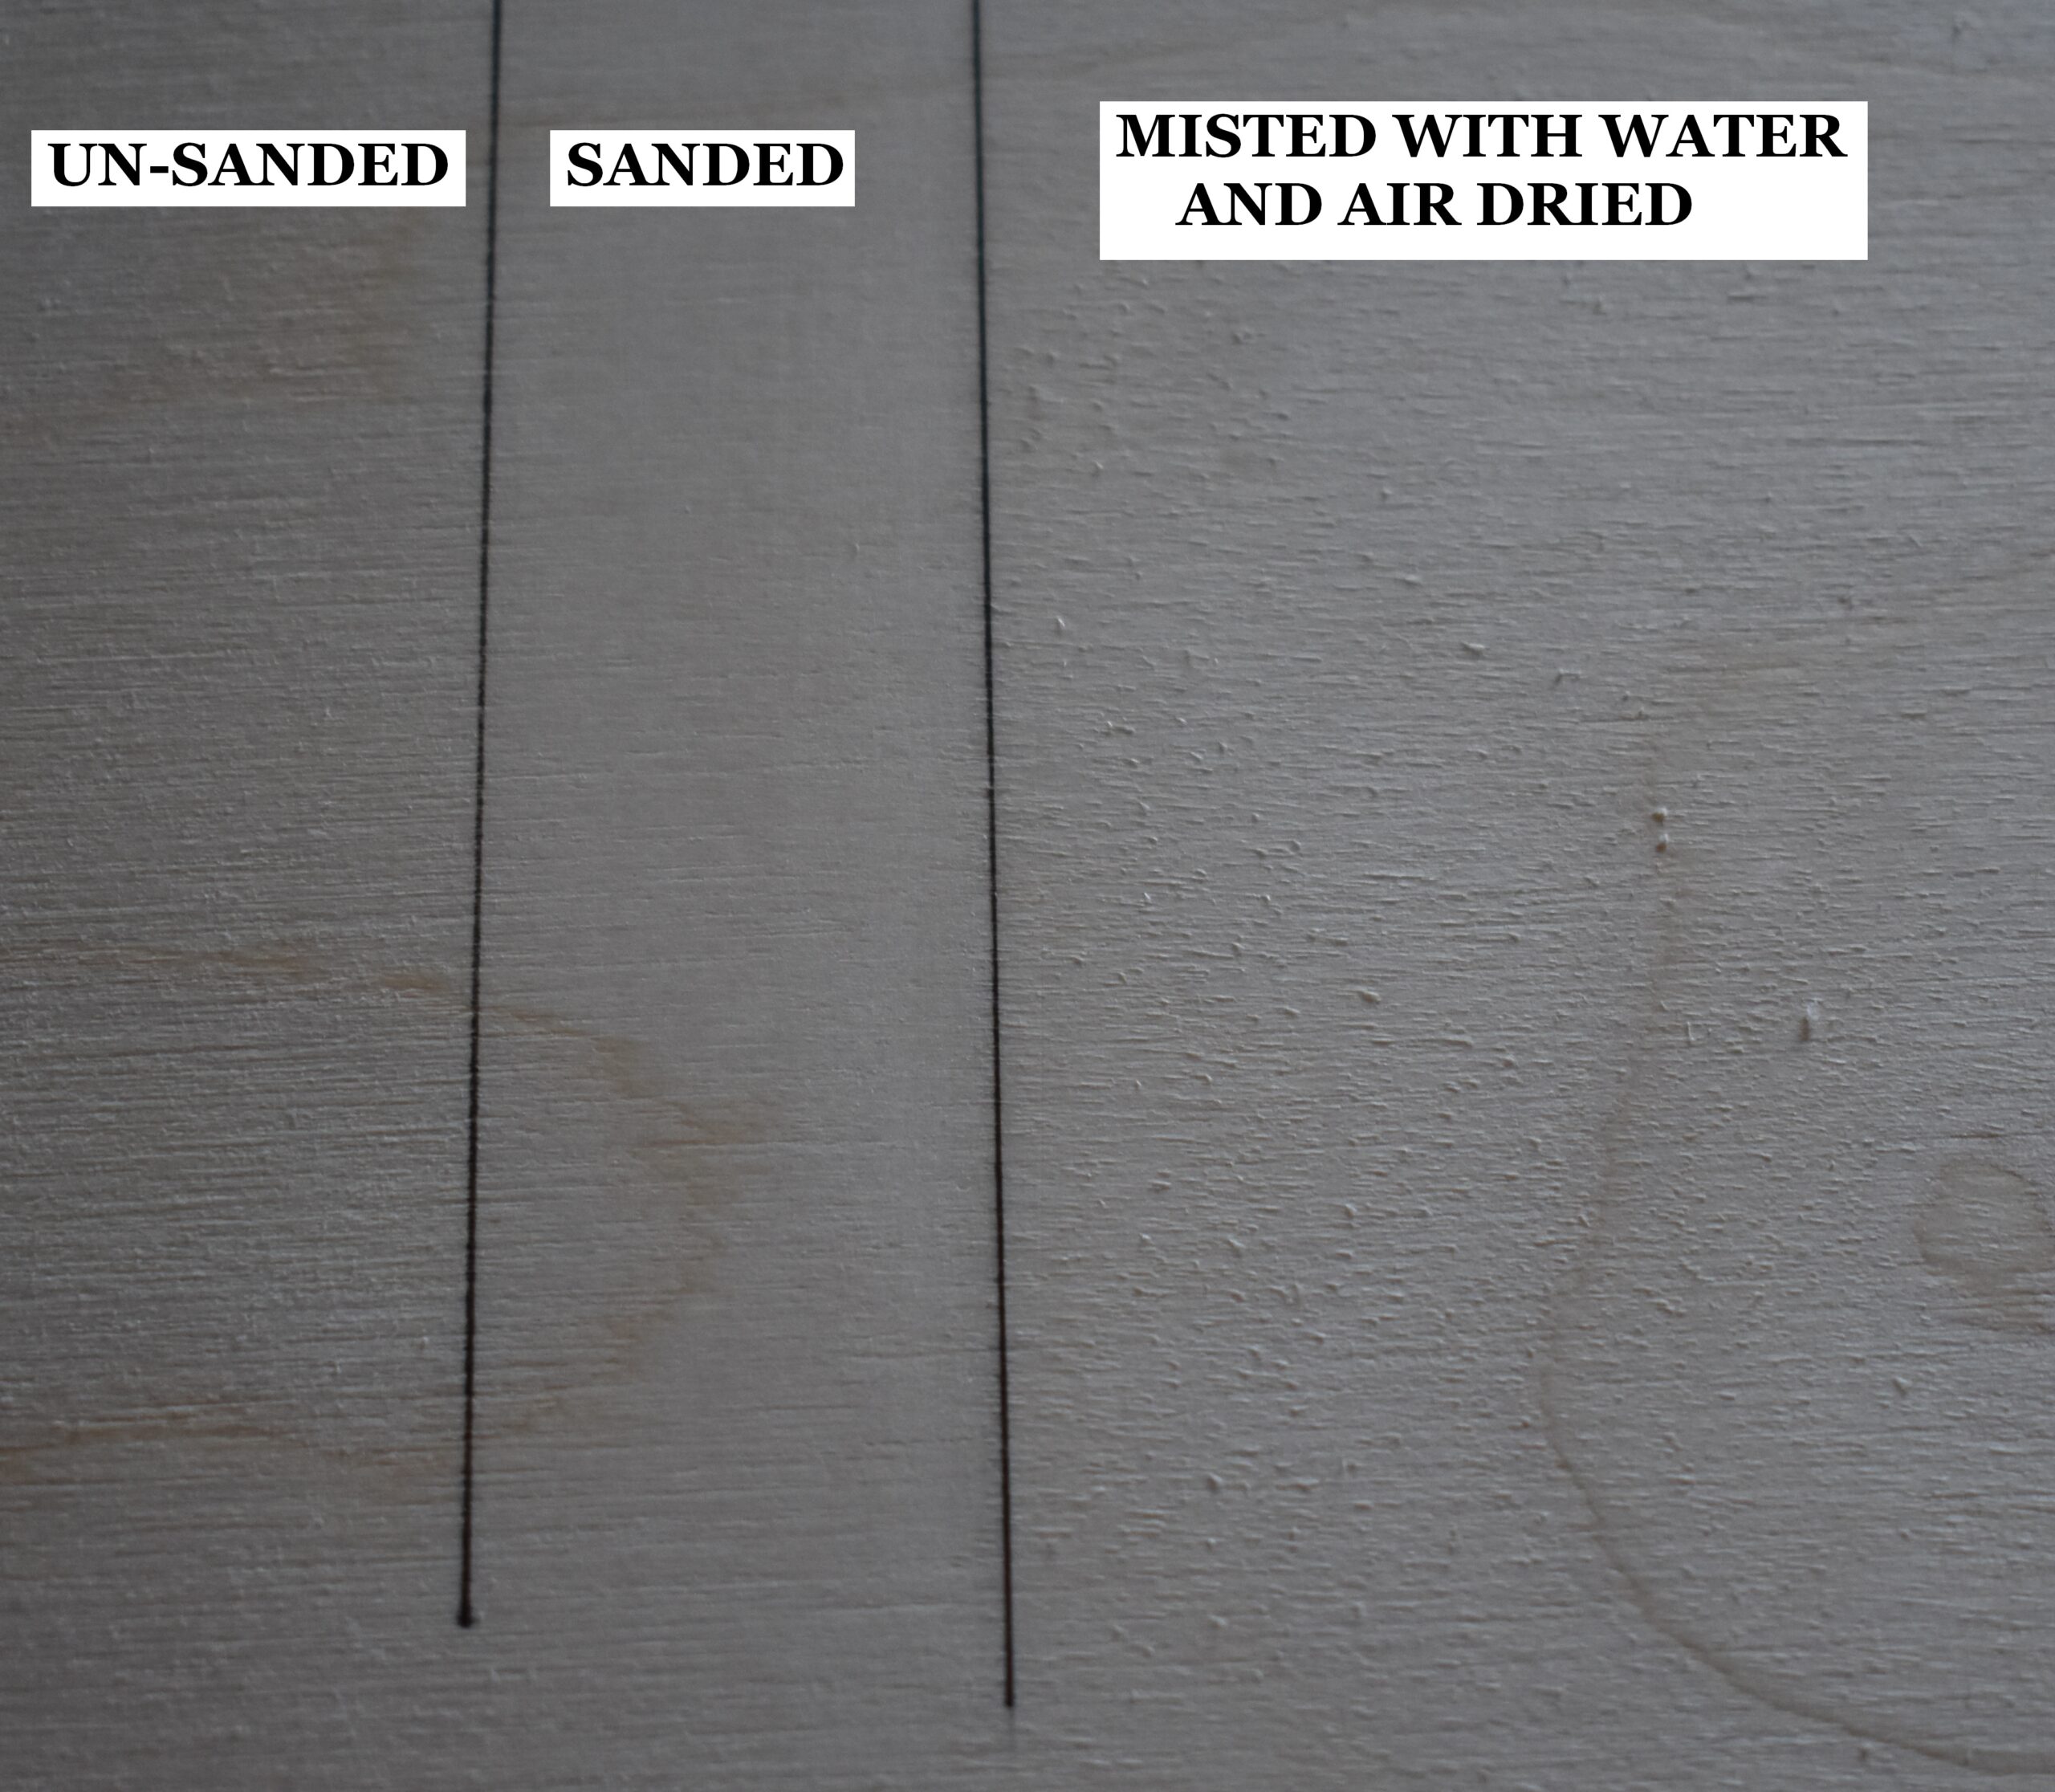 This piece of plywood board is broken up into three sections. The far-left section is how the board looks without any prep work. The board has a rough texture. The middle section of the board shows how it looks after it was sanded, and the surface is a lot smoother. The right section of the board shows it after it was lightly misted with water and allowed to dry. Notice how rough the board looks, but a quick sanding will remove that and leave an ultra-smooth board.
Doing the 4-step process (sand, mist, dry, sand) produces a super smooth surface, and the smoother the surface is the better the burn results will be.
STEP 2 – TRANSFER
 Print out the pattern onto plain paper.
Here’s how I accomplish this. First I coat the back of the printout with graphite. Place the printout graphite side down onto the board and trace over the pattern lines.
I do get numerous comments asking why I don’t use wax-free carbon paper. Quite simply, I’ve yet to find one I liked. They are either too light to easily see, or so dark I can’t erase them from the board. I got tired of wasting my money, so use the method I’ve used since I was a teen.
 Then use either a writer pen tip or the edge of the shader pen tip to burn over the trace line.
Rub a pencil eraser over the area to remove excess graphite.
This is how my rabbit looks at this point.
STEP 3 – EYES
 Burn in the pupil, but avoid the areas of reflected light. Also burn a dark line around the edges of the eye.
Use a small shader and burn in the iris. Again, avoid the areas of reflected light.
Next, darken up the outer edges of the eye, and lightly burn over the lower spot of reflected light.
If needed, use the tip of a sharp knife to gently scrape away some of the color from the left side of the lower spot of reflected light. I had accidentally burn over my lower reflection, so it was hard to tell it was there. Make sure to sure a light hand pressure when scraping.
Then use a writer pen tip to darken the pupil until it is dark brown to black in color.
STEP 4 – FACE
 Use the edge of a shader to burn thin lines that follow the fur growth direction. The pattern lines are drawn in the fur growth direction.
I am using the zigzag burn stroke to block in the facial fur. If you are not comfortable with the zigzag burn stroke, then burn a bunch of single lines.
I have two different videos on the zigzag burn stroke. The first video demonstrates how to use and modify the burn stroke to create fur. Here’s a link to the video: https://youtu.be/KYxpEhYopIM
The second video covers the different textures I create using the burn stroke. https://youtu.be/yaYSqp1Ebyo
Regardless of which burn stroke you use, make sure to vary where you start and stop the burn strokes. Also vary how long the burn strokes are.
 It is very important to use a light hand pressure when burning zigzags or single lines with the edge of shader!
The reason is that the edge is very thin and can easily sink down into the surface of the wood. The deeper it sinks, the harder it is to create layer burn stroke. A light hand pressure will help prevent this from happening.
 The fur along the bottom of the face has some long white hair. I create these by leaving gaps in the fur. Quite truthfully, if this artwork wasn’t a commissioned piece, I would have ignored these white hairs. Instead, I would fill the area with the same short fur texture the rest of the face has.
An important feature to realistic fur is jagged edges. That just means there shouldn’t be straight or smooth edges. This applies along the outer edges of the face, and along transitions.
Transitions are places where the fur either changes texture or color. With the rabbit, the white fur around the eye is a transition. So is the bottom of the face where the short fur ends, and the longer chest fur begins.
In both areas, I burned thin lines that started in the dark face fur, and ended in the transition zone. This created a nice jagged edge along both transitions. It is always important to burn a few tan lines on white fur. This gives the fur texture, and ensures it doesn’t look like unburned wood.
 I did use a micro writer pen tip to burn around the edges of the white hairs along the lower face. This darkened the fur adjacent to the white hairs, and that helped the white hairs stand out.
Again, I wouldn’t bother with these white hairs if this artwork wasn’t a commissioned piece.
There is something I didn’t show, and that is the numerous times I re-burned over the facial fur to slowly darken it up. I probably burned 3-4 layers of zigzags before the color was as dark as I wanted it to be.
STEP 5 – EARS
 With the dark part of the ear I burned 2 or 3 layers of zigzags.
With the white ear fur, I burned short tan lines along the center opening.
I also added a few short tan lines here and there on the rest of the white fur. As you can see, I didn’t add many tan lines to the white fur. I didn’t spend much time on the ears.
STEP 6 – CHEST
 The chest is more complicated than the face.
The fur on the chest was longer and a bit messing looking. To try and replicate this I using a shader to burn wide lines or thick bands of color.
I would reburn over a burn stroke several times to darken. Also, I left gaps between the burn strokes. If you look at the area just above where I’m burning in the photo, you can see there is a part in the fur. Anytime there is a part, I burn along both sides of the part line. The burn stroke starts on the part line and gets pull it away from it. The reason is that burn strokes tend to start out darker than they end. By starting the burn stroke in the center of the part, that will become the darkest area. This will help create the illusion of the part in the fur.
 Next, start blocking in the rest of the fur. For this I’m burning along the pattern lines using the flat of the shader.
If you look closely, you can see that the burn strokes are not uniform in color. The reason is that I use a slight up/down motion as I burn the wide band of color. This creates irregular color.
As I continue to burn wide strokes of color, I leave little gaps here and there. Those little gaps look like highlights.
It might be easier to draw those highlights with white charcoal. Then burn around the white charcoal lines. I will get into this subject in greater detail later on.
It is important to keep things jagged and irregular. To put that another way, don’t create straight lines within the fur.
STEP 7 – THIN LOCKS OF FUR
 I filled a small area with semi-long curving burn stroke. There are gaps between the burn strokes. The gaps become thin locks of fur that look like highlights.
In this composite photo you can see thin locks of fur forming. Those thin locks are created by leaving gaps between the burn strokes.
I vary the angle I’m hold the pen. The steeper the angle, the thinner the burn stroke. That’s because there is less metal in contact with the board. It is important to include an assortment of line widths in the fur. I think it helps add to the texture, visual interest, and realism of the fur.
 Once an area is blocked in, then I re-burn over it to darken and further define individual locks of fur.
I do realize that not everyone is comfortable creating random locks of fur. There is an alternative way of doing things.
Using white charcoal
 Use a white charcoal pencil and draw in the locks of fur. Notice how the locks have slight curves to them.
DO NOT USE COLORED PENCILS! Colored pencils will not work for this because they contain waxes and oils. Those waxes and oils will melt and char under the heat of the pen tip.
Notice how the charcoal lines curve in different directions, and some overlap onto each other. The fur on the rabbit is a bit messy looking, so that’s why I have them going in random directions.
 Once the white charcoal lines are in place, then use a shader and carefully burn around the charcoal lines. Charcoal will resist the heat of the pen tip, but it won’t block it completely.
The white charcoal is easy to see, so that makes it easy to avoid.
STEP 8 – LARGE CURVING FUR CLUMPS

The beginnings of creating a large clump is the same as a thin lock; burn the adjacent fur where you want a clump to be. Or to put it another way, burn the outline of the clump.
Once the clump is outlined, then fill it with wide line or wide bands of color. I’m not sure which of those terms is best to use and/or visualize.
Then start on the next clump. Since I want my clumps to have a curved or bowed appearance, I burn the wide lines with a curve in them.
It is very helpful to darken the fur adjacent to a clump. That way it is easy to see where your clumps of fur are.
When you first block in the fur and start creating clumps, keep the color on the paler side. The lighter color makes it easy to make changes if needed.

I don’t have a set way of doing things. With one artwork I might completely block things in before I start re-burning. With other artworks, like this one, I burn a section, and then start re-burning.
Now I’m started to create the third clump of fur.
I like to leave the outer edges of my clumps either jagged or come to a tapered point. I personally think this looks more realistic versus have a straight line in the fur.
 Now that the fur is blocked in, it is time to re-burn over it until it is as dark as I want it.
During the reburning, I further define each clump. This is done two ways. First, I darken the fur adjacent to the clump. Second, I add more wide bands of color to the clump. I concentrate the color along the ends of the clump.
The clump has an inner and outer edge. The inner edge is where the fur emerges from the body. The outer edge is where the clump of fur ends.
STEP 9 – LONG BODY FUR
 The last thing to cover is the long body fur. This fur is a combination of the previous two techniques I just discusses.
The fur begins very similar to the thin locks in that I’m burned wide lines that curve. Plus, I leave gaps here and there. I do not burn really long strokes of color. Instead, I work smaller sections at a time, and eventually the lines will meet up creating the long fur.
Keep in mind, that with all of my tutorials I’m just explaining how I do things. This does not mean my way is the only way or even the best way of doing things.
After a section is blocked in, then I move onto the next small section. In this section I creating a dark shadow that will be a part or gap between sections of fur.
Also, I created a thin lock of fur that sits on top of the longer fur. I burned a thin line around the edges of the thin lock. Afterwards, I resumed working on the long fur, but I was very careful to avoid burning over the thin lock.
You may or may not find it helpful to use a white charcoal pencil and draw some guidelines in the fur. The pencil can be used to mark the location of thin locks.
 During the reburning, the fur is darkened up.
I also create shadows here and there to give the fur depth.
When burning the long fur, make sure to vary the color of the burn strokes. The color variation is what gives the impression of hair. That’s it for the explanations.
IN CONCLUSION
I hope you found the tutorial informative, and that I was able to break down the information so that it was easy to follow. I also hope you will be able to use the information in your own artwork.
Thank you so much for reading.
Until the next blog,
Brenda
April 3, 2024
Want to subscribe?
- Click on the “Leave a Comment” field at the end of any post (blog) and a subscribe option will appear.
- Put something in the comment field (if you put “test” or “just subscribing” I won’t make your comment public)
- Fill in the sections for your email address and name, and then click on the “notify me of new posts via email.”
- You will get a confirmation email from WordPress confirming you want to subscribe.
- Click on the confirm button in that email and you’re done.
Please note that I do not send out emails. If you have a WordPress account there is a way to subscribe within the WordPress system, but I cannot provide specifics on how it works as I don’t know.