 In this blog I will be doing a product review of the Customizer Engraver CP-V3 by Culiau. I will share with you some different applications I thought of for using the engraver. The applications fall into two general categories: practical and decorative. The practical applications are situations that I experience on a semi-regular basis. Decorative applications, on the other hand, are unique projects that I probably wouldn’t do very often. Much to my surprise, I ended up with a number of both practical and decorative application that I will share with you in this blog.
Note that I won’t be covering the decorative projects in great detail. After all, this is a product review not a how to blog. If you would like more information about a particular project, then leave a comment and let me know. If there is enough interest, I will make a tutorial about it.
 I do have a video version of this review. While I do my best to verbally explain things, sometimes seeing it is easy to understand.
To watch click on the video thumbnail, or click on this link: https://youtu.be/4FbvAs_5oU4
UNBOXING
 Here’s an image of the actual box I received.
It doesn’t look identical to the one on their website, but it could be that they have different styles based on the country the engraver is being shipped to.
What surprised me was how small the box was. For some reason I was expecting something larger.
The box measures 4 ¼” wide x 7 ½” tall x 7/8” deep (10.8 x 19.1 x 2.2 cm). The shipped package easily fit in my mailbox.
 Lifting the box lid reveals an assortment of items like the user manual.
The user manual contains basic instructions for the Customizer.
Of course there is the rechargeable Customizer. It runs on a lithium battery.
There is a black cap for the Customizer, and a USB charging cable.
Also included is a little plastic Ziploc bag that contains several items like the sole engraving bit, the hex key, and two Allen grub screws. I will point out that the engraving bit was carefully wrapped in paper. Also, I like that they give you a spare screw. These things are small, and I think they’d be easy to lose.
 Also included are 30 diamond drill bits. All of them are shaped differently, but some are pretty similar in style.
SIZE
With cap on, the Customizer weighs 2 ounces (56.7 g), so it’s very lightweight. Without the cap the engraver weighs 1.9 ounces (53.9 g).
The Customizer engraver is 5 3/4 inches (14.6 cm) long with the cap on. Without the cap, the engraver is 4 3/4 inches (12.1 cm) long to the end of the collet. The collet is where the bits are inserted.
The Customizer has a circumference of 2 1/8 inches (5.4 cm).
The drill bits are not all the exact same length, but the are very close to 1 3/4 inches (4.4 cm) long.
 Todd used some fancy measuring device to check the diameter of the bits. I don’t have a clue what this thing is called, so I’m calling it the fancy measuring device. According to the fancy measuring device, the bits are 3/32 inches in diameter (0.24 cm / 2.4mm).
Most standard sized Dremel bits are 1/8 inches in diameter, so they are too big for the Customizer.
The USB cable measures 12 ½ inches (31.8 cm) long.
EQUIPPING
 Grab the bit you want and insert it into the collet opening.
Push the bit down as far as it will go.
Be aware that the first couple of times inserting and/or removing bits might require some force. After that things get easier.
Not all of the bits are the exact same size, so there are still a few that require more effort to insert and remove than others.
Once the bit is in place, then secure it to the Customizer with a Allen grub screw. This thing is tiny. I found it was easier to attach it to the hex key and use that to place it into the threaded insert.
Place your finger on the collet to keep it from spinning, and tighten the screw until it is snug.
 I’ve found that you do not need to completely remove the Allen grub screw to exchange bits.
Instead, just loosen the screw just enough to be able to remove the bit, but not enough to remove the screw from the collet. The yellow arrow in this composite photo is pointing to the screw that is still attached to the engraver.
Insert the bit you want.
Tighten up the screw and you’re ready to go.
I was thrilled when I discovered I didn’t have to completely remove the Allen grub screw! The reason is that finding said screw after it dropped onto the floor is not fun! When I said I thought the screws would be easy to lose, I wasn’t expecting it to happen so soon! Fortunately Todd found it using a large magnet he has.
NOISE
In the video version of this product review I recorded the sound levels of the engraver. It’s not a pleasant sound to me.
I will mention here that it can be rather loud depending on what you are doing and the setting you have it on. It often reminds me of a dentist drill. Because the sound bothers me, I wear ear muffs when I use the engraver.
POWER & BATTERY
 Here’s the spec page from the user manual. I’ve got the RPM section circled. Tje RPM’s state: 8,000 / 15,000 / 21,000.
 When you first power on the engraver by pressing the orange button, it begins at level 3. Orange arrow labeled #1 points out the power button.
The yellow arrow (labeled #2) is pointing to the LED indicator that shows what level the engraver is running at.
The blue arrow (labeled #3) is pointing to the charge on the battery. The battery has three bars showing how much of a charge is left on the battery.
The orange button not only powers the unit on and off, but it is used to cycle through the 3 different power levels. Power level 1 is the lowest setting.
 I kept track of every time I used the Customizer until the battery ran out of charge. As I did this, I noted when the battery charge reduced the number of bars that were lit up.
 In fact, I did this a couple of times. What I found that is the number of minutes the battery lasts varies. I’m sure this has to do with what the Customizer is being used for, and the power level being used.
I did not track of how much of the time was spent using the engraving bit versus the drill bits.
 Of course, after the battery is drained, it needs to be recharged. The user manual states that the charger should not exceed 5v 2A.
I hooked the engraver up to different charging ports and timed how long it took. I tried the following: computer USB3 port, a portable power pack (RavPower), and a computer USB 2 port. Do I know how to have fun or what?
 All of the power sources I tried produced 5v, but the amperage was different. From a little internet research I did, I found the following: USB 2 is 0.5a, USB 3 is 0.9a, and the RavPower was 2.1a. In theory, the higher the amperage, the quicker the Customizer should charge.
Surprisingly, the amperage did not make a difference in the charge time. All three tests took very similar amounts of time to charge and that was almost 3 hours!
DRILL vs ENGRAVER
 The engraver can quickly remove all color from burn strokes. This can be helpful for creating distant stars or small moons.
 Another example is the line engraving of a rose.
 The diamond drill bits act more like sand paper. They can be used to slowly remove a little color.
The yellow arrow in this before and after composite photo is pointing the the spot where I removed a little color.
 In this composite photo compares the results of a drill bit and the engraver. The drill bit results are on the top, and the engraver results are on the bottom.
After a couple of passes, the engraver completely removed the color from the board. Whereas the diamond drill bit just lightened the area.
I think both types of bits could be used to remove a little or a lot of color, but how long it takes varies.
HAND PRESSURE
 Hand pressure can impact how the Customizer works.
The lines found on the left column were made using the engraver. The lines on the right were made using one of the drill bits.
Also, the upper row of lines were made using a light hand pressure. I’m using heavy hand pressure on the lower row that I’m currently working on.
 The light hand pressure produced much smaller lines. The heavy hand pressure created wider lines.
 When I angle the board, you can that lines created with heavy hand pressure are much deeper than those made with a light hand pressure.
CLEANING
 The tips can get dirty pretty quickly; especially if you’re using them on dark backgrounds.
I found that rubbing the tips on an ink pen eraser cleans them up. Ink pen erasers are also called sand erasers.
This method worked for both the drill bits and the engraver bit. It even removed the wood debris that clogs the slots on the engraver bit.
PRACTICAL APPLICATIONS
1 – Signing on a dark background
 I begin by signing my name with a white colored pencil.
Then I use the engraving tip and carefully follow along the pencil lines.
The signature can be a light as you want. I removed a little bit of color, so ended up with a signature in the tan hue range.
2 – Highlights
 Next is adding small highlights like those found on a rain drop. This would also work to add small highlights or reflected light on eyes.
 In fact, you can quickly and easily make highlights of any shape or size with the Customizer.
Using the Customizer to create highlights is much faster than scratching the highlights into existence with the tip of a sharp knife. Using the tip of a sharp knife is how I normally create highlights of this nature.
3 – Distant stars
 It’s very easy to create distant stars and small planets on a dark background.
Here’s how my simple artwork looks. I do think it would be possible to create a moonlit scene. Something like snow covered branches on a moonlit night.
4 – White whiskers
 I’m using the Customizer to carve white whiskers on my jaguar artwork.
This composite photo shows me using the tool on the left. The right images shows the whiskers looked after I was done. Again, this was much quicker and faster to do than scraping them into existence.
 I will mention that I used a smaller engraver than what came with the Customizer.
This image shows two engravers. The one on the left, circled in red, is what comes with the Customizer. The one on the right came from Todd’s Dremel. He had a couple of bits that were small enough to fit in the Customizer, so he gave them to me.
5 – Clouds
 I drew some cloud shapes into the sky with a pencil. Now I’m using one of the diamond drill bits to remove some color and create the clouds.
Quite truthfully, I should have practiced first because my clouds didn’t turn out.
In fact, it’s hard to see my clouds.
I think the idea is plausible, but my method needs improvement.
6 – Remove dark grain line
 This composite photo shows the before and after I removed a dark grain line in my artwork. A blue arrow is pointing to the line.
I used one of the diamond drill bits with a fine point to slowly, and gently remove color from the line.
It worked. The line blend in now and isn’t distracting like it was before.
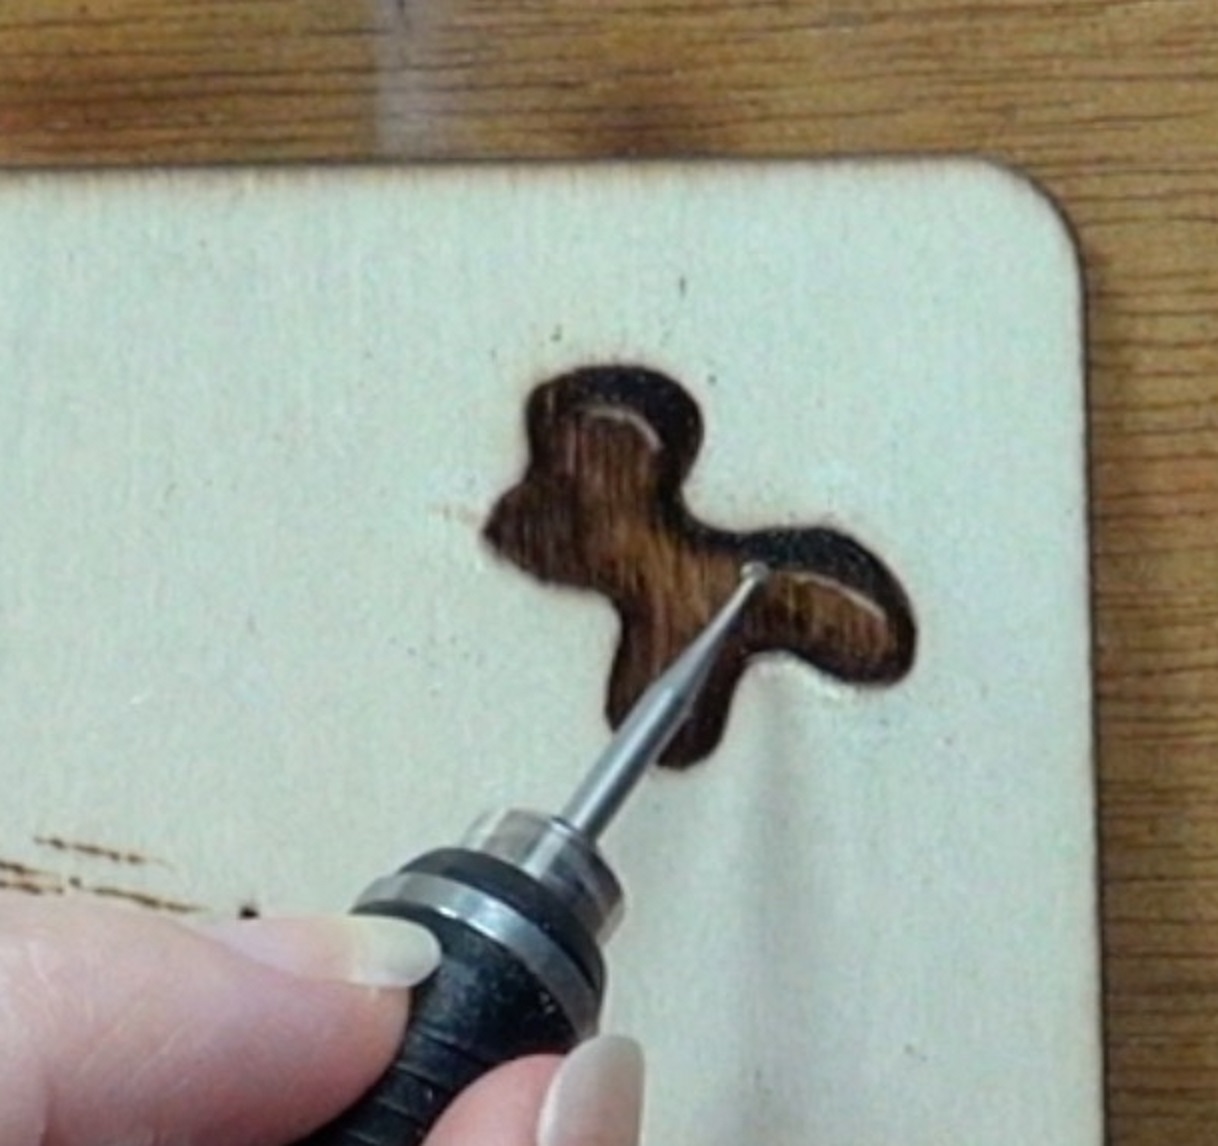
7 – Fixing mistakes
 The arrow is pointing to a spot where I burned the shadow thicker than I wanted. It’s an oops.
I used the engraving bit to thin out the shadow. This worked well.
 In this composite image, a yellow arrow is pointing to a spot where I burned past the edge of the object. This happened because I didn’t keep the pen tip in optimal position.
Optimal position means that the front edge of the shader is on or near the edge of the object. And, more importantly, the body of the shader is over the object.
To fix this, I’m using a diamond drill bit to slowly remove some color (middle image). In retrospect, given how dark the burn mark was, I should have used the engraver. The far right image is how it looked after I was done. You can see that I created a bit of a depression in the area.
 The yellow arrow is pointing to another oops where I burned past the edge of the object. The upper blue arrow is pointing to overburn. Overburn happens when the nib is too hot, and it chars the wood adjacent to where you are burning.
I started out using a drill bit to remove the overburn and the dark line. While the drill bit didn’t remove the dark line, it worked wonderfully on the overburn.
I switched to the engraver and went over the dark line. That removed the majority of the color, so it isn’t as noticeable.
METAL STENCIL
 I want to see if I can use the Customizer like a router with this brass stencil. I placed coins under the stencil to elevate it above the wood because I didn’t want to damage my stencil. Both the coins and stencil were secured with scotch tape.
Then I equipped the engraver and started carving the design by following along the contours of the stencil.
I did my best to try and keep the engraver perpendicular to the board. I also tried to keep my hand pressure constant. I didn’t do well with either one. Both were a lot harder to do than I was expecting.
 The upper left square in this composite image shows how it looked after I was done. Not horrible, but not awesome. It is difficult to see the engraving, so I’m rubbing a pencil over the area (upper right square).
Then I blended the pencil out and the lower image is the results. This makes it much easier to see the carving and all of its imperfections. On the flip side, for a spur of the moment idea it turned out much better than expected.
LEATHER
 I used a stencil to draw a design onto a piece of leather. Part of the leather has been stained, and the other part left natural.
After the designs were inked in, then I used the engraver to carve the designs into the leather.
 It’s super easy to see where I’ve engraved on the stained leather.
The unstained leather doesn’t have as much contrast, but there is enough to see it. It’s also pretty easy to see the spots where I didn’t remove all of the ink marks.
 Here’s the same piece of leather I just showed you. The difference is that I applied leather stain to the lower engraving.
This is how it looked after the stain dried.
Applying the stain made the engraving darker than the adjacent leather. I wasn’t expecting that, but it is a nice effect. I do like the contrast on the engraving at the top of the leather.
 I applied Resolene sealant to the leather and let it dry. Both engravings got a little darker.
COLORFUL DESIGN
 I drew a design on the board using a stencil. Afterwards, I used the engraving bit to deeply carve out the designs. My goal with this experiment is to see if the deep engraving will prevent color from bleeding along grain lines.
I did find it helpful to carve around the edges of a larger design element, and then carve out the center of the element.
Once the engraving was done, I wood burned over the design. I’m burning at a higher heat using the flat of the shader.
 Because I was burning at a high heat, I ended up with a few spots of overburn. An arrow is pointing to one. I just used the Customizer on the spots to remove the color.
 On one of the engraved designed, I applied some watercolor paint to give it some color. My method was to fill one element of the engraving with water, and the dab watercolor into it. This worked pretty well, but the color did bleed. A yellow arrow is pointing to one of the spots.
 On the other design I used alcohol inks. They are more intense in color, but they also bleed more. Maybe it’s really a matter of the bleeding is more noticeable. Not sure.
 Here’s how the designs looked after they dried. The one on the left in with the green frame was done with alcohol inks. The right one was colored with watercolors.
The bright pink alcohol ink bled into the left side of the pink watercolor design.
FANCY BORDER
 I’m using a stamp to put a fancy border along the edge of the board. I used very little ink, and kept the color on the lighter side.
While it might be hard to see, I put pencil marks on the board indicating the location of the halfway. I used the pencil marks to align the center of the stamp with.
 After all of the borders were stamped, I used the engraving tool to carve out the stamped image.
I discovered that it works better to engrave all of one design element before starting doing another one. This helps ensure the design elements look very similar, since you’re repeating the same movement.
 There was some residual ink on the board. To remove it I rubbed over the ink with my Vanish eraser. That removed most of it.
I did have a couple of stubborn ink mark, so I used an ink pen eraser. These are the abrasive grey colored erasers that are also called sand erasers.
 Here’s how the before and after image.
 Next, I burned over the design using the flat of a large shader.
I made the color darker along the outer edge, and let it get slightly lighter the further from the edge I got.
 Here’s how the board looks now.
I do think this application has a lot of potential. There are so many stamps out there that you can create numerous different looks.
As for the center, burn in a scene. Paint a scene. Use it as a picture frame and glue or decoupage an image in the center. So many possibilities!
SMOKE
 I burned a section of the board to a very dark color. Then I used a colored pencil to draw a wisp of smoke.
 Afterwards I equipped a diamond drill bit and slowly removed color.
I worked on the brighter areas first because they helped give the smoke shape faster. Then I worked on the more translucent sections of the smoke.
 Here’s how it looked once I was done. I actually thought that this turned out rather well.
At some point I will have to try creating the smoke using just pyrography and compare the two.
I used a reference photo for this that I found it on Pixaby. Here’s a link to the photo: https://pixabay.com/photos/candle-smoke-flame-fire-light-5883060/
WHITE ROSE
 I started out with 3 dark boards. Each board was darkened up a different way: pyrography, torch, and paint. I did this to compare the results, and show that you don’t have to use pyrography.
Then I applied a rose pattern to each board. The back each pattern has a light coating of spray on adhesive.
 Afterwards, I used the engraver bit and carved along the pattern lines. You have to make sure to engrave deep enough to cut through the pattern and get into the underlying wood.
The nice thing is that it’s pretty easy to see where you’ve carved. The bad thing is that it isn’t easy to tell is whether or not you’re carving deep enough to get through the paper. The other bad thing is that this technique produces a lot of dust compared to carving on wood.
 Then I peeled the patterns and revealed the design. Some of my lines aren’t very bright, and a couple of lines are missing. Overall, it worked pretty well.
 Next, I equipped a diamond drill bit to gently remove some color from each petal to give the rose shape. I removed more color along the outer edges of each petal, and left the center darker.
 Here’s how the boards looked before and after.
I didn’t finish the middle board because it was defective. Pieces of the plywood kept falling off.
 I do have a video the goes into greater detail on how to create the white rose. Click on the video thumbnail or on this link to watch: https://youtu.be/VOLqdryOgEI
MISCELLANEOUS
 I mentioned before that Todd gave me some bits from his Dremel that fit the Customizer. Here’s a photo of the assorted bits he gave me.
Note: since writing this blog, I have discovered that the green rubber polishing bits are very handy to lighten burn marks. I did a short video on the subject. To watch click on this link: https://youtube.com/shorts/CZfKrHLg7iQ
 I found that I could place them in an empty nib tube. This is one from a replaceable pen tip I ordered from Colwood.
The tube was large enough to fix the hex key, and the plastic baggy containing the spare Allen grub screw. I keep it in the baggy so I don’t lose it.
This keeps everything together. Makes it easy to find, store, and, in theory, not lose.
PROS vs CONS
PROS
- It’s very lightweight
- Easy to use
- Portable
- Can be very precise
- Has numerous practical and decorative uses
- Can create gradient highlights
- Can quickly remove really dark burn marks
CONS
- Has a long charge time (3 hours)
- It’s noisy. I wear earmuffs when using it.
- It can quickly create deep gouges into the wood
- Creates a fair amount of dust
- A bit expensive
- I would prefer more engravers and fewer diamond drill bits
SHOULD YOU BUY ONE?
This is always the moment of truth, but it is also a difficult question to answer. I like the Customizer. I feel like there are a number of useful applications where I would use it. My favorite application is creating white whiskers!
The decorative applications I thought of are things I know I wouldn’t do very often, so they don’t appeal to me as near much as the practical applications do. Some of you will have a completely opposite view, and that’s what makes the world an interesting place.
The Customizer costs almost $70 USD (as of February 2023), and that’s quite a bit of money for an accessory that might only be used occasionally. I can’t tell you if it is worthwhile for you to purchase. Instead, you will have to decide for yourself if the expense is worth it.
Because of a website problem, I lost almost all of the images my website had. As a result I had to go blog, by blog and restore them. This happened during the summer of 2025. I mention this because in the little over 2 years that I’ve owned the Customizer, I have discovered that I used it on a fairly regular basis. Mostly to fix mistakes.
DISCOUNT CODE
Culiau gave me a discount code of PyroBrenda that will give you 10% off of their products. Here’s a link to their website: https://culiau.com
The discount code is a nice gesture on Culiau’s part, but please don’t view this as a plea to for you to buy an engraver. I am not affiliated with Culiau.
I do not receive compensation of any sort if you decide to buy something from them.
Instead, I am simply passing on information to you that you may or may not be interested in. If you prefer to purchase the engraver on Amazon, here’s an affiliate link: https://amzn.to/45GUEOY
IN CONCLUSION
That is it for this blog. My first thoughts about the Customizer were wrong. I initially thought wouldn’t be very useful in pyrography, but it turns out that there are a number of ways it can be useful. I’m sure there are many other ways of using the Customizer that I haven’t thought of.
On the flip side, the Customizer is not something I’d use every day. There are certain applications where it becomes an excellent addition to pyrography. An example is creating white whiskers. This is not something I do daily or even weekly. I will certainly keep the Customizer in my studio and within easy reach.
Brenda
Feb 28, 2023
Want to subscribe?
- Click on the “Leave a Comment” field at the end of any post (blog) and a subscribe option will appear.
- Put something in the comment field (if you put “test” or “just subscribing” I won’t make your comment public)
- Fill in the sections for your email address and name, and then click on the “notify me of new posts via email.”
- You will get a confirmation email from WordPress confirming you want to subscribe.
- Click on the confirm button in that email and you’re done.
Please note that I do not send out emails. If you have a WordPress account there is a way to subscribe within the WordPress system, but I cannot provide specifics on how it works as I don’t know.
Hello Brenda: Thanks for the written review and video on the Customizer Engraver CP-V3 by Culiau. Even though the engraver can get loud,almost as intense as a dentists drill you came up with the solution of wearing ear muffs and ,of course, there are always ear plugs that might work. In my honest opinion,the Customizer Engraver sounds like a very versatile tool and I am wondering perhaps if it would work in glass etchings and or jewelry designs. Also, when I worked in ceramics it seemed as though it would have been the key for designs on flower vases,plates, or household utensil holders. I especially liked your fancy border where you stamped the design on first then worked with the engraver around the edges and then added some flowers open and partially closed to the center of the frame. Actually, this project was outstanding and showed your perseverance as an artist! For the most part, the Customizer Engraver seems to have more pro’s than con’s because of it’s numerous practical and decorative uses and because it is easy to use. I think this would be an excellent tool if it would be worked with on a regular basis. Thanks again, and hope you are having a great week. Sincerely, Patricia Russo
Hi Patricia,
Do a google search for Customizer product reviews. Most of the ones out there show people using it on metal, rocks, etc.
I didn’t try any of those items because they don’t relate to pyrography.
I’m glad you liked my fancy border idea. It was one of my favorites because of how easy it was to create an ornate design. I wouldn’t want to trace that design onto a board. 🙂
Have a great day!
Thank you, that is interesting. I look it up tonight. Have a nice afternoon. Patricia
Hope it helps you find what you’re after.
Hey Brenda, another interesting review. The fancy measuring deal is called a caliper. I find them very helpful. I have two power carvers plus 5 Dremels that I rarely use for carving. The first is actually a dental drill made by Henry Schein, Inc. It has a insert for a foot switch. Mine runs at 35,000 RPM and uses 1 amp. As you cannot post photos I can not share the super small 3/8” bit I bought for it. I am anxious to try it on some whiskers instead of using a gel pen. My other power carver is a Gourd Master Pro Carver. It is my work horse for more aggressive carving. I am excited to see how this works to restore light areas such as eye reflective spots. Keep those reviews coming. It gives all of ideas for new tricks to achieve more with our pyrography.
Hi Devon,
sounds like you do a lot of carving.
I’m glad you liked my product review.
al je blogs zijn interesant en informatief. Ik kijk altijd uit naar je werkstukjes.
Een heerlijke hobby, pyrografie. bedankt Brenda
Heel erg bedankt voor de vriendelijke woorden. Ik ben blij dat je geniet van mijn blogs. Fijne dag!
Thank you for your insight. I never knew you can use on paper too. That’s a big bonus for me as I love found pyography on watercolour paper.
Hi Sharon,
thank you for the comment. Yes, it is possible to use on watercolor paper, but it is also really easy to put a hole in the paper with the engraver. 🙂