 In this tutorial I’m going give you 6 tips for getting smooth burn results. Then I will do an example burn to show the tips in action. During the example burn I will provide some addition information such as extending the color, and switching pen tips. I created a video version of this tutorial and I did try to present the information a little differently in the video. My reason for this, is that sometimes if a concept is presented in different ways, one of the explanations might make things understandable. The last thing I will cover is how I fix problems, and the most common reason why they occurred.
Be aware that nib and pen tip are the same thing.
 Click on the image to the left to watch a YouTube video version of the tutorial.
Now, let’s get to work.
SKILL LEVEL: 1
MATERIALS NEEDED:
- Writing tip
- Shading tip
- Practice board of any size
6 TIPS
Tip 1 – Prepare the board
I can’t emphasize enough the need to prepare a board for burning on it. Any sort of blemish or roughness on the board can snag the pen tip causing inconsistent results. In other words, the smoother the board is, the smoother the burn results will be. Plus the easier it will be to achieve smoother results.
 At the very minimum, you need to sand your board with at least 220 grit sandpaper. In this composite image, I’ve drawn a line down the middle of the board. The board to the left of the line has been sanded. Whereas the right side has not. I’ve burned a small patch of color on both sides of the board. Below that is a black frame showing the results.
Both burns look pretty similar, but burning on the sanded side was much easier to do.
I have a 4-step process that I use on ALL boards; including plywood.
 1) Begin by thoroughly sanding the board using 220 grit sandpaper. You can use one that is close to that value.
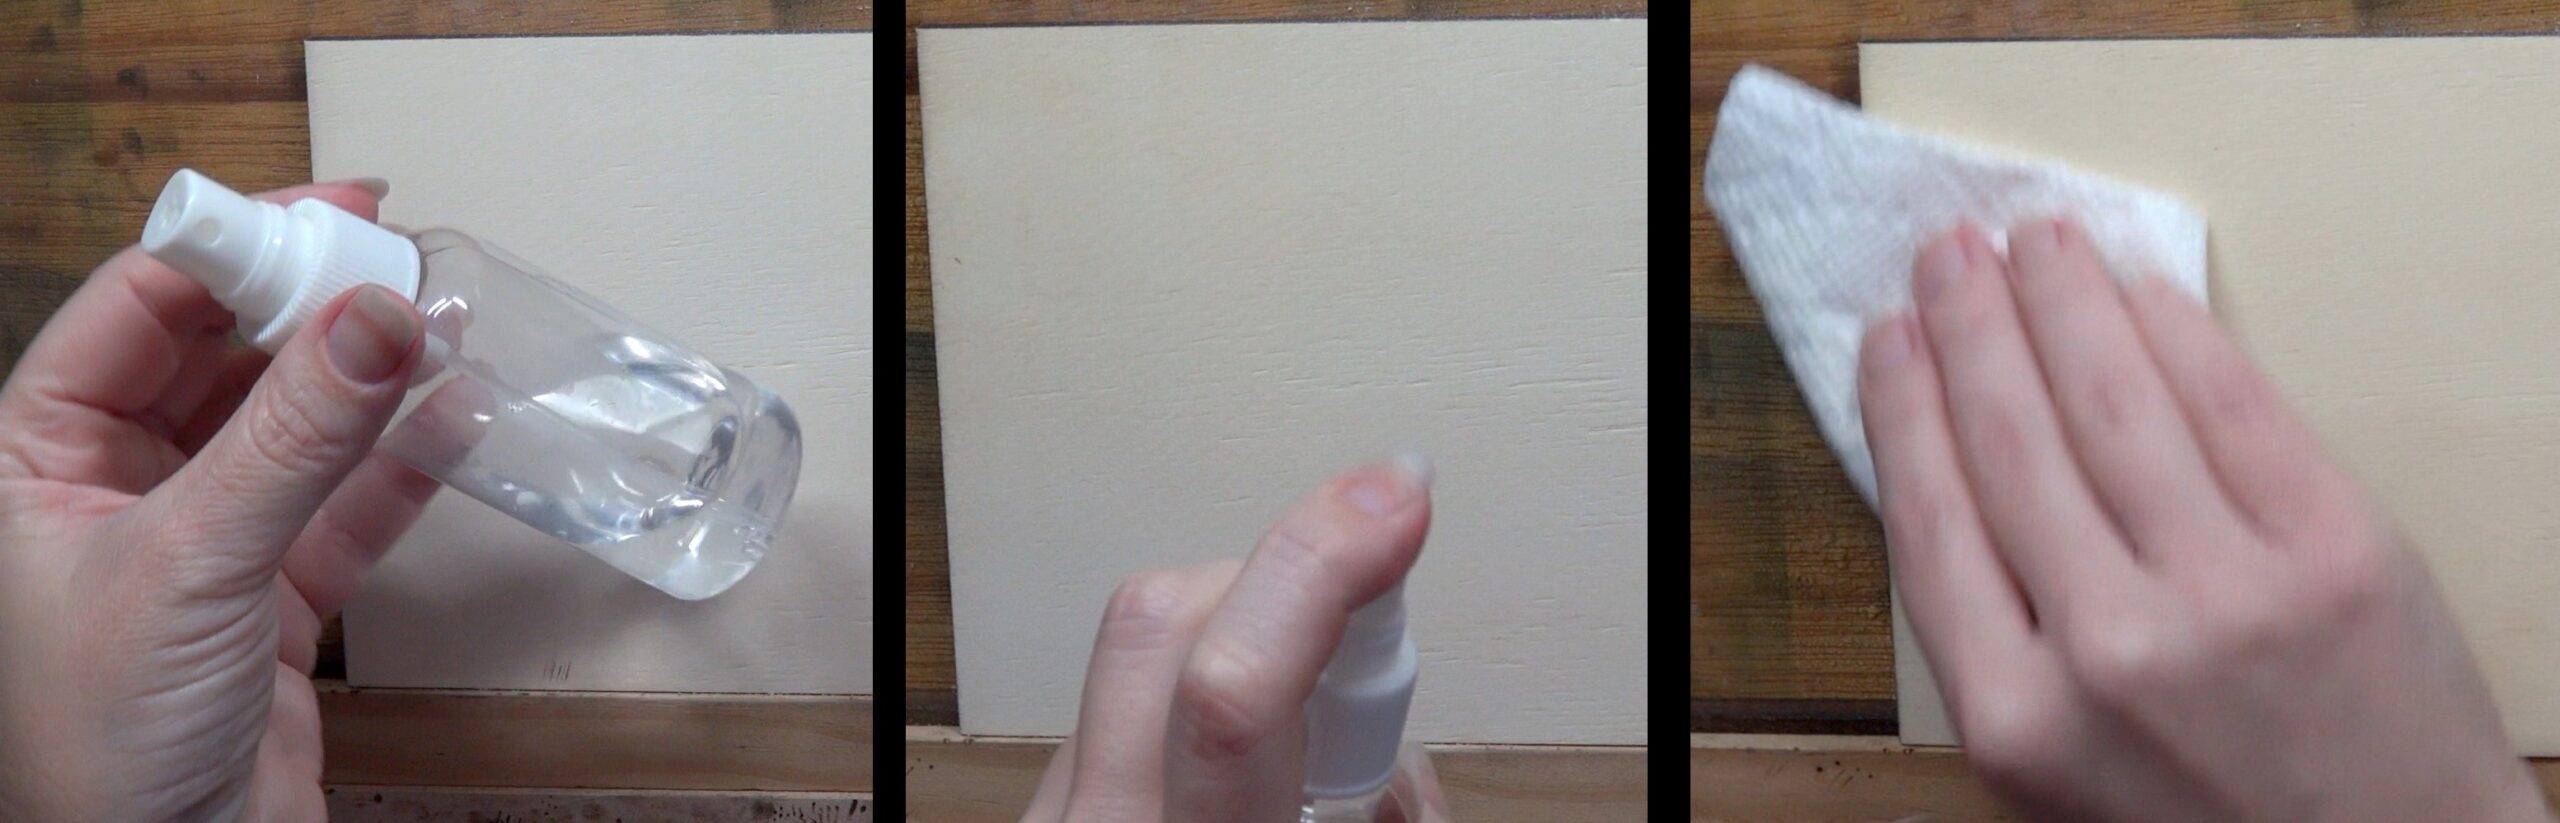 2) Thoroughly wet the board by misting it with water or wiping with a damp cloth. I keep a little spray bottle filled with water for this purpose. Make sure you spray the entire board. It’s okay if it starts pooling or running. Remove and excess water with a dry paper towel or cloth.
 The board should be damp to the touch, but not soaking wet!
 3) Let the board dry completely. Once the board is dry it will feel fuzzy to the touch.
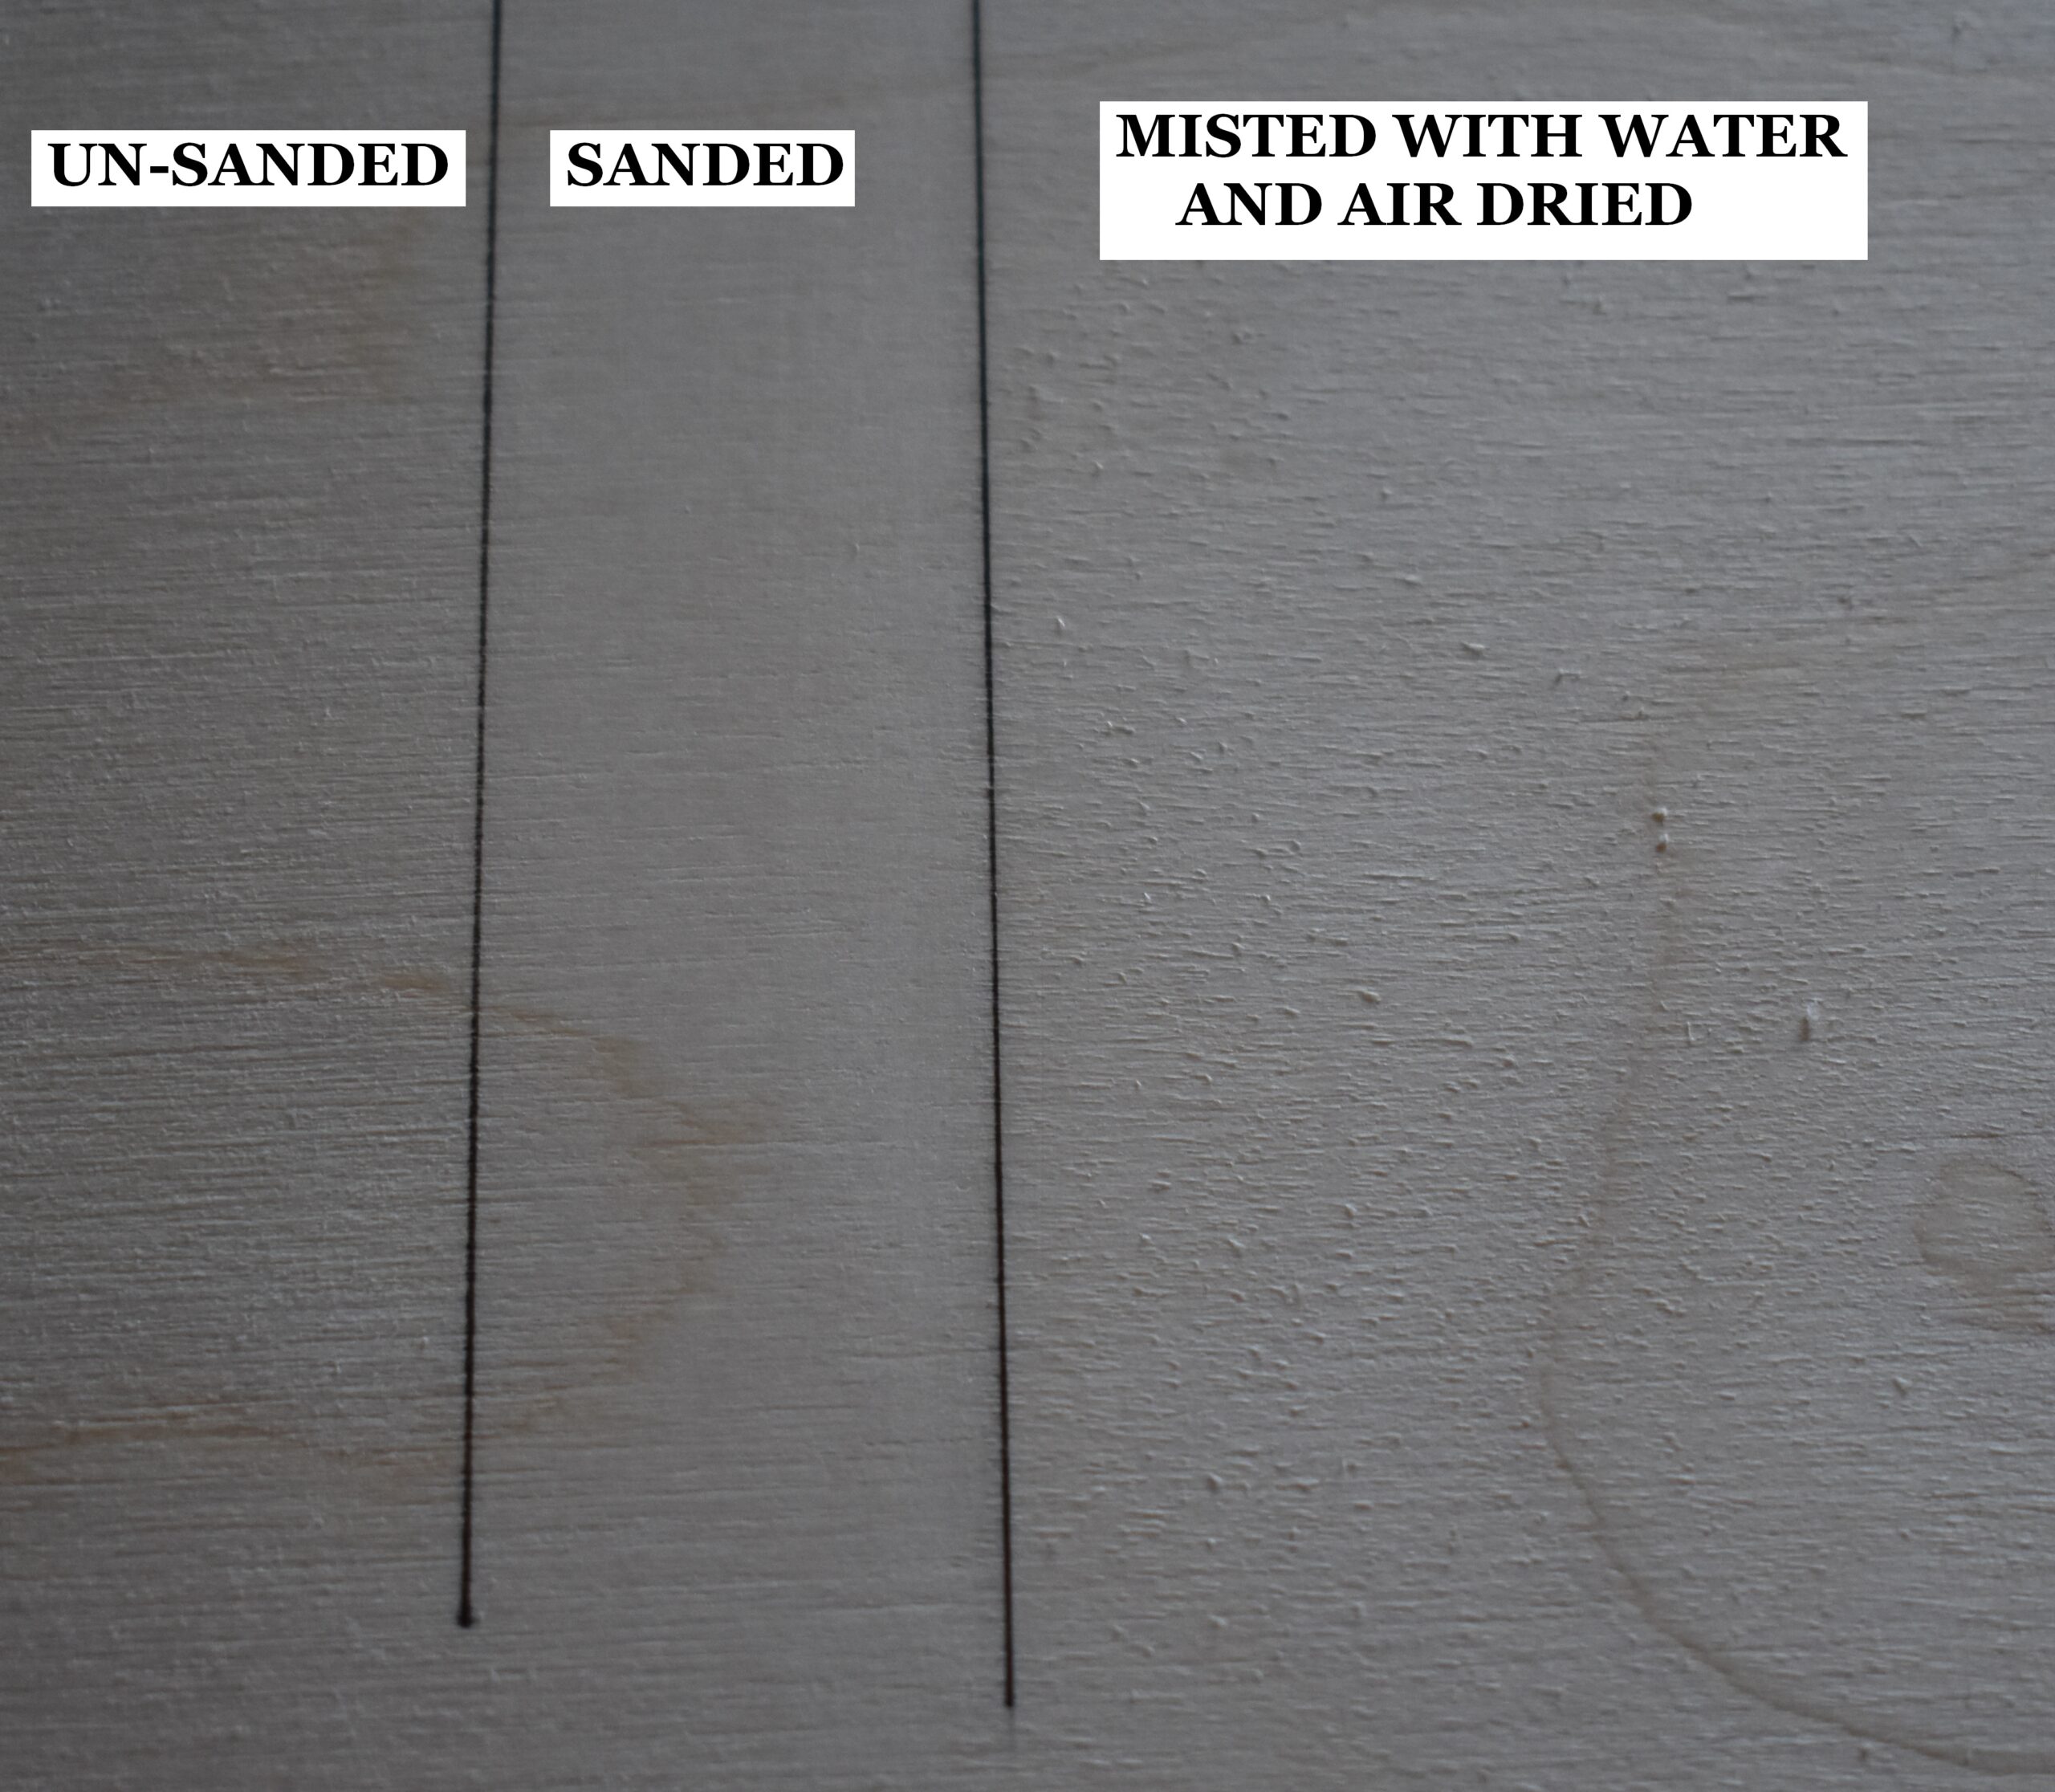
This photo has been broken up into 3 sections.
The left section is how the board looked before I sanded it. It’s a touch rough looking.
The middle section shows the board after I sanded it. Now it is very smooth looking.
The right section shows how the board looks after I misted it with water and let it dry. Now the board is rougher looking than what it started out as.
4) Once the board is dry, then sand again using the same grit or higher grit sandpaper to remove the fuzziness and make the board ultra smooth.
Now the board is ready for use. FYI – if the board should be wetted out second time the grain won’t raise again.
I often get asked is it necessary to wet out the board, or what is the point of wetting out the board.
First off, wetting out the board this is not something you must do, but instead something I highly recommend doing. The reason is to raise the nap and remove it before I burn on the board. This will prevent the board from getting fuzzy if any of the following should happen:
1 – Adding color that is liquid in nature. This would be watercolor paints, markers, inks, thinned out acrylics, etc.
2 – Some brush on wood finishes. For example, when Todd applies lacquer, the first layer is a mixture of lacquer and lacquer thinner. This mixture is has a very runny or watery consistency, and it can easily raise the grain if the wood hasn’t been properly prepared.
2 – Humidity changes. Sometimes it can take me months before I finish a project. During that time the humidity can change from the dry summer months, to the very damp winter months. This can also happen if you live in an area that gets hot and muggy in the summer.
3 – Testing the color change of a board. When I think I’m finished with a project, I will mist the board with water to get an idea of the color change that will happen when a finished is applied. I’ve yet to encounter a finish that doesn’t impart a color change of some sort. The reason I check for this is to see if I lose some of my softer burn marks. If I can’t see them when the board is damp, then I re-burn over them after the board is dry.
What is the problem with having a fuzzy board? Re-burning over it becomes more difficult, but mostly it’s unprofessional. If you bought a wooden table and it felt fuzzy you’d think something was wrong with it. People will think the same thing with your artwork. For some reason people love to touch wood burnings; at least the people I’ve encountered do.
Tip 2 – Adjust the heat
 Before your pen tip ever touches the board, test out the burn results on a scrap board. I have numerous scrape pieces I keep close by just for testing the nib color on.
It is best if the scrap wood is the same type of wood you will be burning on.
Adjust the heat setting on your burner in small increments until the desired tonal value is achieved.
Be aware that even with professional burners it can take up to 30 seconds before the change is fully in effect.
 When you are adjusting your heat setting, it is often better to aim for a tonal value that is 1-3 shades lighter than what you want. The lighter color allows for re-burning.
To help visualize this, I circled the tan color I’m after on this value finder.
I will set my burner to get a shade closer to what the arrow is pointing to. Again, this is to account for re-burning which will darken up the burn results.
If you switch pen tips make sure you going through the heat adjusting process again.
The reason is that no two pen tips will require the same heat setting. Even if they are the same type, they will most likely need different heat settings to get the same results. The heat settings might be close, but extremely doubtful that they will be exact.
 Each burn patch in the red rectangle was made with a different heat setting.
The one on the far right was done with the lowest setting of the 4 patches. The one on the far left had a heat setting so high that smoke was emitted during the burn. Hopefully you can see the smoke.
The problem with burning at higher temperatures is that it becomes difficult to get lighter colored burn results. You have to move your hand faster to account for the higher heat. The faster your move your hand the harder it is to maintain precision and consistency.
 The burn patch I’m working on may look okay from a distance, but if you look closely you’ll see that it has a lot of irregularities in it.
I’m burning a pretty high temperature, so I’m having a much harder time keeping the color uniform. The minute I lift the nib from the board, the heat quickly builds ups resulting in some burn strokes being darker than others.
Basically, the higher the heat is, the harder it is to control the results and achieve smooth burns. I highly recommend turning down the heat and working at a slower more controlled pace.
Tip 3 – Blot and move
 Just before you start burning, blot the pen tip on a scrap board. This is to remove any excess heat.
Then quickly start burning. If there is a pause before you start burning then blot the nib again. I often pause to check the reference photo I’m using. Before I resume burning, I blot the nib.
Once your pen tip touches the board, keep it moving.
Do not pause or allow the pen tip to rest on the board. Doing so will cause uneven burn results.
 Small dark blotches that appear at the beginning of a burn stroke are often the result of heat buildup.
Anytime the pen tip is not in contact with the wood the heat builds on the pen. Once the pen tip contacts the board, the excess heat produces a dark burn spot or blotch. The yellow arrow is pointing to a dark blotch.
How dark blotches will be depends on two things:
1) The heat setting, The higher the heat is set, the quicker the heat builds up.
2) The duration of the pause. The longer the nib is not in contact with the board, the hotter the nib gets.
 Some blotches (yellow arrow) are unlikely to be noticed unless the person was fairly close when viewing the artwork, and really looking. Blotches that are slightly darker than the surrounding color I don’t tend to fuss over.
Where as the blotch the red arrow is pointing to is very noticeable.
Both of the blotches in the examples could have been avoided if the pen tip had been blotted just before burning.
Tip 4 – Hand pressure and speed
 I cannot emphasize enough the need to using a light hand pressure when burning! The majority of the problems I see are due to using a heavy hand pressure.
Let the pen tip gently touch the board so it can easily glide over the surface. Using a light hand pressure with help keep the heat at a steady level producing more consistent results.
Another important aspect is to keep a constant hand speed.
If you slow down your hand speed, the resulting burn will be darker in value. Speed up your hand and the burn will be lighter in value. So, if you want uniform smooth color, it is important to keep your hand moving at a steady speed.
 This burn patch is being created using a heavy hand pressure.
Notice how color started out dark, but quickly faded. Plus, the color isn’t very uniform. Often the hand speed varies when using a heavy pressure, and that further contributes to the uneven results.
 Here’s a composite photo comparing the light and heavy hand pressure burns.
There are two rectangles, and each rectangle has two patches of burned color. The left burn patch was created using a light hand pressure, and the right was done using a heavy hand pressure.
The yellow rectangle, on the left, was burning using a lower heat setting than the blue rectangle on the right. I think this shows that the higher the heat is the worse the heavy hand pressure problem becomes.
Tip 5 – Burn direction
 It is easier to control hand pressure and speed if you pull the pen tip down towards the bottom of the board.
Avoid pushing the pen tip up towards the top of the board. The reason is that it is much harder to keep a consistent hand pressure, or match the hand pressure used during the downward stroke.
Keep in mind, that I’m not saying it can’t be done, because it can. What I’m saying is that it is easier and you’ll get more consistent results pulling the pen tip down towards the bottom of the board.
This dark burn stroke in the middle that the red arrow is pointing to was made by pushing the pen tip up and away from myself. The pressure and hand speed were different, and this resulted in the color not matching.
 Another consideration is the grain direction of the board. For some reason burning with the grain tends to produce smoother results than burn against or across the grain.
In this photo the grain on my test board is horizontal.
The burn patches found in the red frame were burned across the wood grain, so they were burned vertically.
Whereas the burn results to the left of the red frame were burned with the grain. The left burn patches are smoother looking.
I’m not sure why, but this is more noticeable when burning on plywood versus boards made out of a solid piece of wood.
When possible, try to burn with the wood grain.
Tip 6 – Overlap and re-burn
 The last tip I have involves overlapping and re-burning.
The burn patch starts out like they all do, a single burn stroke created using the flat of the shader. The burn stroke starts at the top of the patch and is pulled down towards the bottom of the board.
The second burn stroke should slightly overlaps the first one.
Continue to extend the patch of color with new burn strokes that slightly overlap the last burn stroke. Overlapping the burn strokes helps hide individual burn strokes.
The top row is showing this, and the patch is pretty smooth look. It’s not perfect, but I do want to point out that I’m burning on plywood. You will never get as smooth of results on plywood as you can with a solid board.
The lower row shows how I started reburning over the patch. This helps smooth or even out the color. When I re-burn I use the same techniques that I’ve using. 1) Pull the pen tip down. 2) Slightly overlap the burn strokes.
The lower right corner shows the final results. It’s smoother looking than it was with just one layer of burn strokes, and it is darker. Since my style of burning involves a lot of reburning, I always set my burner to get a lighter color than what I want the final color to be.
PUTTING IT ALL TOGETHER
 In the video version of this tutorial, I demonstrate how I created a smooth burn on this board. During this demonstration I recap all of the information, so you can see the tips in action.
FIXING PROBLEMS
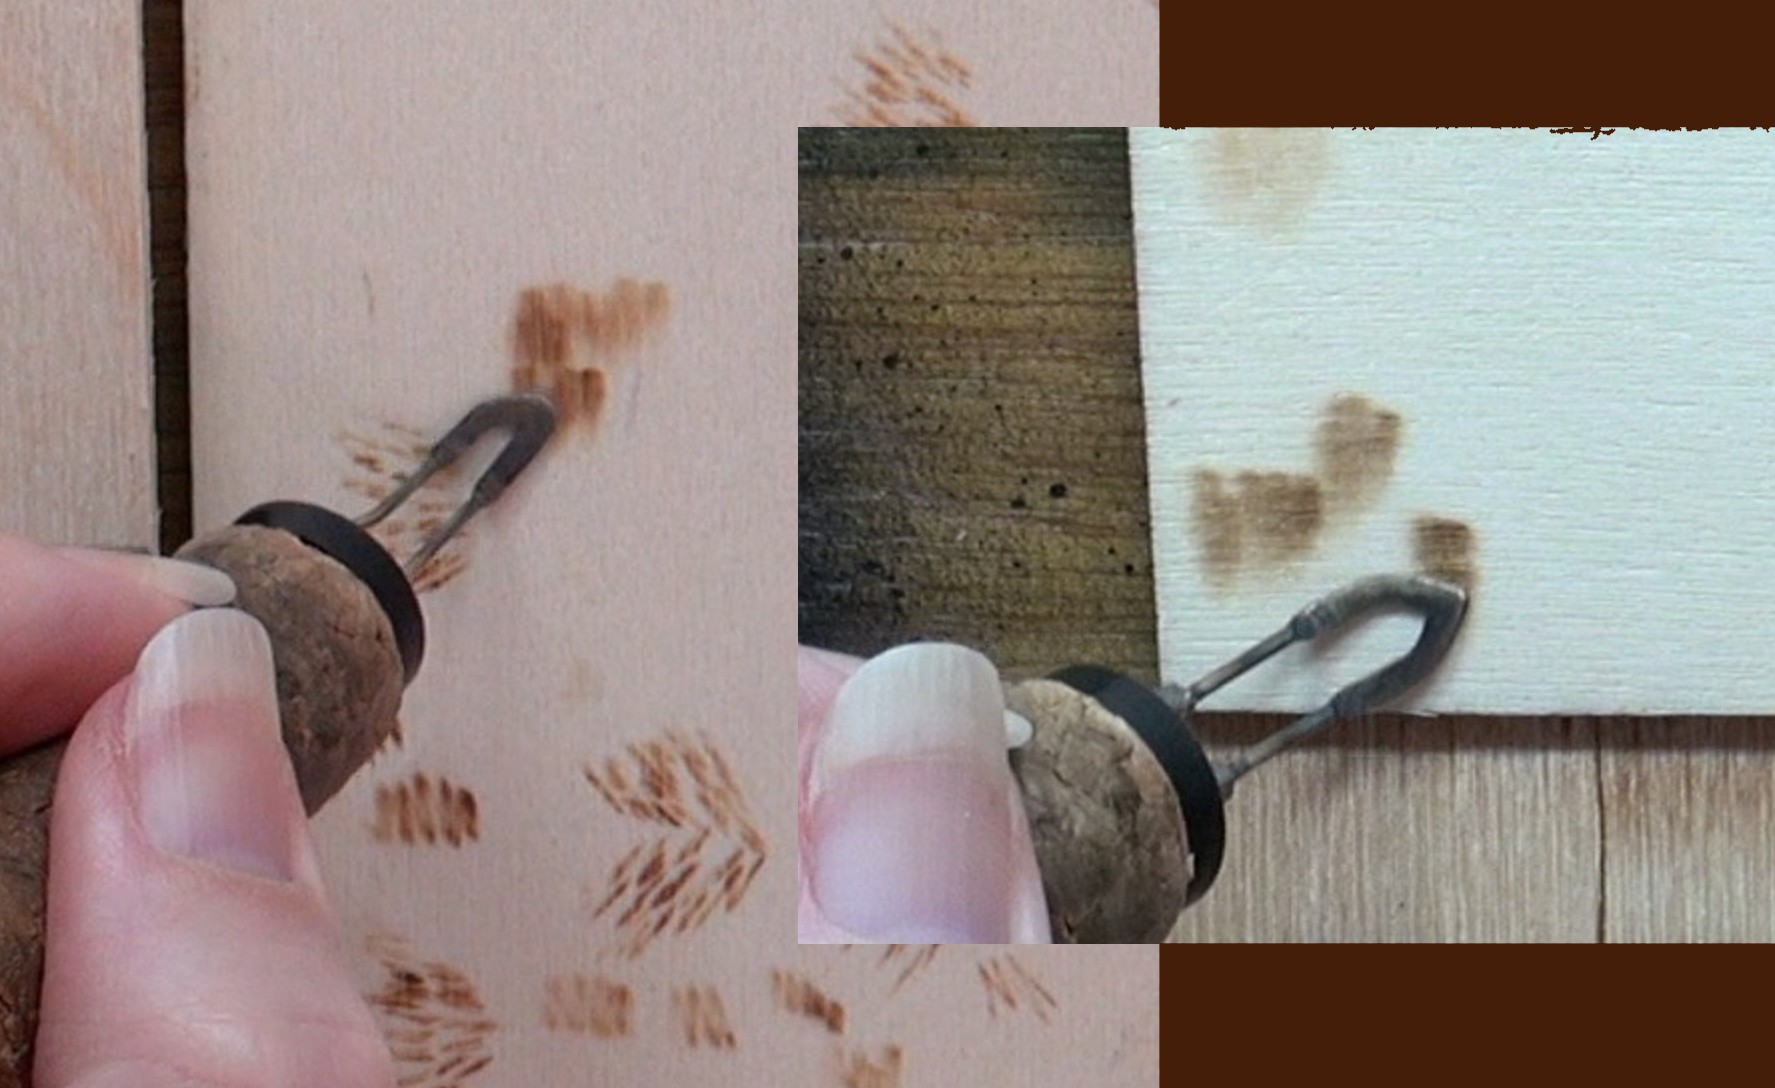
Problem 1 – Scraping
 Now let’s examine a problem burn. This first section of this composite photo shows a patch of color with 2 small spots of noticeably darker color. I’ve marked the two spots with yellow arrows to make sure you know the spots I’m referring to.
These spots are mostly likely the result of not blotting the pen tip before burning. I’m often guilty of this. I will pause to examine the reference photo, and then resume burning without blotting first. I’ve had to fix problems of this nature many times.
Use the flat tip of a sharp knife, and very gently scrape over the burn mark. I can’t emphasize enough the need to scrape lightly. It is very easy to gouge the board when scraping.
An X-acto knife is my favorite because its small tip that allows me to be extremely precise with my scraping.
I like to scrape both vertically and horizontally. It is important to only scrape on the darken spot.
The far right section on the composite photo shows a close up of the board and after I scraped away the dark blotches. The scraping method is a bit time consuming and tedious to do, so I only use this method for small blemishes.
Problem 2 – Targeted reburning
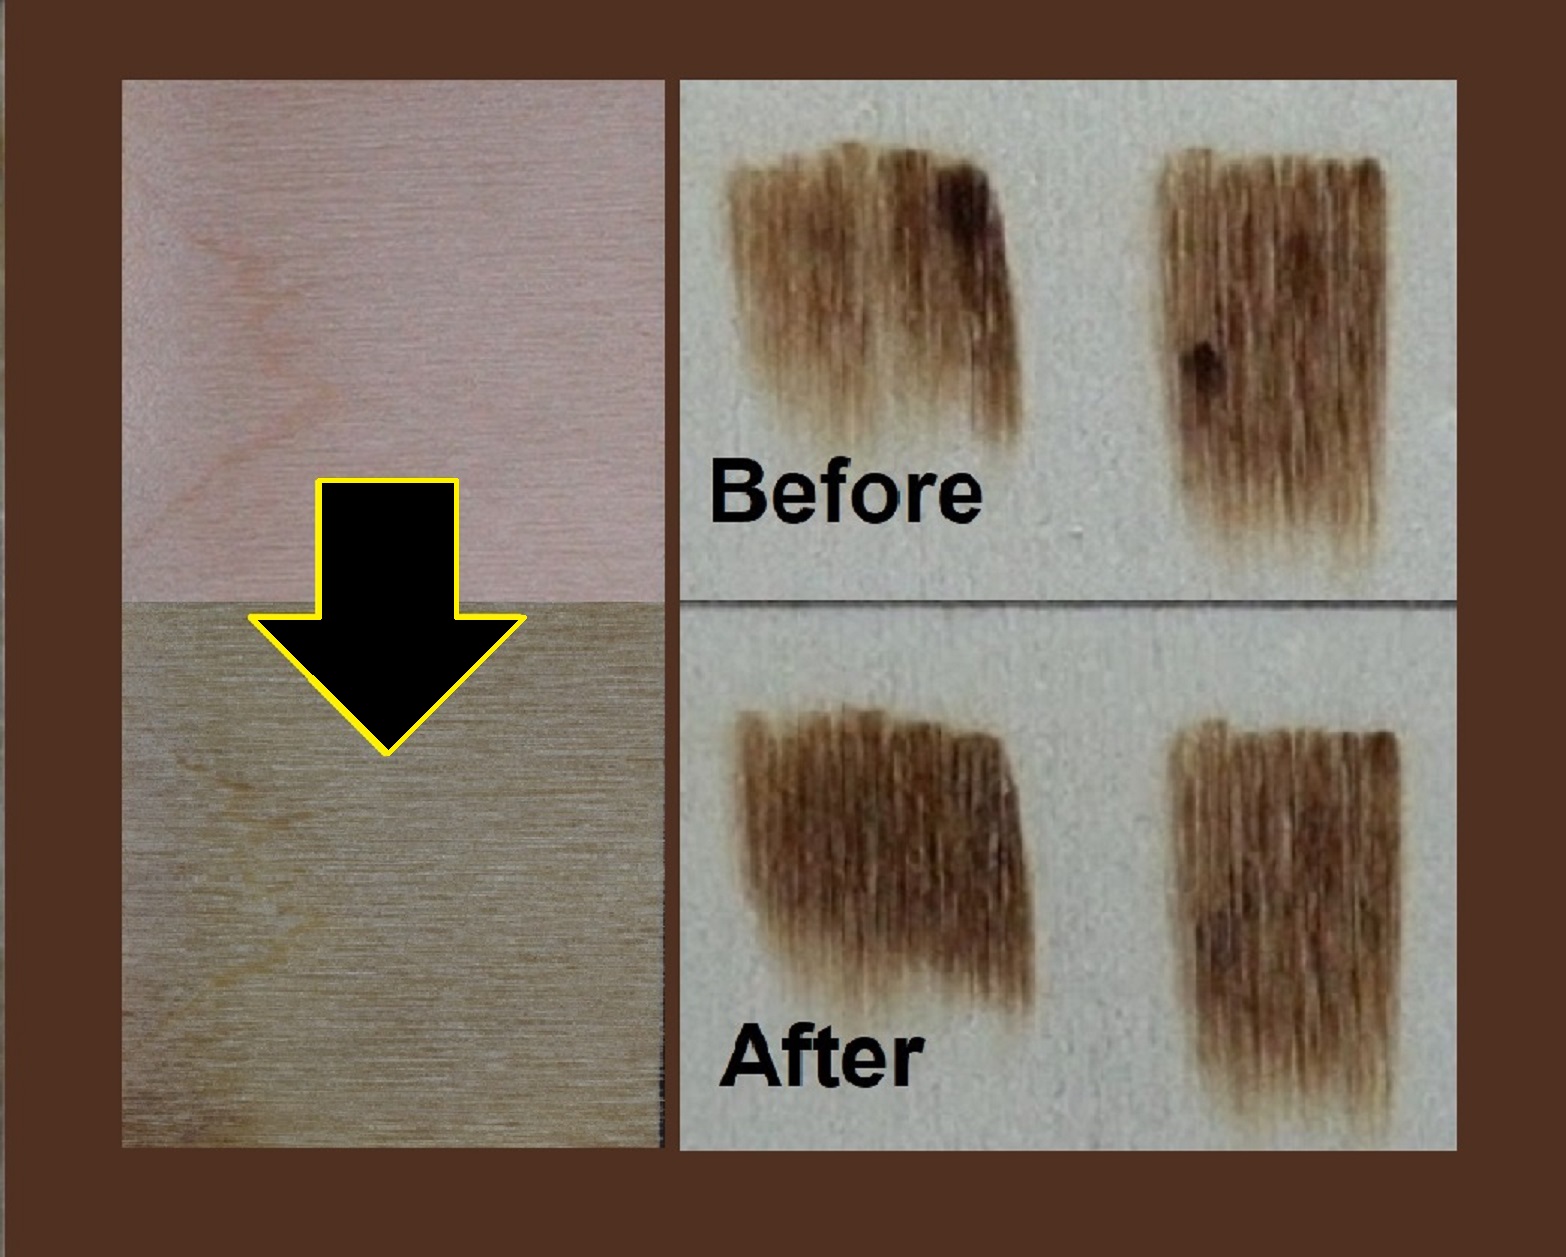
 Here’s another problem burn that has several issues. First there is a dark burn spot on the upper right, a very pale streak in the middle, and the bottom of the burn area has an overall lighter color than the top.
I’ve marked the problem areas with yellow arrows. I have two options with this patch of color.
Option 1 – Darken everything to match the dark burn spot on the upper right. This is the easiest solution.
Option 2 – Lighten the dark spot, and re-burn over the light areas.
I’m going to demonstrate option 2 since I think you can easily figure out option 1.
 I begin by scraping away the excess color on the dark spot. Again, I’m using the edge of a sharp knife and gently scraping away the dark color. The yellow rectangle shows how the patch looked after I was done scraping.
 Now I’m going to start doing a targeted re-burning. This means I’m only re-burning over specific areas instead of the entire patch.
Where needed I do a lot of reburning. With this problem patch, I did the most reburning on the pale streak in the middle of the patch.
It is extremely important to turn down the heat on your burner when doing a targeted reburn. There are three reasons for this.
1) We need to work slow and precise. The slower you burn, the darker the results. If the heat is too high, then you’ll end up with super dark results.
2) Often the burn strokes are very short. This means the pen tip isn’t in contact with the wood for as long, so it doesn’t lose much heat. That will often create darker burn results.
3) It is better to burn lighter and re-burn to build up the color until it matches the existing burn area.
 Because of the just mentioned reasons, it’s important to work at a lower heat than what you initially burned the patch with.
I often reduce the heat on my burner by a full number or two. For example, my burner goes up to 10. Let’s say I created the patch while the burner was set at 4. When I start doing a targeted re-burn, I will turn the heat down to 3 or maybe even lower depending on how slow and precise I need to work.
 Here’s a composite photo showing the before and after of this problem burn patch.
IN CONCLUSION
That’s it for the tutorial. I hope the information will help you get smoother burn results. Keep in mind, that if you’re just starting out that this might seem like a lot of information to absorb. Not to mentions a number of different skills to master. Be patient and continue to create art. This gives you the needed experience to improve both your artwork and burning skills.
Until the next blog,
Brenda
Oct 12, 2021
Want to subscribe?
- Click on the “Leave a Comment” field at the end of any post (blog) and a subscribe option will appear.
- Put something in the comment field (if you put “test” or “just subscribing” I won’t make your comment public)
- Fill in the sections for your email address and name, and then click on the “notify me of new posts via email.”
- You will get a confirmation email from WordPress confirming you want to subscribe.
- Click on the confirm button in that email and you’re done.
Please note that I do not send out emails. If you have a WordPress account there is a way to subscribe within the WordPress system, but I cannot provide specifics on how it works as I don’t know.
Hi, I have been trying to create imagery like tribal and celtic tattoos on wood. My problem is that to fill in the areas as darkly as needed (as close to black as possible) I can clearly see the burn lines. Is it possible to do this without the lines so obvious and if so, how?
Thanks
I’m not sure it can be done, but there are two things you can try.
1 – paint the designs. 🙂 Yes, I know, this isn’t pyrography.
2 – burn at a lower heat and reburn a number of times to build up the color.
One really important thing to do is use a light hand pressure. This will help keep the pen tip from sinking down into the wood.
Thank you. I will try these suggestions!
Thanks for the post, great information for a very new burner
Welcome to the exciting artform called pyrography. Hope you’ll enjoy it as much as I do!
Grazie per i tuoi preziosi consigli, sono veramente utili e intetressanti
Grazie
Thank you so much for your great information. This tutorial will be invaluable to me and many others. Thanks for sharing so much with all of us.
Jerry
Hi Jerry,
I’m glad the blog was helpful. Thank you for the lovely comment!
B
I tried to view the video several times with no results. Could you please send me an email with the video attached? Wayne
Hi Wayne,
I had a wrong link. The video link should be working now. Sorry for the hassle.
b