 In this first installment of a three-part tutorial series I am going to explain to you how to create the Jaguar artwork featured at the beginning of this blog. This is a beginner friendly project, so our goal is to create artwork that is clearly a jaguar but is not a photorealistic one. With that goal in mind we will examine the reference photo and determine the essentials needed for the artwork. Then I will walk you through the basic steps that will produce great results without being overly complex.
I said that this is a three-part tutorial series. In part 2 and 3 we build upon the artwork we create in this tutorial. You can decide how much, if any, of the additional tutorials you want to do. So let me quickly show what the other tutorials cover.
 Part two is nothing more than re-burning and fine-tuning the jaguar from this tutorial to give it more tonal depth and make it look a bit more 3d. Part 2 is not an essential step, so if you’re a beginner you can skip it.
 Part three covers adding a background to the artwork. To make it as easy as possible, I broke it down into stages that get progressively more difficult. The first stage adds the dark tree trunk shapes, the second stage add color to the entire background, and the last stage adds the underbrush to the background. Depending on your skill and comfort level you can decide at which stage you want to stop burning.
 Click on the image to the left to watch a YouTube video version of the tutorial for part 1. Or you can click on this link: https://youtu.be/rJICiEwuztU
At this time, the blogs for part 2 & 3 are not functional. Below are links to the tutorial videos:
Part 2 = https://youtu.be/zwByeCoLUmk
Part 3 = https://youtu.be/uvlAu5m5tlw
Now, let’s get to work.
MATERIALS NEEDED:
- Writing tip
- Shading tip
- 4 x 6 inch (10.2 x 15.2 cm) piece of wood
- Pattern Jaguar mp pattern
Be aware that pen tip and nib are the same thing.
STEP 1 – PREP THE WOOD
 Wood burning is much easier if you take the time to prepare the wood surface. Always smooth the wood surface by sanding it with at least 220 grit sandpaper.
 Then thoroughly wet the board by misting it with water or running it very quickly under the sink faucet.
The board should be damp to the touch, but not soaking wet.
Let the board dry and then sand again.
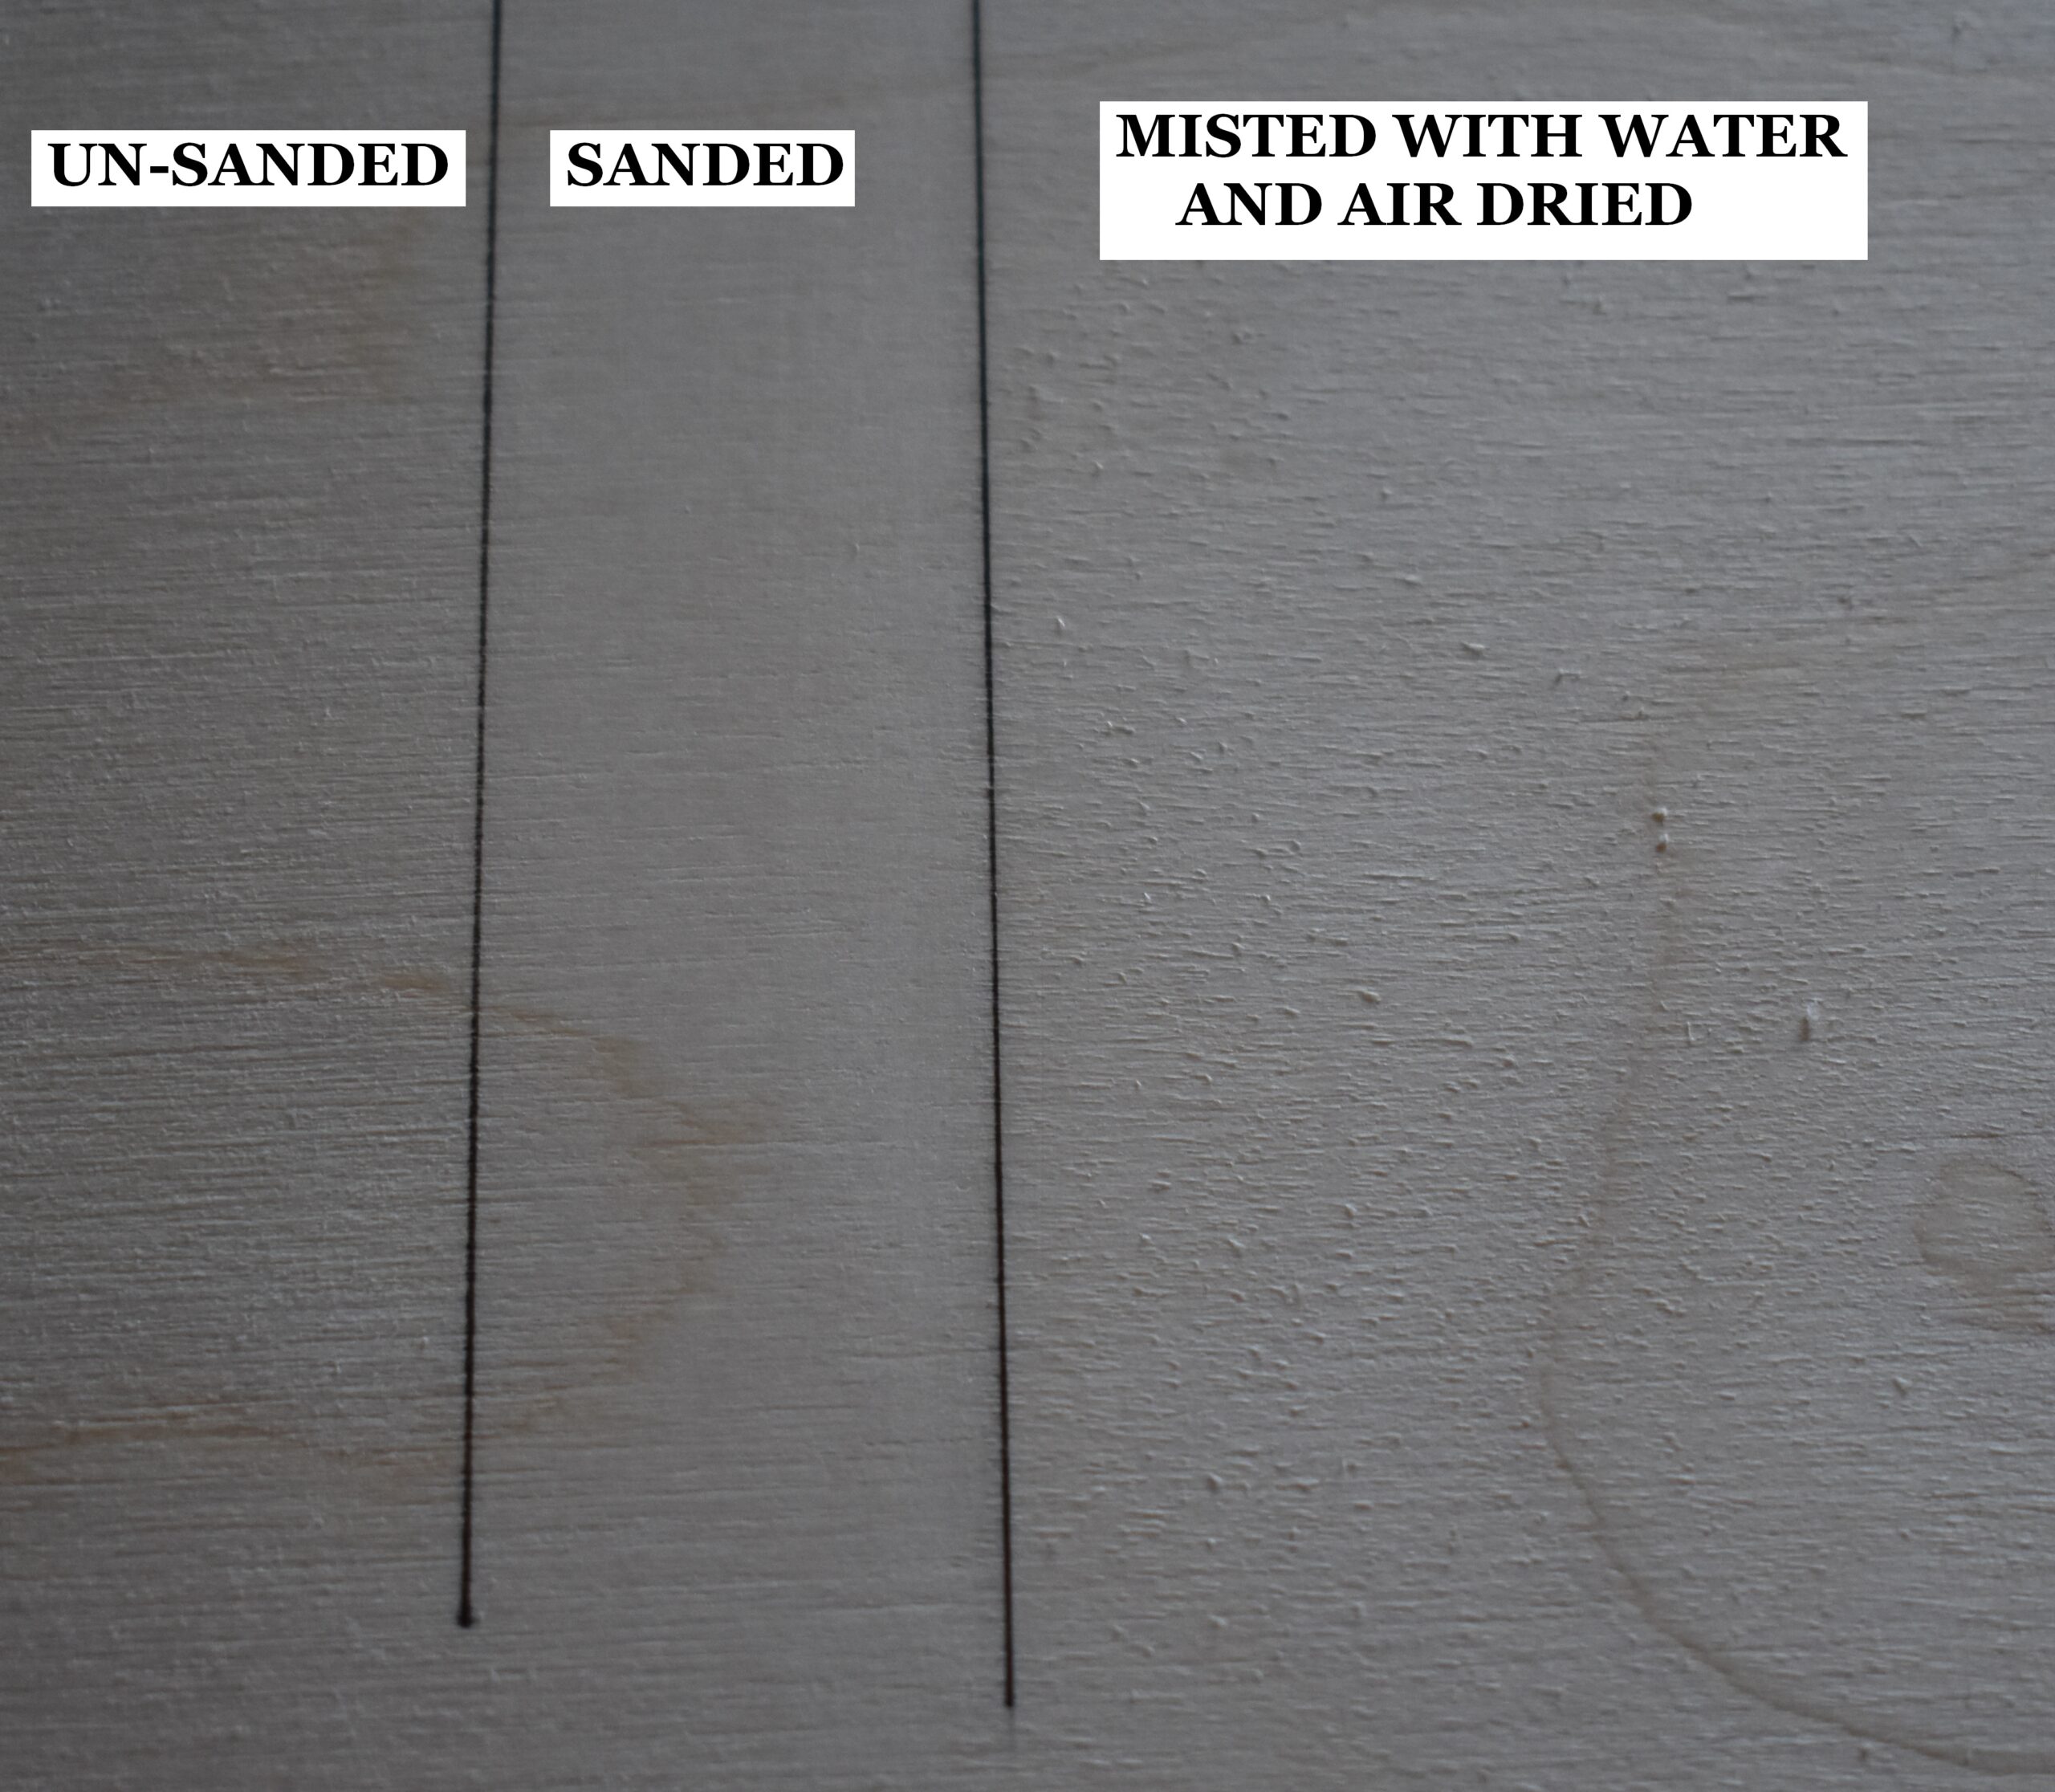 This piece of plywood board is broken up into three sections. The far left section is how the board looks without any prep work. The board has a rough texture. The middle section of the board shows how it looks after it was sanded, and the surface is a lot smoother. The right section of the board shows it after it was lightly misted with water and allowed to dry. Notice how rough the board looks, but a quick sanding will remove that and leave an ultra-smooth board.
Doing the 4-step process (sand, mist, dry, sand) produces a super smooth surface, and the smoother the surface is the better the burn results will be.
STEP 2 – THE REFERENCE PHOTO
 Here is the reference photo I used. Note that the Jaguar image I’m used was obtained from Pixabay user NetzwerX. Here’s a link to the original photo. Jaguar Photo
Looking at the photo and decide which aspects or details are the essential. Another way of thinking about this is to decide what are the minimum amount of details needed to create the impression or appearance of the jaguar?
Here’s my list of what I consider as essential:
- The shape or outline of the body essential.
- The spots
- The orange-colored portion of the fur (this is so that the jaguar doesn’t look like an albino version).
- Facial features: eyes, nose, ears & mouth
- The log the jaguar is standing on. The log isn’t essential for the jaguar, but I think it is needed for the artwork. Otherwise, the jaguar will appear to be floating in space.
Obviously, I did not add color to my version of the artwork, but if you want to add a touch of color to yours please do so. Just be safe about it and add the color after you are completely done burning.
STEP 3 – TRANSFER THE IMAGE
 Transfer the patten to your board. I use the tracing method to transfer all my patterns to my projects. It’s cheap, easy, and gives me control on what I want to include.
Print off your pattern on lightweight paper (standard copier paper is perfect), coat the back of the pattern with a graphite pencil, position on the wood, and trace over the pattern.
 Make sure to check the trace results for accuracy before removing the pattern. By that I mean look for any missing lines. Once the pattern is removed it is very difficult to replace it so that the lines match up perfectly.
I often get asked why I don’t use carbon or tracing paper. True carbon paper has wax in it. Wax will melt and bond with the wood leaving a mess that can’t be fixed. The graphite tracing papers I’ve tested out are either too light to see or so dark they won’t erase. I got tired of wasting money on them, so use my old-fashioned method that has never failed me.
STEP 4 – SHAPE and SPOTS
 In this step will take care of 2 items; the jaguar’s shape and spots. Be aware that I put the facial features in it’s own step (step 6), so don’t be concerned if you see photos of completed features.
 Begin by burning over the trace lines using a writer pen tip. I am using a micro writer pen tip by Colwood, but any writer pen tip will work.
Use a light hand pressure when burning. Writer pen tips have a tendency to sink into the surface of the wood which leaves an embedded or grooved line in the board. Depending on how dark the line is and where its located this embedded line can really show up as a pale line in the artwork.
 On the pattern there are some dashed or dotted lines. In this photo I colored over the dotted lines with a yellow marker so you could easily see their loction.
These lines indicate where the orange-colored fur ends and the white fur begins. Make these lines are are super pale in color! These lines need to blend into the orange-colored fur, and the lighter the lines are the easier it will be to do this.
My guideline for how dark to burn dotted and/or dashed lines is that they should be a touch hard to see.
Note that the curved dashed line on the face marks the location of shadows. This is needed for part 2. If you are not planning on doing part 2 then ignore the dashed line on the face.
 After the outline of the jaguar has been burned over, then start working on the many, many spots.
With the spots you can fill them in using a writer nib. Depending on the size of your artwork, some of the larger spots might be easier to burn in with a small shader. My artwork is very small, so I used a writer nib for all of them.
Try to keep the color mostly uniform, but it doesn’t need to be perfect. A little tonal variety will add to realism, so don’t get hung up on trying to create perfectly uniform color. If the spot is mostly dark or in the brown tonal range then it will be just fine.
I switched to Colwood’s standard writer pen tip because it is larger than the micro writer I was using. This makes it easier for me to fill in the spots.
There are a lot of spots on the jaguar, so this step will take a bit to do. I like to burn along the edges of the spot and then fill in the spot using circular motion.
Keep the heat setting on your burn adjusted so you get a light brown burn result. This will allow you to create a dark burn without creating overburn. Overburn is discoloration of the wood beyond the edge of the item you’re burning in.
 Nearing the end of the spots.
I mentioned before that there are a lot of spots on the jaguar, and burning them in gets a bit monotonous. Don’t feel that you need to burn them all in one session; I didn’t.
 Once the trace lines and spots have been burned in, then rub over the area with a pencil eraser to remove any residual graphite.
STEP 5 – THE FUR
Now we will burn in the fur. We’ll start with the orange-colored fur and end with the white fur.
Again a reminder that the facial features are covered in step 6.
ORANGE-COLORED FUR
 Begin burning over the colored fur on the body using the shader of your choice.
Do your best to burn the orange fur to a uniform dark tan to light brown color.
Use the flat of your shader when burning. This puts more metal in contact with the wood, and will make burning in the fur quicker to do.
Also, use a very light hand pressure! The light hand pressure will allow the pen tip to glide over the surface of the wood producing more consistent burn strokes. I can’t emphasize the need for using a light hand pressure enough! There are a number of problems that can be prevented by using a light hand pressure.
 I have a video shows how hand pressure impacts your burn results. Click on the thumbnail to watch or click on this link: https://youtu.be/q8OGqS5kyHg
One more thing, make sure you’re not burning at too high of a heat. Adjust the heat on your burner to the point where you get a dark tan to very light brown burn results. A lower heat setting will help keep the pen tip from getting super-hot, and this will make it easier to control the burn strokes.
If you are having difficulty getting uniform burn strokes, I suggest turning down the heat on your burner. I’ve found that burning at too high of a heat causes a lot of problems especially when you are first learning pyrography. Also, burn the strokes in the direction the fur grows. That way if the color isn’t uniform the burn strokes will look like fur.
Do not worry about shadows or contouring; this is a beginner jaguar. Instead, do your best to apply uniform color to the orange areas on the body.
 When you work along edges keep your pen tip in optimal position. This means that the edge of the pen tip is on the inside edge of the shape. The rest of the pen tip is angled over the shape you are burning in.
In this photo I’m working along the upper edge of the body. I don’t want to burn over the background. I’ve got the edge of the pen tip on the outer edge of the body. Rest of the pen tip or the body of the pen tip is angle over the body – not the background. This helps ensures that only the body gets burned on. Optimal position is what helps ensure your edges are crisp and clean.
 If you look closely, you’ll see that my color isn’t perfectly uniform. The slight color variation won’t harm thing.
Keep in mind that some areas will seem darker depending on how many spots are in the area. The more spots the darker the area will seem.
Pay attention when working on the sides of the jaguar as the lower portion transitions to white fur. I marked the transition with a dotted or dashed line on the pattern.
Along the upper edge of the back is another place you need to keep your pen tip in optimal position. This will help ensure that you don’t burn past the edges of the jaguar shape.
WHITE COLORED FUR
 Lightly burn the inside of the back right leg. This will help the viewer tell where the leg ends and the tail begins. Plus the color will help push the leg into the background; making it seem further away than the closer leg.
 Then burn a wide band of tan along the bottom edge of the belly. This is just so that the lower edge of the belly is a different color than the unburned wood behind it. This is really important if you decide to omit the background step or only do the first part of the background.
 Lastly, burn a light tan band of color on the neck adjacent to the white cheek on the face.
This is just to help differentiate between the white fur on neck and the white cheek on the face.
STEP 6 – FACE
 Use a writer pen tip and burn in the spots on the face. Also burn the lines around the eyes.
 Reburn around the eyes filling the area with a dark brown to black color. Do the same with the pupil.
 Next burn the dark area along the bottom of the nose.
I want to point out that you can see the curved dashed line on the jaguar’s face. I mentioned before that the line is needed for part 2. Make sure to keep the dashed line fairly pale in color. It should be a couple of shades lighter than the color of the orange fur.
Again if you are not going to do part 2, then leave this line out.
 Lastly burn in the shadowed area on the mouth.
 Next, use the shader of your choice and burn in the orange colored fur on the face. My artwork is not very big, so I’m using the smallest shader I own for this.
 Make sure that the orange colored fur on the face has the same tonal value as the body.
It would look very odd to have the facial look noticeably lighter or darker than the color on the body.
After you get the orange fur on the body and face done, stand back a couple of feet and compare them. Are they the same in tonal value? If the answer is yes, then you’re good to go. Otherwise reburn over the areas that are lighter in value until the orange fur on the entire body looks to be very similar in value.
 Here’s how the face looks at this point.
 Let’s finish the face. First, lightly burn over the nose. I chose to make it a shade or two lighter in color than the orange fur. You can make the nose darker and that will look fine too.
 Then lightly burn over the eyes making them a tan color.
How dark you burn the eyes is up to you. The only consideration is to make sure that they are lighter in value than the dark area surrounding them.
To the put that another way, you don’t want the eyes to appear black in color.
 Now, burn tan strokes of color along the outer edge of the ear. Start the stroke on the outer edge of the ear and pull the stroke towards the inner ear. Stop near the halfway mark. Try to vary the color of the burn strokes a little.
Notice how the burn strokes are not the same length. Also, I vary the angle I hold the pen, so that the line thickness changes. The steeper the angle is means there is less metal in contact with the wood resulting in thin burn strokes.
 Very lightly burn over the chin. This is so that it will stand out a little more from the unburned background.
That’s it, the jaguar is done.
STEP 7 – THE LOG
 We are almost done with this artwork. The only thing left to do is burn in the log.
Begin by burning the cast shadow next to the front feet.
I will warn you now that I didn’t burn my cast shadows dark enough and had to re-burn them later on. Which I will admit didn’t happen until part 2.
 Then reburn over the lines on the log so they are a brown color. These lines give shape to the log and visual interest.
 Now use the flat of the shader and burn long wide strokes that follow the contours of the log.
The dark lines we burned on the previous step are the contour lines, so allow your burn strokes to follow along those lines.
I am using my largest shader for this, but any shader will work.
 The color of the burn strokes do not need to be uniform. In fact, a little variety would be good.
As you can see the log matches the color of the cast shadows around the feet. It’s not imperative that the cast shadows be there. You can add them or not. The jaguar will look great either way.
IN CONCLUSION
That’s it for part 1 of the jaguar series. Even though the jaguar was reduced to its essential elements, I think it turned out extremely well. It is very easy to tell that the artwork depicts a jaguar, and the step are basic. I really do hope that you’ll try this and be ready for part 2. Part 2, which will be my next blog, builds upon the artwork from this blog.
Before I go I’ll answer a couple of common questions I get. The artwork was burned on birch plywood. It measures 4 ¾ x 6 ¾ inches (12.1 x 17.1 cm) and took me 2 ½ hours to create.
Until the next blog,
Brenda
Mar 23, 2021
Want to subscribe?
- Click on the “Leave a Comment” field at the end of any post (blog) and a subscribe option will appear.
- Put something in the comment field (if you put “test” or “just subscribing” I won’t make your comment public)
- Fill in the sections for your email address and name, and then click on the “notify me of new posts via email.”
- You will get a confirmation email from WordPress confirming you want to subscribe.
- Click on the confirm button in that email and you’re done.
Please note that I do not send out emails. If you have a WordPress account there is a way to subscribe within the WordPress system, but I cannot provide specifics on how it works as I don’t know.
This looks really interesting. I can’t wait to have a go
Hi Denise,
thanks. I do hope that you will try it!