
In this blog I’m going to explain how to create the feather pyrography artwork in the above picture. I think this is a wonderful follow-up project to the stone tutorial as we will expand the use of the shading pen tip. I like how this project turned out, and, in my opinion, it’s really easy to do and I’m hopeful that you will agree.
 A few years after I wrote this blog I created a new feather that didn’t require a pattern. I didn’t write a blog for it, but I did created a YouTube tutorial. This tutorial covers the same basic information found in this blog, but it has a bit more information and some concepts might be explained slightly differently. Also, the video shows how to create a pale feather.
To watch, click on the video thumbnail or this link: https://youtu.be/SKixeRgjJ0A
MATERIALS NEEDED:
- Writing tip
- Shading tip
- white charcoal pencil (not color pencil)
- Piece of wood approximately 4 x 11 inches. (you can reduce or enlarge the pattern size if needed/desired)
- Attached pattern Feather pattern
STEP 1 – PREP THE WOOD
 Wood burning is much easier if you take the time to prepare the wood surface. Always smooth the wood surface by sanding it with at least 220 grit sandpaper.
 Then thoroughly wet the board by misting it with water or running it quickly under the sink faucet.
 The board should be damp to the touch, but not soaking wet.
Let the board dry. Once the board is dry, you will notice that the rough appears and feels rough. That’s because the grain swelled and is now sticking up from the rest of the board. To remove this, just sand again with 220 grit sandpaper.
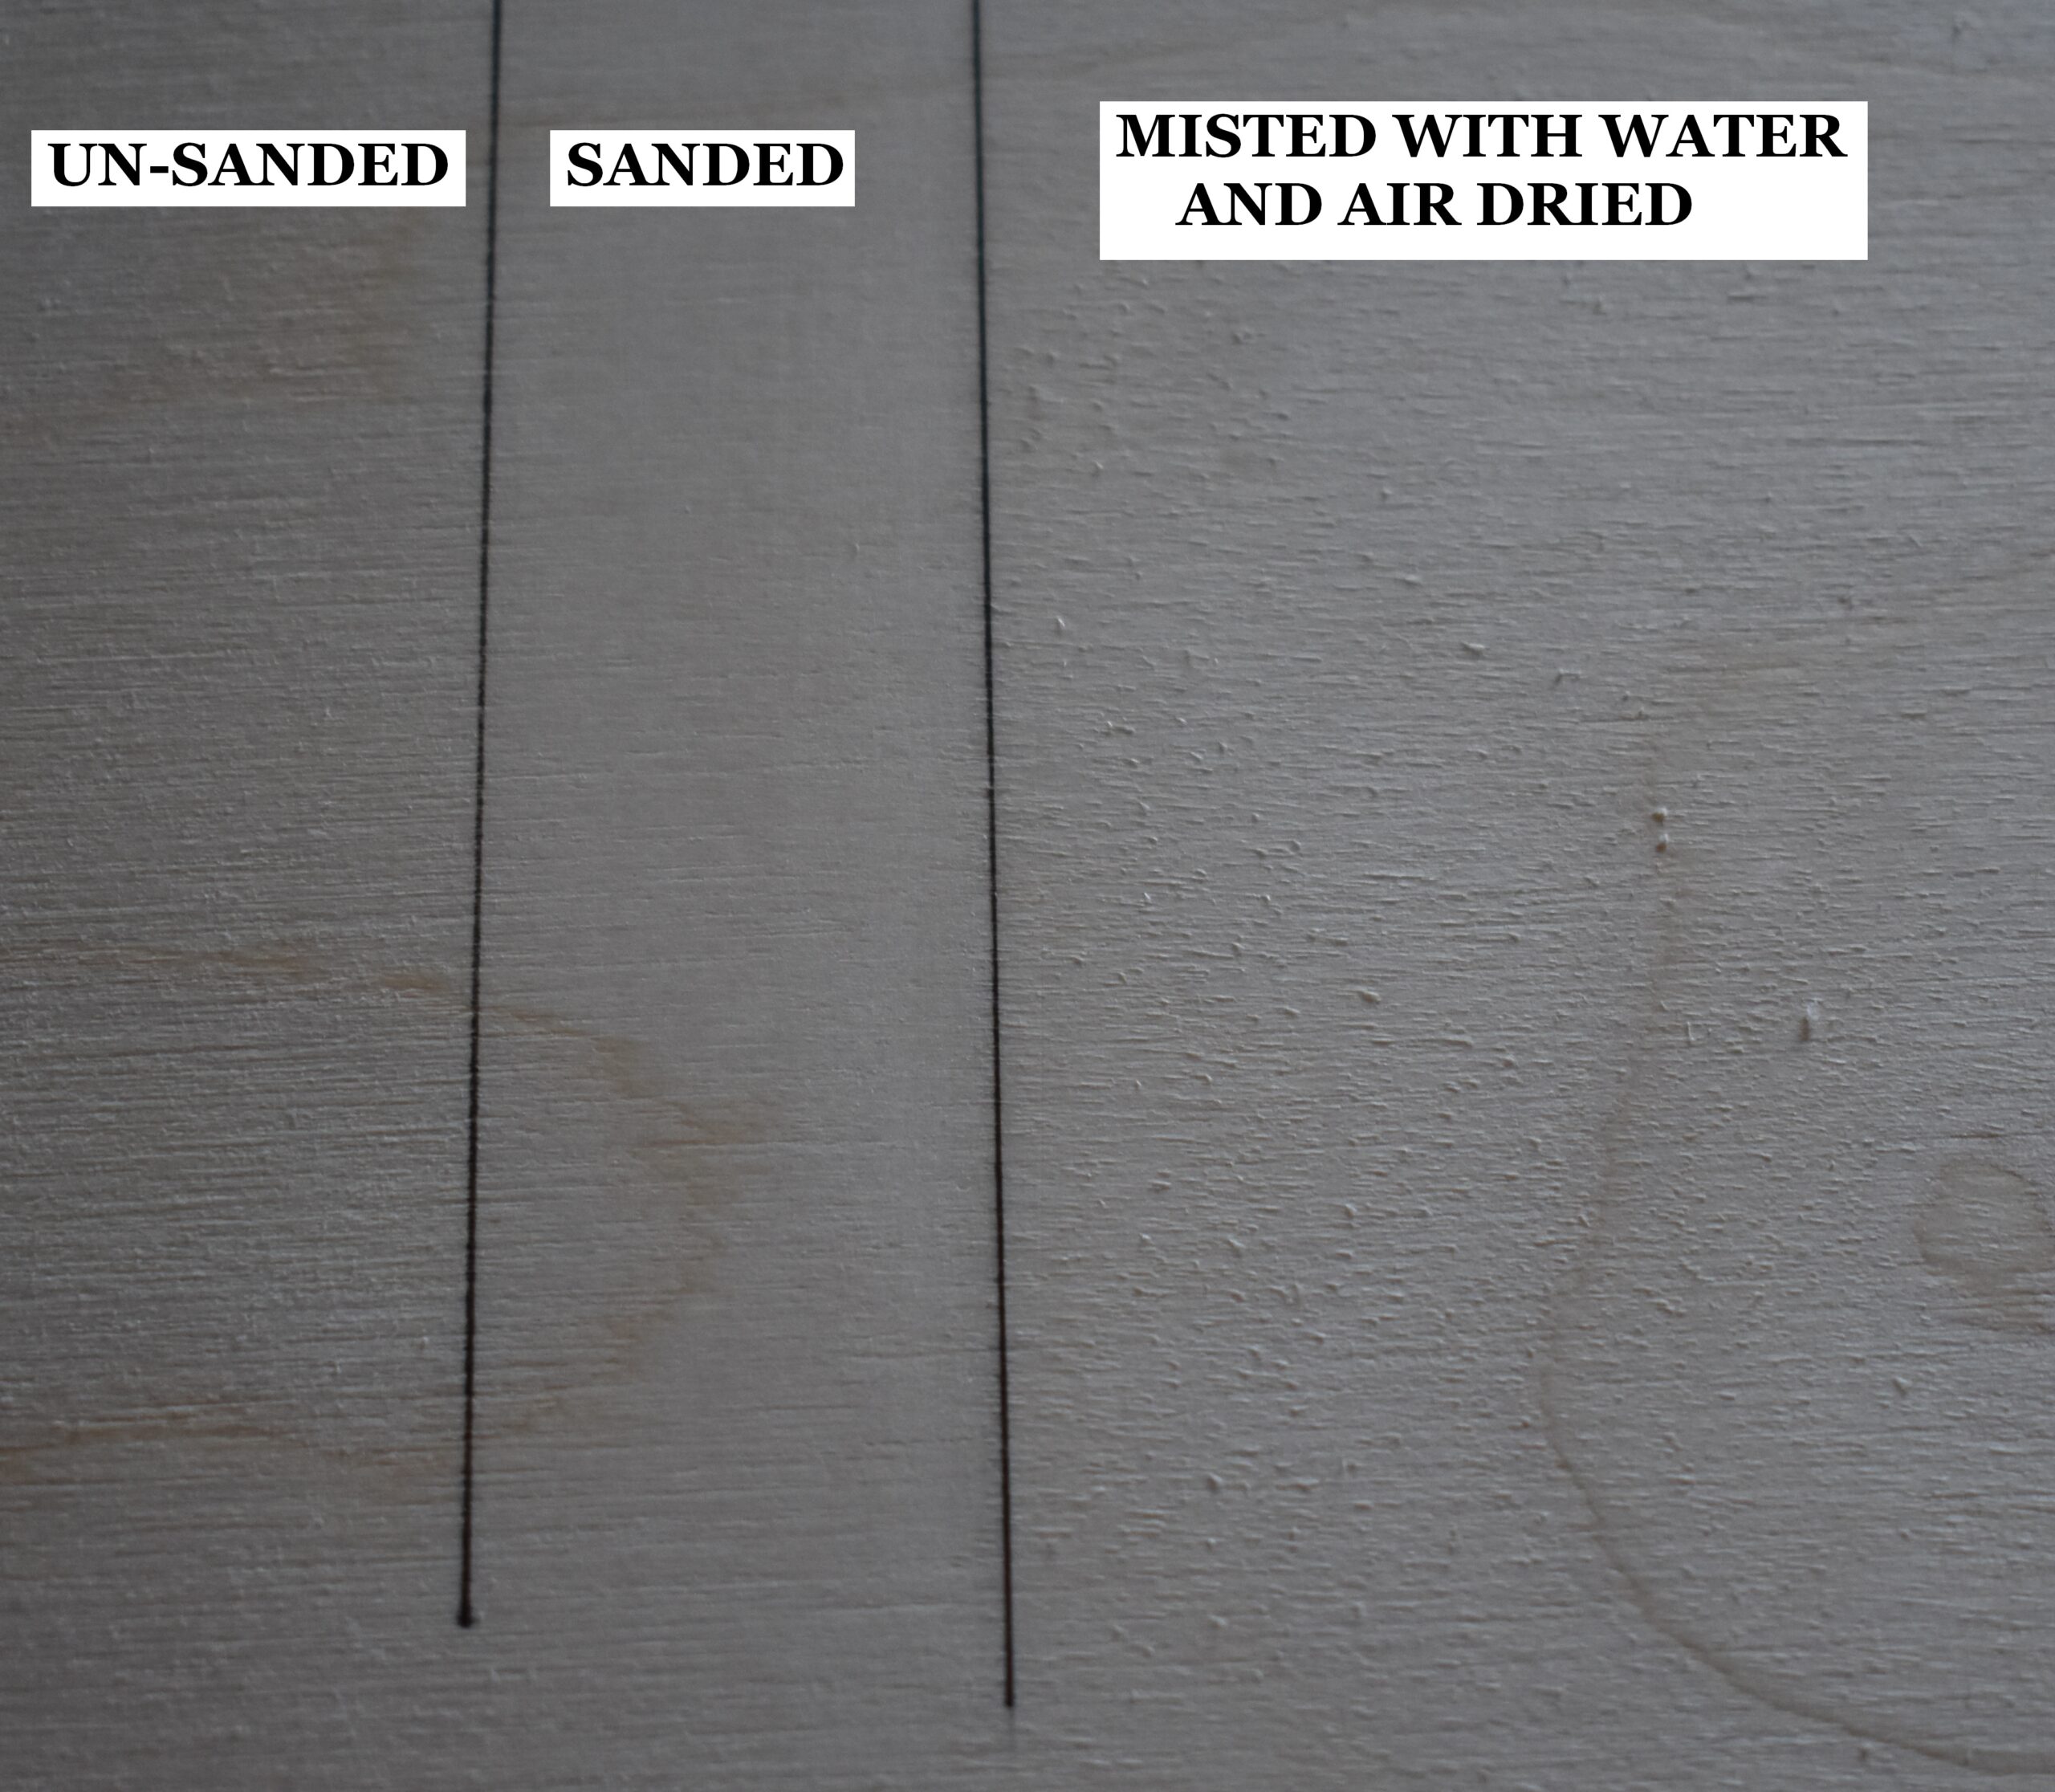 This piece of plywood board is broken up into three sections. The far-left section is how the board looks without any prep work. The board has a rough texture. The middle section of the board shows how it looks after it was sanded, and the surface is a lot smoother. The right section of the board shows it after it was lightly misted with water and allowed to dry. Notice how rough the board looks, but a quick sanding will remove that and leave an ultra-smooth board.
Doing the 4-step process (sand, mist, dry, sand) produces a super smooth surface, and the smoother the surface is the better the burn results will be. There are other benefits to the 4-step process.
- Humidity changes won’t impact the board. This means that the grain (or nap) won’t swell.
- You can safely add liquids without worrying about the nap raising (grain swelling). Liquids include things like watercolors and water-based wood finishes that are brushed on.
STEP 2 – Transfer Pattern
 I use the tracing method to transfer all my patterns to my projects. It’s cheap, easy, and gives me control on what I want to include. Print off your pattern on light weight paper (standard copier paper is perfect for this),coat the back of the pattern with a graphite pencil (I use one in the B ranges), place pattern on wood, tape in place, and trace over pattern with a sharp pencil. Slowly peel the pattern back and look for missing spots. If there are missing spots, replace pattern and track over spots, and then recheck. Once all of the trace lines are present remove the pattern, and you’re ready to start burn.
You might need to cut the pattern down in size so you can see where to place it on the wood.
STEP 3 – Burn the Outline
 With the writing pen tip on medium low, lightly burn in the trace lines. After you have burned in the trace lines, rub over the surface with a pencil eraser to remove any residual graphite.
Feather Anatomy
Before we can continue with this tutorial, we need a common language to speak about the structure of a feather. Not only are you learning how to create pyrography art, but you’re also going to get a lesson in avian anatomy. Yes, you could have probably lived your life happily ever after without knowing this information, but think of it as me helping you ward off dementia. You’re welcome.
 Barbs = solid structure the makes up most of a feather.
Calamus = the barb free hollow shaft or quill end of the feather.
Downy Barbs = the soft wispy hairs that are found just before the solid barbs start.
Rachis = is what the calamus turns into once barbs are present.
Tip = the very end of the feather.
Armed with our common language, we can now continue the tutorial.
STEP 4 – Burn a Dark Line Along the Rachis
 Burn a dark line along both sides of the rachis. The purpose is to make the rachis stand out from the barbs.
OPTIMAL PEN TIP POSITION
 Note the pen tip position in the picture. The edge of the pen tip is on the outside edge of the rachis. Positioning the pen tip this way ensures that I am only burning on the barbs and not on the rachis. I call this the optimal position.
Optimal pen tip position ensures that you are burning where you INTEND to burn and that your borders are crisp/clean.
 When you need to, turn the wood so that you can easily keep the pen tip in optimal position for burning.
STEP 5 – Burn Pull Away Strokes
 Pull away is the name I’m calling the stroke I used to create the feather texture / look. I’m going to do my best to explain, but if it doesn’t make sense then I highly suggest watching the video.
 With the shading pen tip on medium heat, place the edge of the pen tip along the outer edges of the barbs. Then pull the pen tip away from the edge towards the rachis (feather center).
 Pull the pen towards the rachis away from outer barb outer edge. lift the pen tip up from the wood. This creates a stroke of color that is darkest at the starting point and then fades out. How quickly it fades depends on the heat of your pen and how fast you pull away.
It is up to you where you end your pull away stroke. I recommend varying where you end them. Often I reburn over the area several times to slowly build up the color.
 With this pull away example, I’m burning a thin line. To create a thinner line, just angle the nib so that less of the metal is in contact with the board.

Another difference with the example is that I slowed down my hand speed to get a darker result. I did not change my pen heat while doing the pull away strokes. This style of burning means that I don’t have to reburn over the area numerous times.
Let’s recap the basic steps for the pull away burn stroke.
1) Always start the burn stroke on an edge.
2) Pull the nib towards the opposite edge.
3) How fast or slow you move your hand determines how quickly the color fades.
4) You will get better results if you pull the nib down towards yourself versus pushing it up and away. Pulling the nib down makes it much easier to control the burn results.
5) Vary where you finish the burn stroke.
 Burn short pull away strokes along both sides of the rachis.
In this photo I’ve finished burn on one side, and I’m just starting to burn along the opposite side. Nothing has changed about the pull away stroke other than the length of it.
 Here’s how the feather looks after short pull away strokes were burned along the rachis.
 Now burn pull away strokes along the outer edges of the feather. In this photo I’m burn the barbs on the side that is shorter in width.

I stopped the burn stroke near the half way mark between the outer edge and the rachis. This will make the edges of the barbs darker than their centers. That added with the fact that the color gradient, gives the barbs a rounded or curved appearance.
 Here’s a progress photo. Be aware that I reburned over the barb area several times to build up the color.
STEP 6 – Draw Highlight On Rachis
 Use a white charcoal pencil and drawing a line where you want the white highlight on the rachis to be. The line I drew runs approximately 1/3 the length of the rachis. Note that I’ve placed this line along the upper edge of the rachis.
DO NOT use a white colored pencil in this step. Colored pencils are made with wax, so when the heat of the pen touches the line made with a colored pencil it cause it to melt and bond with the wood.
 Here’s how my feather looks after drawing in a highlight line.
Is this step necessary? No. I like to use it because I think it makes it easier to see where the highlight will be. I need to point that that white charcoal is heat-resistant, but it won’t completely block the heat of the pen tip. Because of that I highly recommend avoiding burning over the white charcoal.
STEP 7 – Shade Rachis & Calamus
 The goal of this step is to darken the rachis & calamus, so it looks more three-dimensional. Also shading the calamus will enable it to stand out from the pale background.
 I used two methods to darken up this area. First I went along the lower edge of the rachis & calamus burning a thin band of color, or, if it’s easier to visualize, a thick line of color. Secondly I used small circular strokes along the band/line I just burned to further darken up the band/line and to extend the color a little further into the rachis/calamus.
 Remember, the goal is to provide some color and give shape to the rachis and calamus. The other goal is to provide contrast with the barbs, so make sure to they are lighter than the barbs.
 Finishing up the calamus.
After you’re done shading the rachis/calamus make sure to erase the charcoal line if you drew one.
STEP 8 – Darken the Downy Barb Hairs
 With a writing tip, I darkened up the downy barb hairs. I also added a lot more hairs than the pattern shows. To do this I just created another hair slightly above or below one of the downy barb lines we burned in during step 2 – burn the outline.
You don’t have to add more downy barb hairs, but I’m just showing how you can modify patterns slightly.
 After drawing them in, I went over them with the shading tip to quickly darken them up as the writing tip isn’t the easiest to do that with. While darkening the downy barbs I also did a few pull away strokes along the rachis.
STEP 9 – Darken and Fine Tune
 The last step is to darken and fine tune the feather.
I felt that my feather needed to be darker, so did pull away strokes over most of it.
One thing I want to point out is that during the finetuning step, I burned over the entire barbs on the feather. I still used pull away strokes for this. This means I started on either the outer edge of the barbs or the edge of the rachis. Then I pulled the nib towards the opposite side, but instead of stopping at the halfway mark I burned all the way to the opposite side.
Below are a few progress photos.


That’s it – we’re done. I hope that this ended up being as easy as I was thinking it would be. If you think the feather should be a lot darker, by all means, make it darker. It’s your project, so own it.
TIPS FOR A PALE FEATHER –
If you wanted a white or pale colored feather, you would do the exact same steps we did creating this feather, but don’t burn the feather as darkly. Instead keep it a light tan color and then darken up the background to make the feather stand out.
Final words – –
This project was burned on birch plywood, it measures 4 x 11 inches, and took me 2 ½ hours to complete it. That said, this is not a race or contest. I only put how long a project takes me as I get asked that question a lot. You may get this done faster or slower, but that doesn’t matter. What’s important is you’re doing the tutorial and learning to control the shading pen tip.
Brenda
Feb 21, 2016
Thank you for your tips. I wanted to burn a small feather but only had an inch of wood on which to put it. I followed your advice and even though I’m very heavy handed and had the burning tool up too high it came out pretty good considering what it would have looked like without your help. Main thing is my daughter and four year old grandson recognised that it was a feather (and not a tiny banana)
I think you are a natural sharer of your amazing gift and even though it makes you feel uncomfortable being on camera you know that there are thousands of people out there who are too shy, house bound or have other reasons not to be able to get out to enjoy their hobby.
Some people I think may just enjoy your videos. Hearing you speak so softly and kindly and watch the art you create. That sentence could seem very bad but if you’ve never picked up a paint brush but have spent decades in awe of the wonderful Bob Ross then you will know what I mean ☺️☺️☺️☺️
Hi April,
I’m glad that my tutorial was helpful. You must have done well because kids are brutally honest, so good job!
Bob Ross was and still is an iconic person who created beautiful work. His method was very peaceful and enjoyable to watch. Heck, I watched almost every Bob Ross episode as a teenager dreaming of one day becoming a fantastic painter like him. Wasn’t meant to be as I did not care for the painting process. Not sure why. That’s okay because I doubt I would have found pyrography if I had stayed with painting. I enjoyed pyrography almost from the start and that wasn’t something I could ever say about painting.
Being on the camera is getting slightly easier, but I doubt I’ll ever feel truly comfortable with it. Thank you so much for the kind and wonderful comment!
Brenda
Gracias Brenda por el patrón de la pluma, creo que intentare con este.
Hola Ernesto,
De nada. Diviértete creando la pluma.
Brenda
Hey Brenda – thanks for posting this and your video. I especially loved the warding off dementia comment – that was great. Can you please tell me which tips you used here – specifically, the model numbers and perhaps names for the shading tip and pen tip for the down? Also, do you teach any of this or belong to any pyrography clubs out there? We visit family in Spokane every so often and so I’d definitely drop by for a class or whatever if you have anything like that (and if you’re near that part of the state). Thanks again, William.
Hi William,
thank you for the wonderful comment. I use Colwood’s Tight Round J shader. I need to mention that I bent the end of the shader to a 45 degree angle (or something close to it) to make it more comfortable to use. Colwood now offers to bend the tips and they bend them along the 2 wires that connect to the end (much better option as what I did could bust the tip off). The other pen tip I use is the Micro Writer. I don’t think it has a letter associated with it. Depending on the video, I might be using Colwood’s old style micro writer (two wires that come down to a point) and they don’t make that one anymore. With good reason as it was easy to bend it and I have. The new style micro writer is a lot more sturdy and creates the same thin line.
I do not teach classes. Boy, even the thought of babbling in front of a group of people makes my heart race, but I really appreciate that you’d want to attend one.
Thank you again for the comment, William, and I hope the information helps.
Brenda
Thank you Brenda. I will be giving it a try here soon. I ordered a BPH pen, burner and various tips for writing and drawing, and first tried some calligraphy lettering which turned out okay. So next will be the feather, of course practicing on some scrap wood first.
Hi William,
Well I hope you thoroughly enjoy the art of pyrography. To me it is a lot of fun and a very relaxing hobby. (well, except showing my face in the videos…that’s not so relaxing!). Great job on experimenting around with your pen tips. I’ve discovered some great textures just by playing around and trying to see what some of the tips can do.
Brenda
So I thought I would share with you, my first to attempts – two practice runs. I am happy enough with the second one now that I am going to go for it on the actual project piece.
Hi William,
how exciting! I’m looking forward to seeing them.
Brenda
I love your work, my feathers are going on a carved out design on a tree stump, it will be a stool I wanted them to look more realistic. Thank you
Hi Darla,
sounds beautiful! Glad my tutorial could be of help. Happy burning!
Brenda