 In this tutorial I’m going to briefly explain how to create wispy smoke. My goal with this tutorial is to help you identify the basic components of the smoke. Then show you how to replicate what you see. Once this is done, I hope that you will see how easy it is to create the smoke texture.
During the course of this blog, I will explain two different ways to create the smoke. The first method is done with only pyrography. The second method uses a rotary tool, like a Dremel. Any rotary tool will work. There isn’t a benefit to one method over the other. Instead, it is just a way of showing you different ways to create the same texture.
 Click on the image to the left to watch a YouTube video version of the tutorial. Or you can click on this link: https://youtu.be/m5PfTKnqsuY
The video contains more information than this blog does.
Now, let’s get started.
Be aware that nib and pen tip refer to the same thing.
PHOTO ANALYSIS
 Here’s the reference photo I used. I found it on Pixabay. Here’s a link to the original: https://pixabay.com/photos/candle-smoke-flame-fire-light-5883060/
 I’m only going to replicate the smoke found within the green rectangle.
 The green arrows are pointing to thin pale lines found along the edges of different smoke streams or columns.
 The area between two pale lines is much darker than the edges.
 For the most part, the smoke is fairly translucent. The exception is the column of white smoke that has a green circle around it.
 Lastly, here’s a closeup of the main smoke column, and the convoluted area above that curves around.
ABOUT THE SMOKE
Before I continue on, I want to point out that smoke doesn’t have a specific texture. At least when compared to tree bark, fur, or things along those lines. Instead, smoke is all about how opaque or translucent it is.
The thicker the smoke is, the more opaque it is. This means not as much color is needed.
The thinner the smoke is, the more translucent it is. This means more color is needed.
Smoke in its absolute basic form is nothing more than areas of light and dark.
PATTERN
 I do not have a pattern for the smoke. This image is the line drawing I did, and it is as close to a pattern that you will get. I did use photoshop to darken some of the lines.
PREP THE WOOD
 Wood burning is much easier if you take the time to prepare the wood surface. Always smooth the wood surface by sanding it with at least 220 grit sandpaper.
 Then thoroughly wet the board by misting it with water, or running it quickly under the sink faucet.
 The board should be damp to the touch, but not soaking wet.
Let the board dry and then sand again.
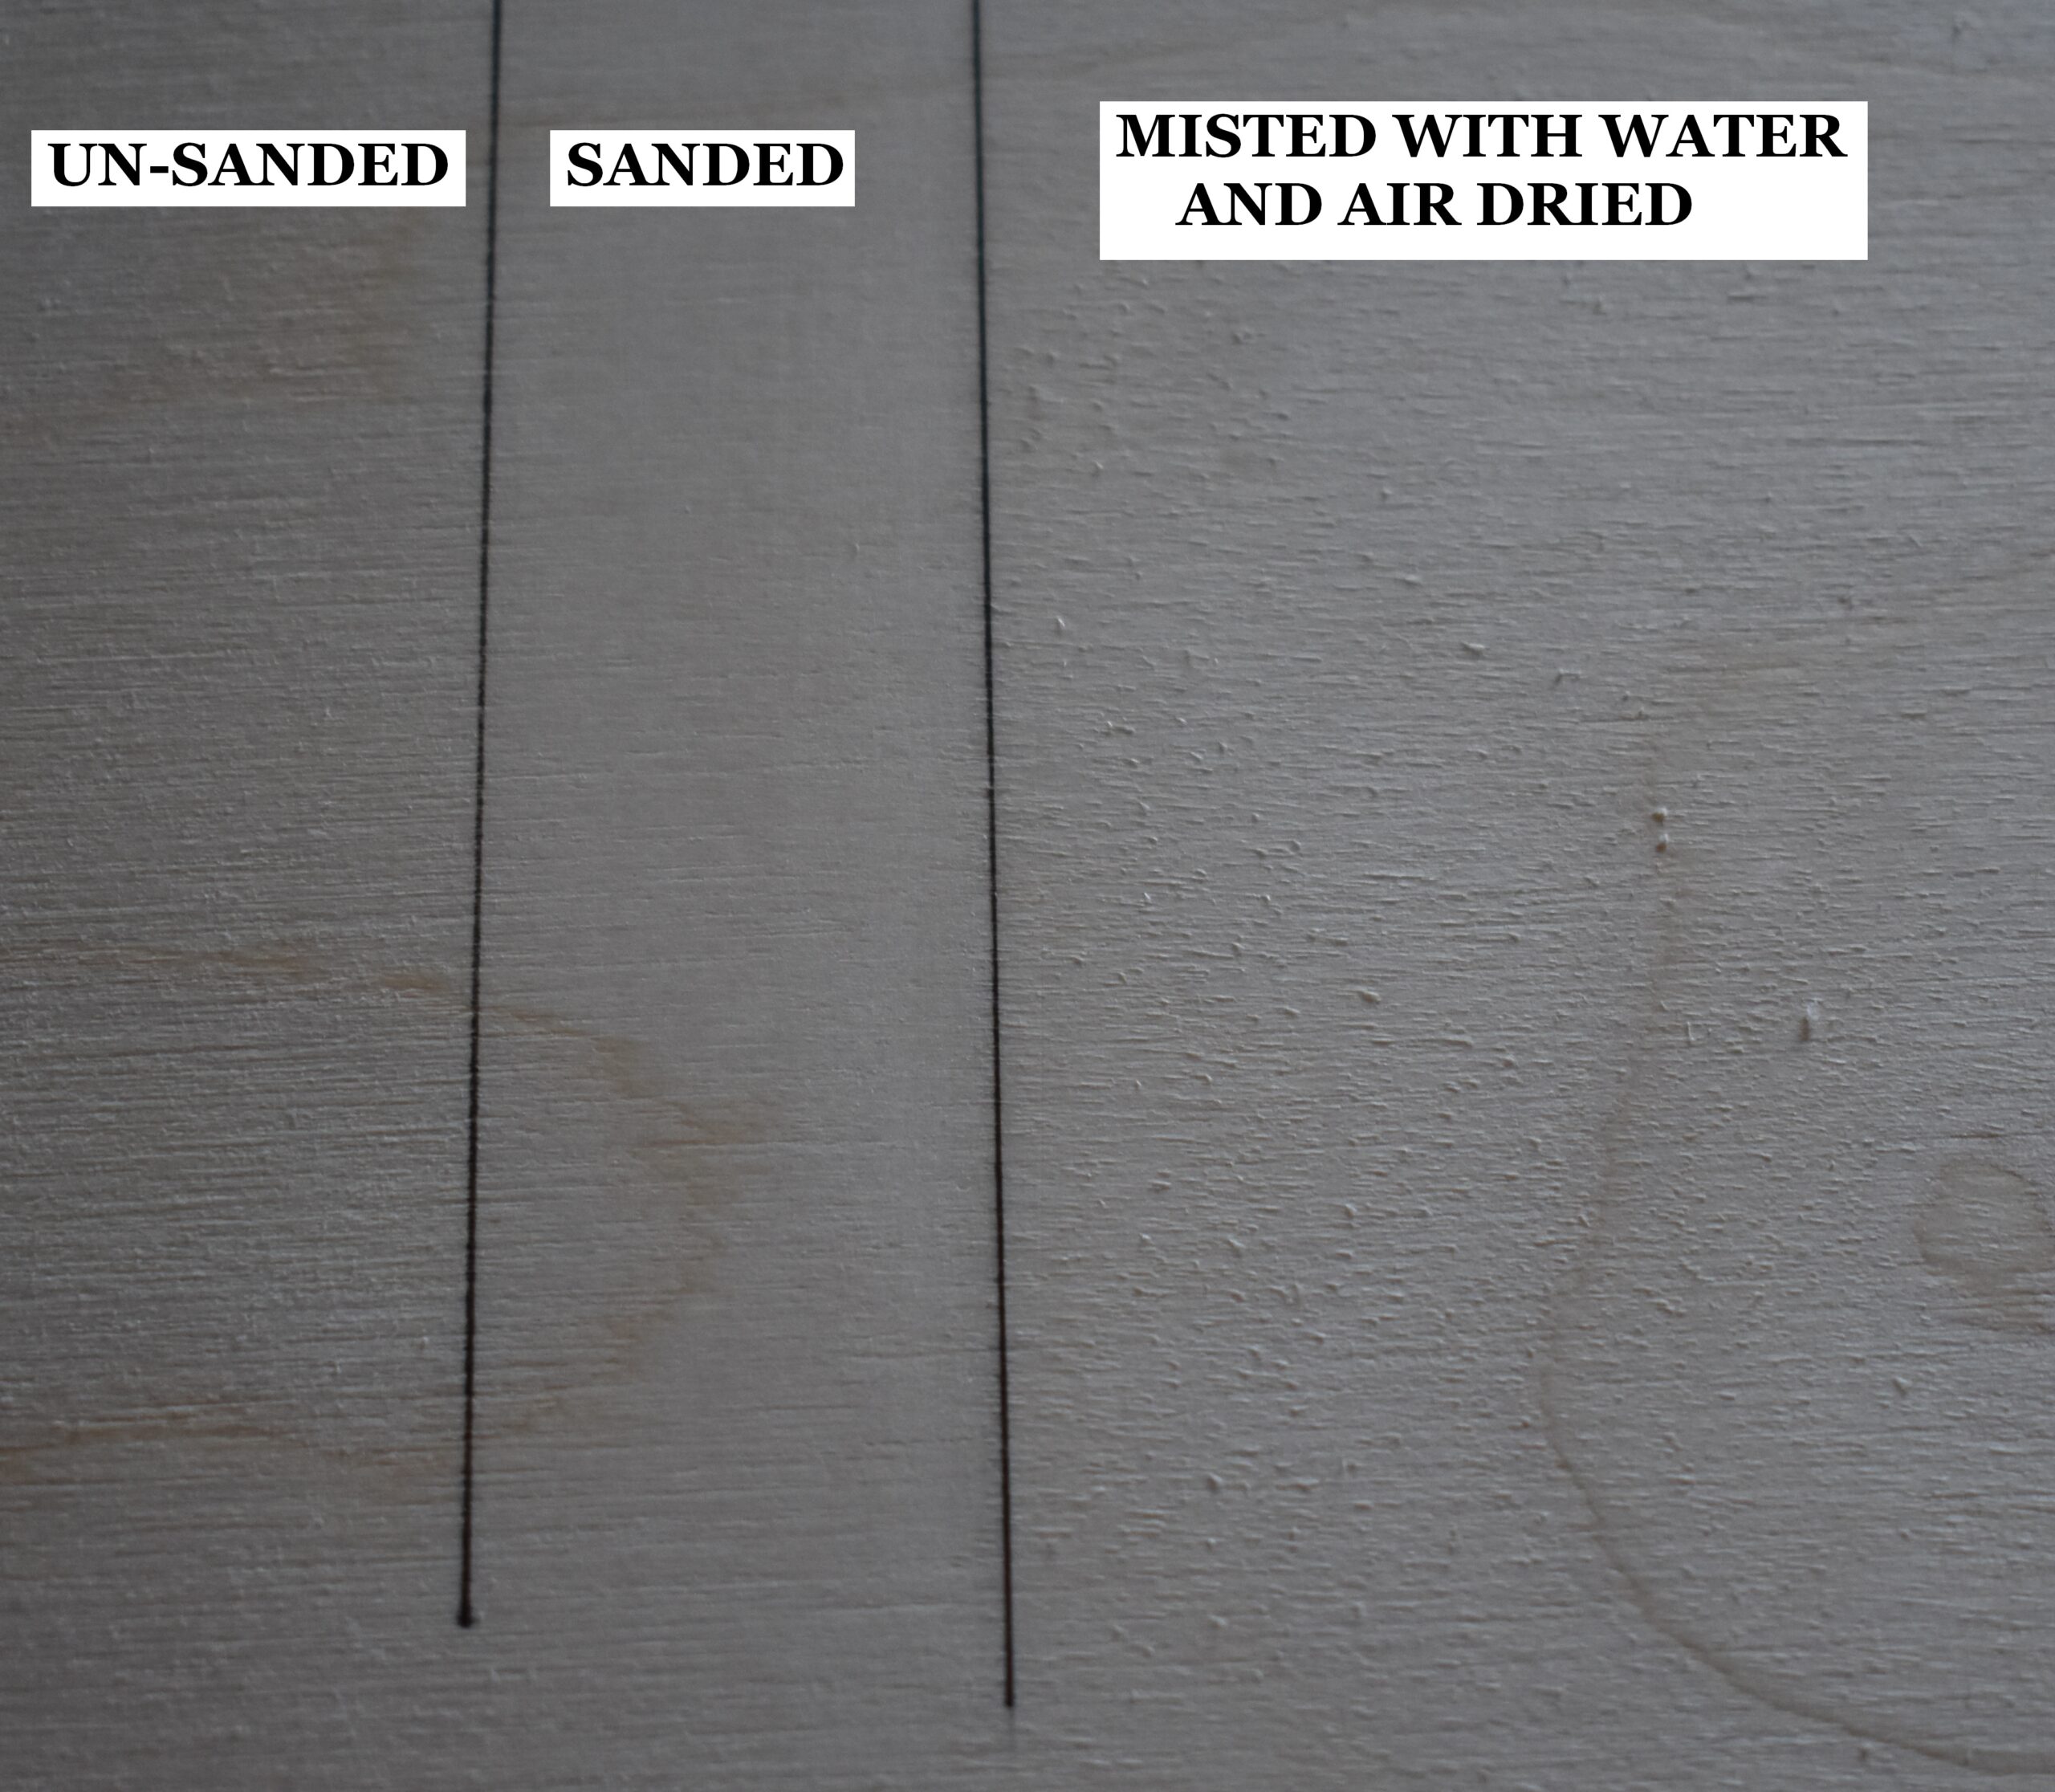 This piece of plywood board is broken up into three sections. The far-left section is how the board looks without any prep work. The board has a rough texture. The middle section of the board shows how it looks after it was sanded, and the surface is a lot smoother. The right section of the board shows it after it was lightly misted with water and allowed to dry. Notice how rough the board looks, but a quick sanding will remove that and leave an ultra-smooth board.
Doing the 4-step process (sand, mist, dry, sand) produces a super smooth surface, and the smoother the surface is the better the burn results will be.
METHOD 1 – Pyrography
 This is my pyrography rendition of the smoke. Let’s go over how it was created.
 First, I sketched out the basic shape of the smoke onto the board.
Then I used a shader and burned the background around or behind the smoke to a dark brown or black color.
 Because I was burning the background using a high heat, I had quite a bit of overburn on the smoke.
Since a lot of the smoke is transparent, I wasn’t too concerned about getting the smoke to a super pale color. The exception was the thin bright column of smoke on the right. For that I’m using the tip of a sharp knife to clean up some of the smoke edges.
Overburn is when the area adjacent to where you are burning darkens up. I’ve got a couple of arrows pointing to some spots where the wood adjacent to the square I’m working in was darkened up.
 To remove overburn, I normally use a sand eraser (aka ink eraser) over the area. The sand eraser is the grey colored portion of the eraser in the photo.
This will remove the majority of the color. I did use an eraser on the smoke, but I didn’t record that step. The red arrow on the inset photo shows a spot of overburn that I removed with an eraser.
Just keep in mind that depending on how dark the overburn is, the eraser might not remove all of the color. When that happens, I get out the knife and scrape away any remaining color.
 After the smoke was cleaned up, then I started burning the left column of smoke.
This column has pale thin lines along the outer edges. The column of smoke gets gradually darker the further from the bottom it gets. As I’m burning, I’m adding more color at the top of the column, and I’m creating a thin pale line along the outer edges of the column.
I’m using either circular motion or uniform strokes as my burn method. I purposely picked a spear shader because the pointed tip allows me to create thin lines, and get into smaller places.
If you do not have a spear shader, then use the shader you are most comfortable with. I would also recommend using a writer nib in areas where there are a lot of thin pale lines.
 I’m not burning at a high heat. My burner is set so that I’m getting a medium tan color. Because I’m burning at a lower heat, I have to reburn over areas a number of times to build up the color.
The smoke does not need to be super smooth or uniform in color.
When I’m using the circular motion burn stroke, little color variations tends to occur within the area I’m burning. This is perfectly okay. In fact, it probably adds to the realism.
 Here’s a progress photo.
 When working on the convoluted area of the smoke, it would be beneficial to use a writer pen tip.
I tend to be a bit lazy, so I seldom switch nibs.
Every time I switch nibs, I have to wait for the pen tip to get up to temperature. Then I have to test the burn results and adjust the heat setting until I get the desired results. Thus, I tend to stick with the nib I have equipped.
 In the convoluted area, I’m working very slowly. I either avoid or very lightly burn over the pale lines along the edges of the smoke.
Another thing that I am frequently doing is consulting the reference photo. Here are a few things that I check for:
- I check how dark or light the area is that I’m working.
- I check how pale the thin lines are along the edges.
- I check the general shape of the smoke.
I’m not trying to create an exact replica of the reference photo. Instead, I’m just trying to create something that looks similar. The main goal is to capture the basic components of the smoke, so that viewers will think it is smoke.
 I first burn along the edges of the pale lines. Then I fill in the area between the lines. The pale lines are what give the smoke the majority of its shape.
 Like I said before, there is a considerable amount of reburning being done to build up the color.
 Here’s a comparison photo showing the reference and my rendition.
It’s only okay to me.
I will admit that I did the engraving method first. When I started on the pyrography method I was bored with the subject matter, and I didn’t take the time to make the translucent areas dark enough.
METHOD 2 – Engraving
 Here’s my rendition of the smoke using the engraving method.
 I started out by burning the board to a very dark color. Then I used a white colored pencil to draw the basic shape of the smoke onto the board.
 I will be using the Customizer engraving pen equipped with a diamond coated bit. Here’s a link to one on Amazon: https://amzn.to/45GUEOY
As I said before, any rotary tool will work. I like the customizer because its small pen shape makes it easy for me to handle.
 Then I lightly rub the engraver over the smoke. I’ve found that the diamond coated bits act like sand paper to slowly remove thin layers of color (burn marks).
 Here’s a progress photo.
The process of removing color is the opposite of the pyrography method. With the pyrography we burned and reburned to slowly build up the color.
Another difference between the two methods is the process for creating pale thin lines. With the pyrography I avoided or burned lightly over the lines. With the engraver, I kept running over the line until enough of the color had been removed.
 I did try using a carbide burr bit to remove color from the board. The burr is very aggressive, and it was easy to gouge the board. It is necessary to use a very light hand pressure when the burr bit is equipped.
One thing I like about the burr, is it can remove color a lot faster than the diamond coated bits. In fact, it can very quickly remove all of the color from the board.
 I only used the burr on the spots I wanted to be very pale in color. Mostly I stuck with the diamond coated bits. The Customizer comes with an assortment of bits, so I tried out different ones on this project.
The bits are very much like pyrography nibs in that the larger the nib, the wider the burn results. The larger the, the wider the band of removed color was.
 Here’s a comparison photo.
IN CONCLUSION
I hope you the information in this blog and corresponding video helpful. I recommend trying to create smoke; even if it’s a small practice piece like I did. The smoke is pretty easy to replicate once you break it down into its major components. I hope that you will find this to be a true statement.
Until the next blog,
Brenda
Sept 30, 2025
Want to subscribe?
- Click on the “Leave a Comment” field at the end of any post (blog) and a subscribe option will appear.
- Put something in the comment field (if you put “test” or “just subscribing” I won’t make your comment public)
- Fill in the sections for your email address and name, and then click on the “notify me of new posts via email.”
- You will get a confirmation email from WordPress confirming you want to subscribe.
- Click on the confirm button in that email and you’re done.
Please note that I do not send out emails. If you have a WordPress account there is a way to subscribe within the WordPress system, but I cannot provide specifics on how it works as I don’t know.