 In this blog I’m going to briefly explain how to create The Jungle artwork. This is fun projects because of the variety of textures it has. Plus, the subject matter is a little different. This will not be an in-depth tutorial because I didn’t feel like it. I do include a few pictures with explanations, and some progress photos to help you with the artwork. Granted, there isn’t near the number that a regular tutorial blog would have. Despite that, I think when combined with the video, you will be able to replicate things.
The main purpose of this blog is to provide the image I used for the artwork. When you look at the reference image, you will notice that the waterfall isn’t there. The waterfall and background foliage is something I added because the artwork looked unbalanced to me.
Let’s get started.
 Click on the image to the left to watch a YouTube video version of the tutorial. Or click on this link: https://youtu.be/5WKj5d9FfXM
 Here’s the image I used for this artwork.
The image is from the book Plants, by Jim Harter.
I like this book because the images are old pen & ink line drawings. This means they images are easier to replicate versus a photograph of the actual object.
I used a number of the images for background filler, and I’ve gone through the book to get ideas for projects.
Here’s an affiliate link to the book on Amazon if you’re interested in getting more information: https://amzn.to/3nry8G3
 I do not have a pattern for this artwork. This image is as close to a pattern as I have for this artwork.
Notice that image does not include the waterfall. The waterfall is something I made up after I finished burning in the plants. I added the waterfall because I felt that there was too much empty space in the lower right side of the artwork.
STEP 1 – PREP THE WOOD
 Wood burning is much easier if you take the time to prepare the wood surface. Always smooth the wood surface by sanding it with at least 220 grit sandpaper.
 Then thoroughly wet the board by misting it with water or running it quickly under the sink faucet.
The board should be damp to the touch, but not soaking wet.
Let the board dry and then sand again.
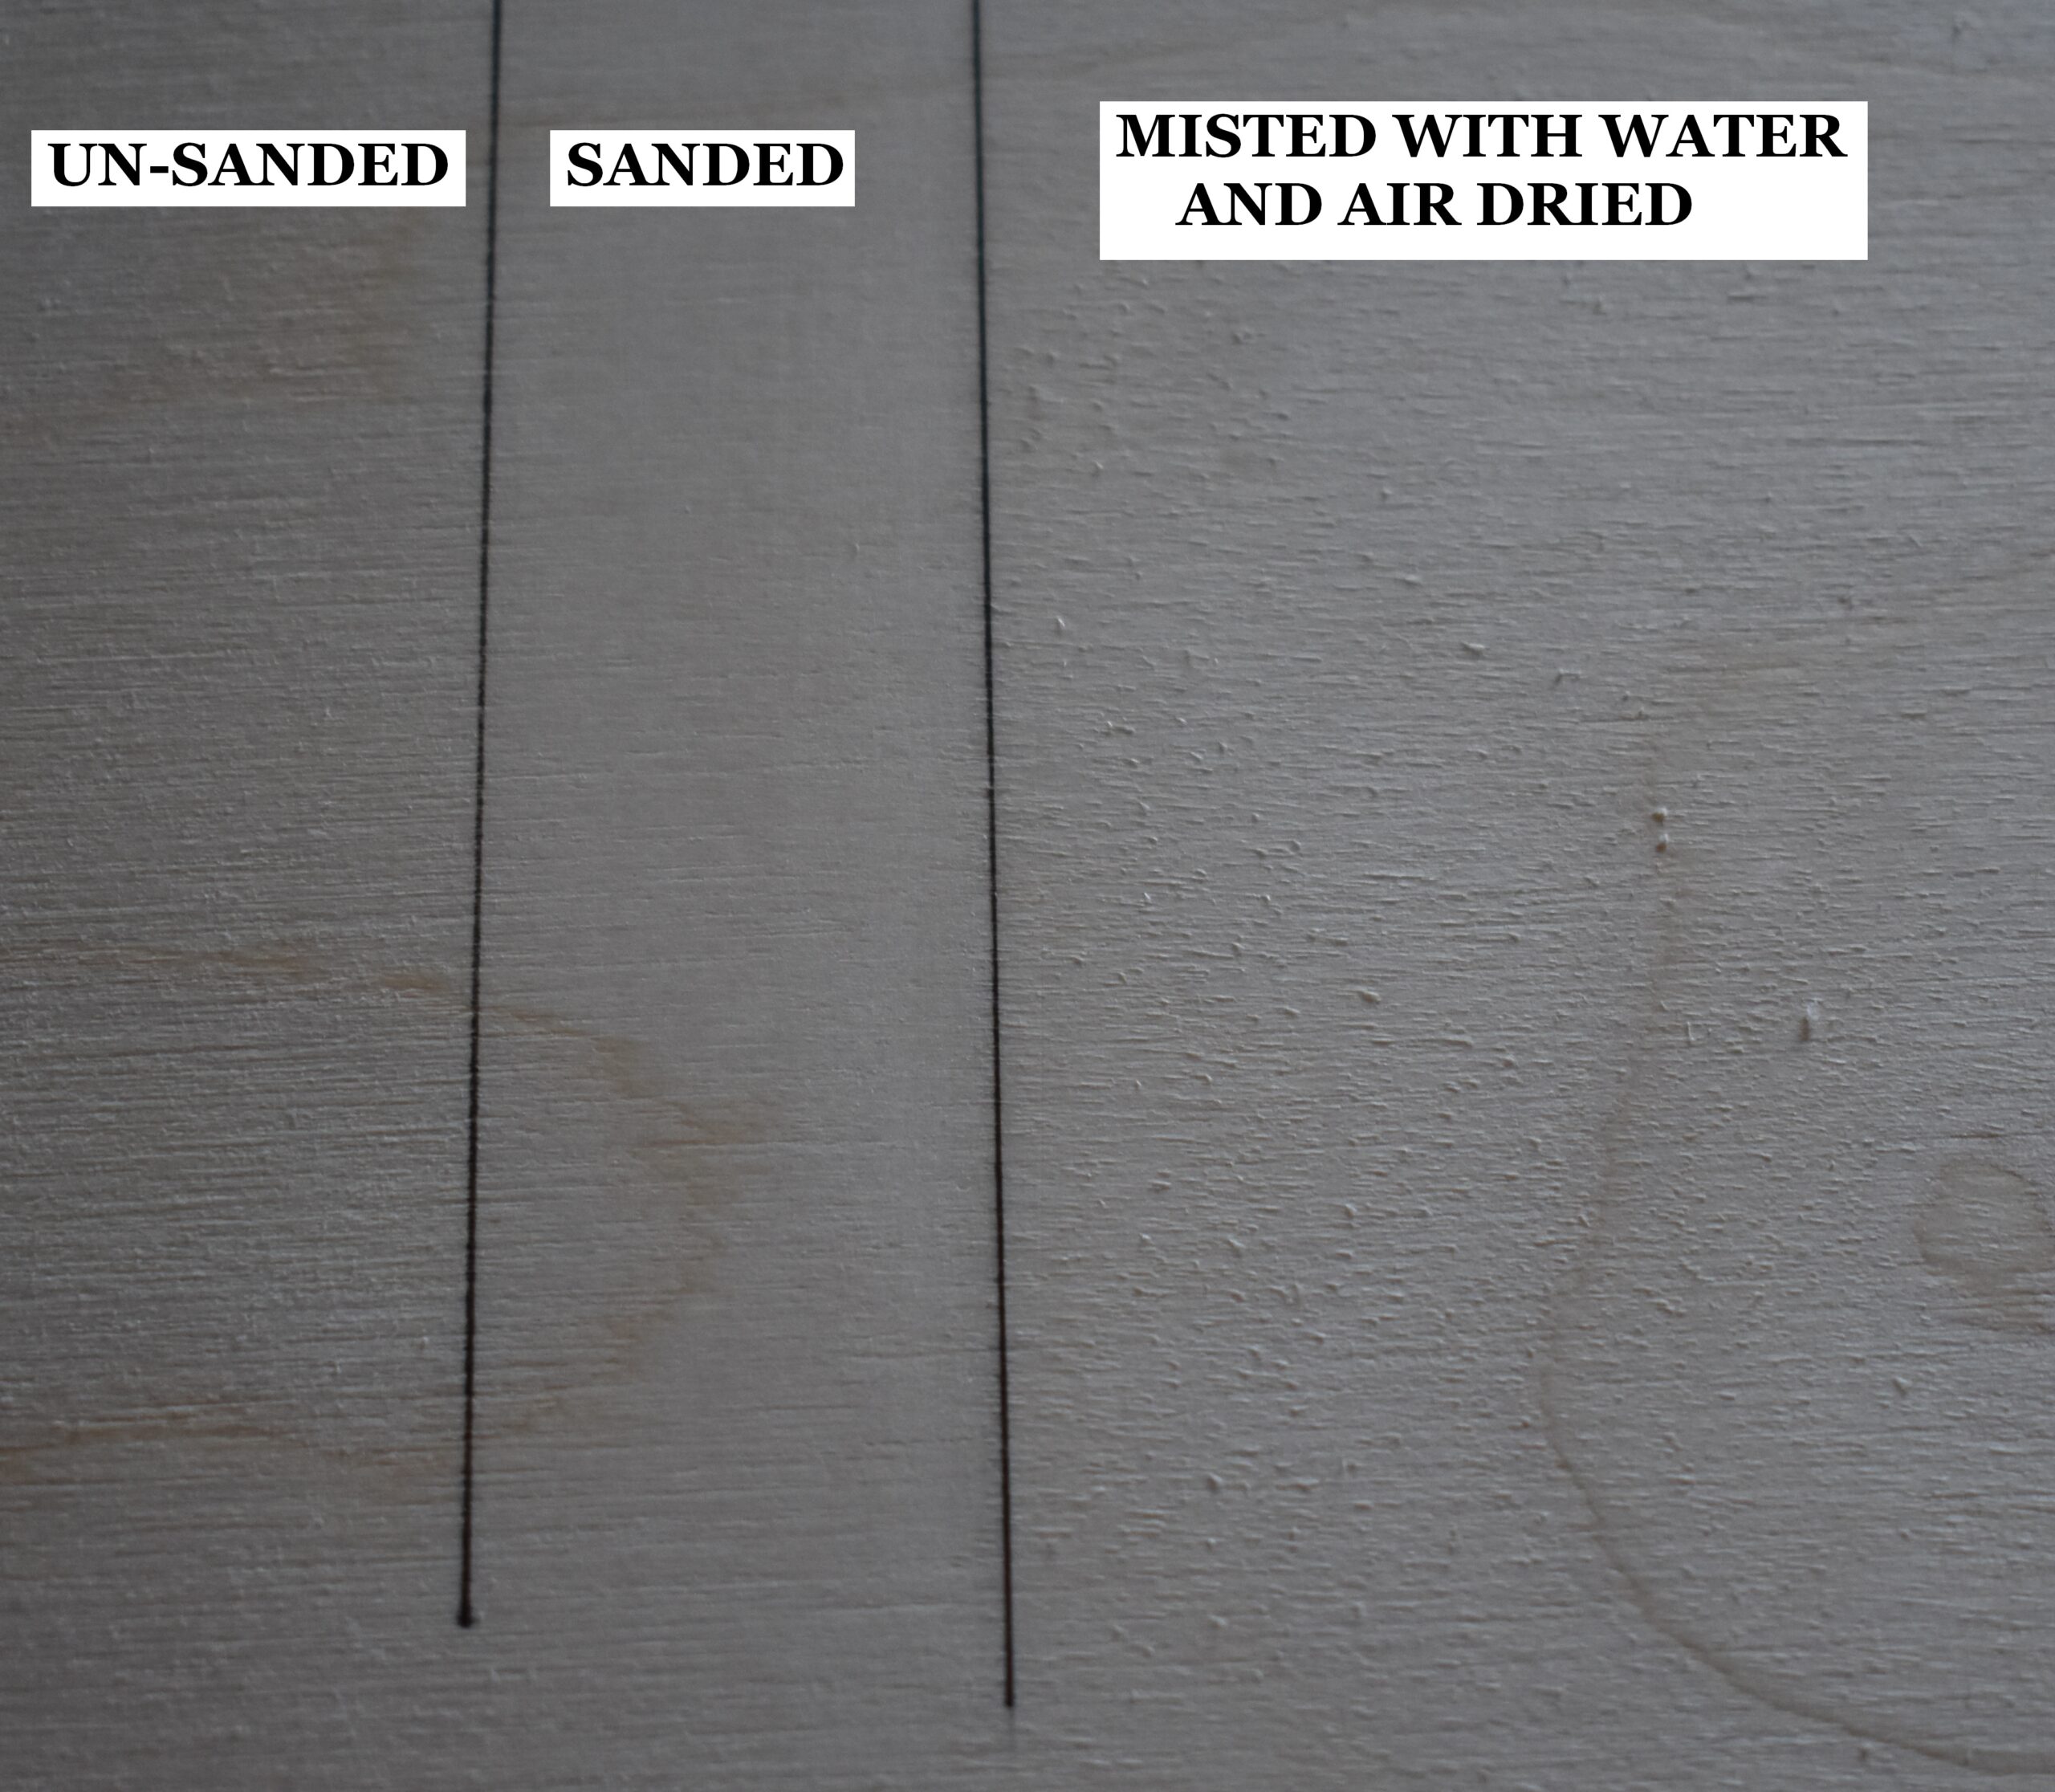 This piece of plywood board is broken up into three sections. The far-left section is how the board looks without any prep work. The board has a rough texture. The middle section of the board shows how it looks after it was sanded, and the surface is a lot smoother. The right section of the board shows it after it was lightly misted with water and allowed to dry. Notice how rough the board looks, but a quick sanding will remove that and leave an ultra-smooth board.
Doing the 4-step process (sand, mist, dry, sand) produces a super smooth surface, and the smoother the surface is the better the burn results will be.
Note that I am burning on leather. Leather doesn’t need to be prepped, unless a firm surface is desired. If so, the leather needs to be wetted out and burnished. Allow it to dry, and you’re ready to go. Burning means that you firmly rub over the leather with a clean object. I have a piece of ultra smooth cherry wood that I use for this, but I’ve also used the edge of a drinking glass.
STEP 2 – OUTLINE
 Trace the image to the board, and then lightly burn over the trace lines with a writer nib.
Regardless if burning on leather or wood, the process is the same. Print out the image, coat the back with graphite, place the printout graphite side down onto the board or leather, and secure. Then trace over the lines.
Afterwards, rub over the area with a pencil eraser to remove excess graphite.
For those of you who are after a free pattern, I didn’t create a pattern for this artwork. This image is as close to a pattern as you are going to get.
STEP 3 – PYROGRAPHY
 I mounted the piece of leather onto a heat safe board. The board was large enough that I could secure my reference material nearby. Plus, I placed a piece of scrap leather nearby to test the pen tip on.
I highly recommend you do something similar. You should always have any reference material and a piece of scrap burning material close by.
The leather was mounted on the board using loops of scotch tape. Nothing fancy or high tech, but it works.
 Use the shader of your choice and start burning in the darker areas on the background foliage.
You can burn these areas as dark as you like. I aimed for a dark brown color.
 For the grasses, hanging vines, and other small dark objects it is easier to use a writer pen tip.
 Here’s how the artwork looks so far.

The large branch was burned in, and then curving lines were drawn over it. This helps darken the branch and give it texture.
With the tree trunk, I burned the upper portion of it fairly dark. Be careful to avoid burning over the roots or vines that are hanging down from the branch.
I’m sure the branch is actually some sort of plant. I didn’t feel like doing research on it, so I’m calling it a branch. If you know what it is, leave a comment and let me know.
 I used a writer to create the plant clinging to the tree trunk. I think it was suppose to be a fern, but I ended up creating a leafy plant.
 If you would prefer a fern texture instead I have a video explaining how to create sword ferns. No pattern is needed, and there isn’t a corresponding blog. Click on the video thumbnail or this link to watch: https://youtu.be/ZNshIA0dc9A
 I’m used a large ball pen tip to draw or burn curving lines onto the branches. Currently I’m burning a very dark shadow under the branch.
Why did I switch to a ball pen tip? Several reasons. One) I’m burning on leather, and tips that are really smooth tend to glide over the surface better. Ball pen tips tend to be very smooth.
Two) Sometimes I like to try out different pen tips. I have a lot of them (well over 60), but tend to use 5 on a regular basis. Since the purpose of this project was to try out some new leather I had bought, I wasn’t worried about things being perfect. For me, this is the perfect type of project where I feel comfortable trying different tips and experimenting with burn techniques.
In addition to burning curving lines on the branch, I also used the tip to burn a very loose or open circular motion over the hanging vine and roots near the branch.
 What I mean by loose or open circular motion is that you can see little openings on the loops of the circular motion. Basically, it’s nothing more than drawing a chain of small circles. Sometimes the circles overlap, but you can still see little gaps or openings between the loops.
I do have a shorts video on YouTube that shows the difference between closed and open circular motion. Here’s a link to the video: https://youtube.com/shorts/V2FcLbrG2Ps
 Here’s another progress photo.
 Towards the middle of the tree trunk, I started adding line lines along its surface to give it shape and texture.
The lines are burned in a semi-vertical direction to give the tree trunk shape, color, and texture.
 With the large leaves, I begin by burning a series of lines on the leaves. The lines vary in length, thickness, and color. On the areas where I want creases or veins, I use the side of the shader to burn thin darker lines. The rest of the time I’m using the flat of the shader.
 After the assorted lines were burned in, then I went over the leaf using a shader. I darkened and widened some of the lines. I added subtle shadows and highlights.
I highly recommend starting with the side leaves before working on the large leaves facing the front. The front facing leaves are the focal point, so you want those to look as good as possible. Starting with the side leaves allows you to perfect the technique on leaves that aren’t as noticeable. It’s what I did, and it worked for me. Hopefully this will work for you too.
 Truth be told, I added a lot more texture on the leaves than the reference image.
My basic approach was to darken an area between two lines. Then leave a gap, and darken the area between the next two lines. This created a series of depressions and ridges that ultimately give the leaf a ruffled appearance.
After the leaves were blocked in, then I re-burned over them to emphasize the depression areas. Darkening the depressions on the leaf really helps the pale ridges stand out more. The combination of pale ridges and darker depressions makes an almost ruffled appearance on the leaves.
I personally like the look of it. If you don’t, then decrease the contrast between the depressions and ridges. That will make the leaf look flatter. It’s completely up to you how you handle it.
 Now the jungle portion from the book is done.
If you were to compare this with the drawing from the book, you will see that my artwork is not an exact replica. I think that is a good thing. When you create artwork, I think you should allow your creative side to show through.
 While I like the image, it is really lopsided to me. It just screams that something is needed to the right of the large tree trunk. I pondered this for a day or two, and then decided to add a distance waterfall.
I burned a line along the top and sides of where I wanted the waterfall to be.
You can use a pencil to draw in where you want your waterfall to be. Do what feels comfortable to you!
 Then I used circular motion to create little blobs of color that vaguely resemble distant shrubbery.
My use of circular motion in this instance is closed circular motion. This means the loops or chains of circles do not have little gaps. I re-burn over small areas to create tonal variety. The result is little sections of roundish shapes of differing tonal values.

For the lake, I burned a series of short lines that radiate outwards from the waterfall spray.
I created puffy little clouds or cotton balls at the base of the waterfall to replicate the spray.
Since the waterfall is very pale in color, it is important for the foliage and lake water around it to be dark enough to help the waterfall stand out.
I re-burned around the lake area a couple of times slowly build up the color.
I also darkened the water just above the puffy spray. This was done to help the spray stand out. To darken the water, start each burn stroke on the spray and pulled the pen tip up towards the top of the waterfall. Make sure to vary where each burn stroke stops because you don’t want a horizontal line forming on the waterfall.
Again, you can use a pencil to draw the tops of the fluffy rounded spray shapes. This makes it easier to visualize the area and know where to start your burn strokes. Just make sure to erase the pencil marks once the area is burned in.
IN CONCLUSION
That is it for this blog. Despite this being tutorial not being as in depth as most of my blogs, I hope that you found the information helpful. I do think that between the YouTube video and this blog, you shouldn’t have much if any difficulty with the artwork. I know I enjoyed it because it was a bit different from the usual animal themed artwork I do. Plus, I really enjoyed created the assorted textures the image has.
Thank you for reading.
Until the next blog,
Brenda
Feb 13, 2024
Want to subscribe?
- Click on the “Leave a Comment” field at the end of any post (blog) and a subscribe option will appear.
- Put something in the comment field (if you put “test” or “just subscribing” I won’t make your comment public)
- Fill in the sections for your email address and name, and then click on the “notify me of new posts via email.”
- You will get a confirmation email from WordPress confirming you want to subscribe.
- Click on the confirm button in that email and you’re done.
Please note that I do not send out emails. If you have a WordPress account there is a way to subscribe within the WordPress system, but I cannot provide specifics on how it works as I don’t know.
Brenda you are the most AMAZING ARTIST!!!! Each piece you make leaves me speechless. This is just incredible, Thank you for sharing your beautiful art with the rest of the world.
Hi Margaret,
that is very sweet of you to say. Thank you very much