
In this tutorial I’m going to discuss how to create my Christmas Candy Canes pyrography art. I really like the textures and tonal contrasts in this postcard. I also like the recurring theme of light striking and reflecting on the canes, bows, and holly leaves giving them a three dimensional look. So my goal with this tutorial is to show you how to render the reflected light to capture the look I created. Without further ado, let’s get to work.
 Click on the image to the left to view the tutorial video. Or click on this link: https://youtu.be/auGYrzoXbqg
MATERIALS NEEDED:
- Writing tip
- Shading tip
- 4 x 6 (10.2 x 15.2 cm) piece of craft plywood
- Attached Pattern (enlarge or shrink as needed) Christmas Candy Canes pattern
- White Charcoal pencil
I use general’s brand of white charcoal. Here’s an Amazon affiliate link to the product: https://amzn.to/3a3GFfq
STEP 1 – SAND THE WOOD
 Wood burning is much easier if you take the time to prepare the wood surface. Always smooth the wood surface by sanding it with at least 220 grit sandpaper.
 Then thoroughly wet the board by misting it with water or running it quickly under the sink faucet.
 The board should be damp to the touch, but not soaking wet.
Let the board dry. Once the board is dry, you will notice that the rough appears and feels rough. That’s because the grain swelled and is now sticking up from the rest of the board. To remove this, just sand again with 220 grit sandpaper.
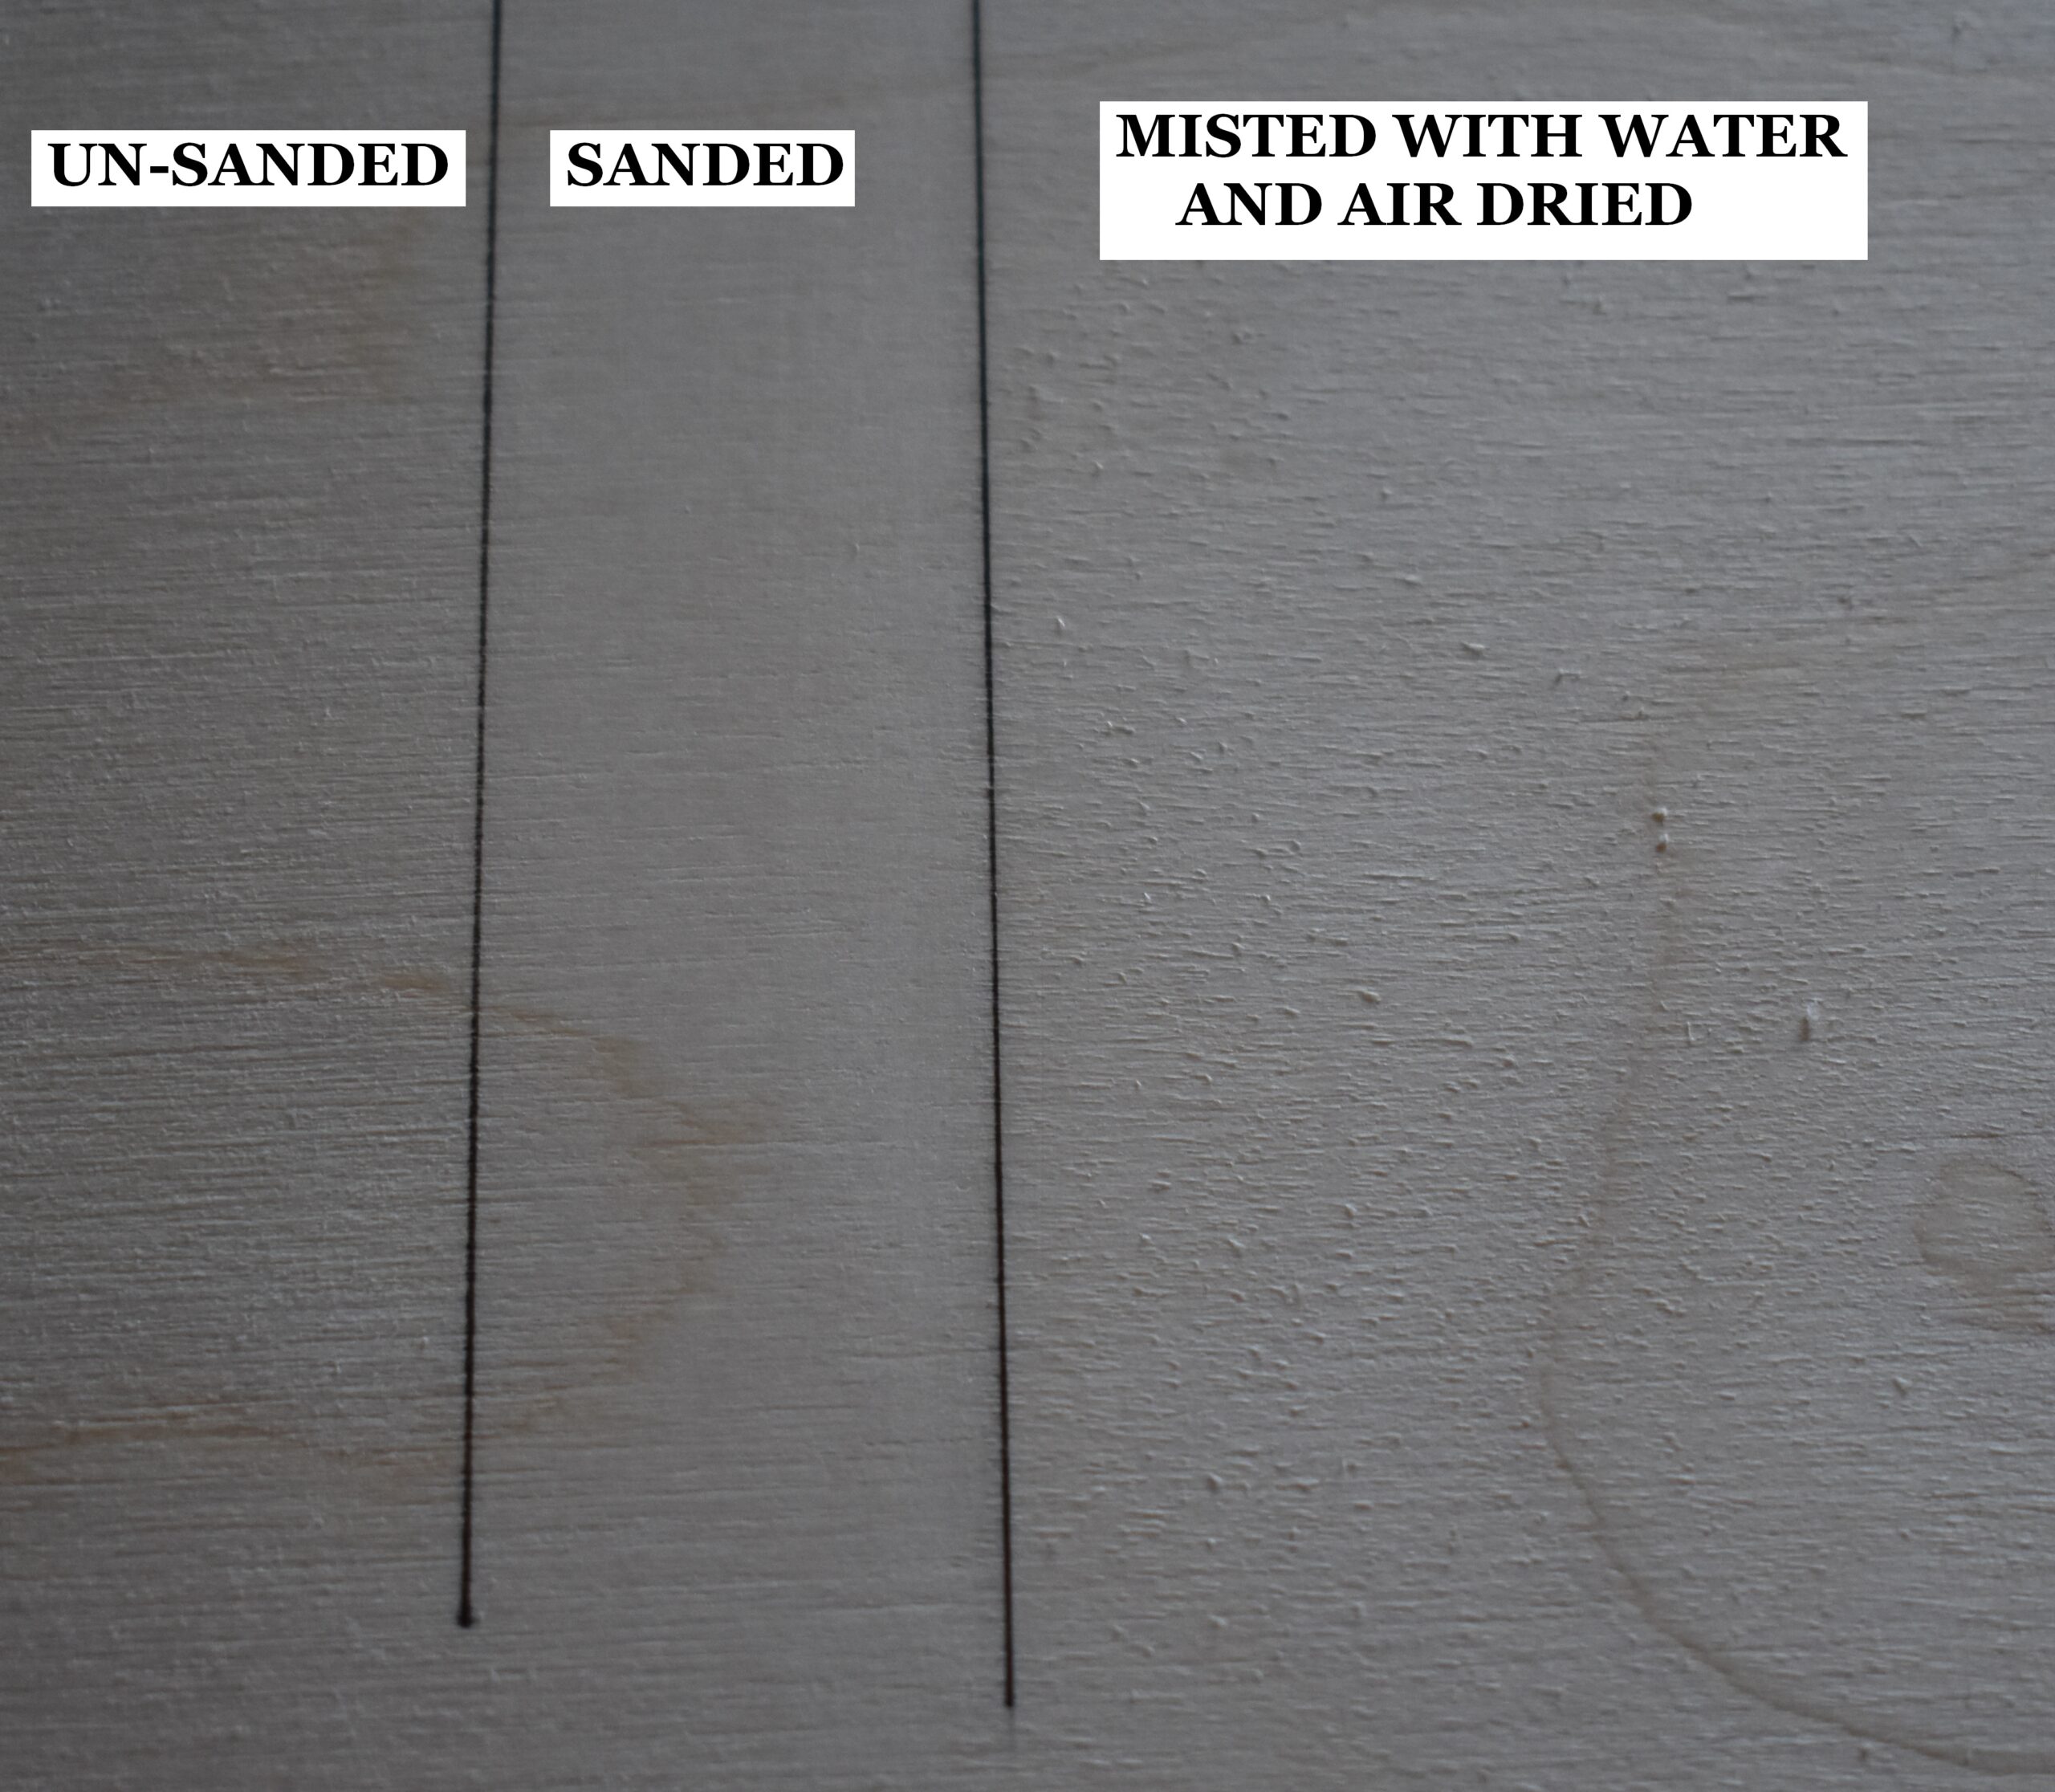 This piece of plywood board is broken up into three sections. The far-left section is how the board looks without any prep work. The board has a rough texture. The middle section of the board shows how it looks after it was sanded, and the surface is a lot smoother. The right section of the board shows it after it was lightly misted with water and allowed to dry. Notice how rough the board looks, but a quick sanding will remove that and leave an ultra-smooth board.
Doing the 4-step process (sand, mist, dry, sand) produces a super smooth surface, and the smoother the surface is the better the burn results will be. There are other benefits to the 4-step process.
- Humidity changes won’t impact the board. This means that the grain (or nap) won’t swell.
- You can safely add liquids without worrying about the nap raising (grain swelling). Liquids include things like watercolors and water-based wood finishes that are brushed on.
STEP 2 – TRANSFER PATTERN TO WOOD
 I use the tracing method to transfer all my patterns to my projects. It’s cheap, easy, and gives me control on what I want to include. Print off your pattern on light weight paper (standard copier paper is perfect), coat the back of the pattern with a graphite pencil (I use one in the B ranges), place pattern on wood, tape in place, trace over pattern with a sharp pencil, remove pattern, and you’re ready to burn.
You might need to cut the pattern down in size so you can see where to place it on the wood.
Check for missing lines before you remove the pattern.
STEP 3 – BURN THE OUTLINE

With the writing pen tip on medium low, lightly burn in the trace lines. After you have burned in the trace lines, rub over the surface with a pencil eraser to remove any residual graphite. It is easy to get into the habit of burning your outline or trace lines darkly, but if you want to create realistic art don’t get into that habit. The goal is to burn lines dark enough to see, but not so dark that you end up with something that looks a coloring book.

Using a micro writer to burn in the trace lines. A standard writing pen tip will work.

I do want to quickly point out that I put tiny little squiggles in the “red” stripes on the candy canes to identify them. This helped ensure I burn the red stripes and didn’t accidentally burn a white segment.
STEP 4 – THE CANDY CANES

The first thing we will do is render the candy canes. One of my favorite things about the candy canes, besides their patterns, is the bright ‘reflected light’ that runs along the surface of the candy cane. It really helps add to their 3D appearance.

Use white charcoal to draw the ‘reflect light’ line along the candy cane. It is very important you use white charcoal and not a white colored pencil. Colored pencils have wax in them that will melt when you touch them with the hot pen tip. White charcoal won’t melt and, as an added bonus, it will resist the heat of the pen helping to keep the wood underneath as pale as possible.
When you draw your reflected light line, keep in mind that when you work your way around the candy cane to keep the line on the same side of the cane.

Let’s look at the right candy cane to see what I’m talking about. Starting at the bottom of the hook, I have the reflection line near the right side of the candy cane. When I hit the arch of the candy cane, the line moved to closer to the center of the cane, but once I was on the straight stretch, the line was back by the right edge of the candy cane. This is the same for the left candy cane.
OPTIMAL PEN TIP PLACEMENT – –

NOTICE the placement of the pen tip in this photo; I call this Optimal Pen Tip Placement.
The end of the pen tip is on the inside edge of the candy cane. Positioning the pen tip this way ensures that I am only burning on the candy cane and not on the holly leaf or anything else behind the candy cane.
Optimal pen tip position ensures that you are burning where you INTEND to burn and that your borders are crisp/clean.
Turning the wood, when needed, is important to ensure optimal pen tip placement. You can angle your hand in weird positions to accomplish this, but if you’re burning for any duration of time it’s much easier to just turn the wood.

Edge the candy canes with a thick line that is light to medium tan color. This accomplishes two things: 1) defines the outer edges of the candy canes, and 2) starts the foundations of the 3d effect.
 If you need to, go over the line a couple of times to build up the thickness and color. I tend to keep the heat on my burner a bit lower and make multiple passes with the pen tip to slowly build up color and/or line thickness.
 Make sure to rotate the board as needed to keep the nib in optimal position.
Now we’re going to burn the red stripes on the candy canes. The red stripes need to be pretty dark, but don’t make them super dark.
The goal is a medium brown color. It’s best to adjust the heat it little increments as you learn what works best for each pen tip. They are all a little different.
While burning in the red stripes I had two basic strokes I used; parallel lines and pull-away strokes.
Parallel Lines:
First you can use short straight lines that run parallel with the outside edge (or length) of the cane to slowly fill in the area. To do this start at the top edge of one red stripe segment, slowly pull the pen down to the bottom edge of the segment, move the pen over slightly and repeat until the segment is filled. Make sure to avoid coloring over the white charcoal area.
 Starting a parallel line. I also call them uniform strokes.

The parallel line is uniform in color throughout the burn. It is essentially a wide band of uniform color.
Here are some tips that will help produce better results:
1) Make sure you use a light hand pressure
2) Keep your hand pressure constant
3) Keep your hand speed constant
4) Burn so you are pulling the nib down towards yourself
 Hand pressure has a huge impact on your burn results. I have a video tutorial that covers this subject in great detail. Plus, there is a test you can do to check your own hand pressure. To watch click on the video thumbnail or click on this link: https://youtu.be/q8OGqS5kyHg
Pull Away Strokes:
Place the pen tip on the outside edge of the candy cane in a red stripe segment. Pull the pen tip towards the white charcoal line and lift up before reaching the charcoal line. Move the pen tip over and repeat until the segment is filled.
 Starting a pull away stroke. The stroke starts on the edge of the candy cane.
 Then pull the stroke away from the edge of the candy candy and burn it towards the center of the candy cane. Stop the stroke before reaching the white charcoal line.
 Starting a second pull away stroke. Pull away strokes start darker than they end.
Finishing the second pull-away stroke.
All of the tips, except tip 3, for uniform strokes apply to pull away strokes.
You will have to experiment to find which technique works best for you. I find that I use a combination of them.
 Generally, I use a parallel stroke to fill in along the edges to keep them crisp and clean and then switch to a pull-away for the rest of the segment.

I like to burn all of one side of a candy cane before working on the opposite side. This is not a requirement. Instead it’s just a preference.
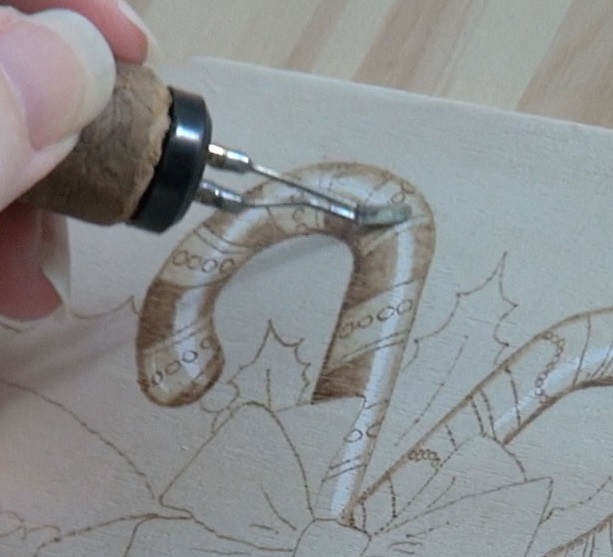
Again, make sure to rotate the board as needed while burning. 
After you’re done burning the red stripes on the first candy cane, then burn in the strips on the other one.
 Here’s how my candy canes look so far.
Next we are going to LIGHTLY burn in the white stripe segments. You can use the exact same process as was done for the red stripes, but turn the heat down a bit to make sure the white segments don’t get too dark. You don’t have to worry about overlapping into the red stripe area as it won’t be noticed (assuming your pen heat is low).
 The reason for this step is that we are adding just the barest touch of color to help give the canes their 3D appearance. Also it will help the “reflect light” areas stand out a little more.
 I used the same techniques that I used with the red stripes. The only difference is that I reduced the heat setting on my burner so I was getting a medium tan color.

Erase the white charcoal from the candy canes. Notice how there is still a very pronounced ‘reflected light’ line where the charcoal was.
 With the charcoal erased, we’re ready for the last step of adding the decorative dots. I used the writing tip for this step.
First I burned over the circles. I kept the circles that were on or very close to the light reflection line a bit paler. The circles that were near the edge of the candy cane I burned slightly darker.
Also, I darkened up the line found above the red stripes on the left candy cane.
 On the right candy cane, I placed a row of tiny dots just above and below each red stripe.
 For the curving ‘S’ line in the middle of the white stripe, I darkened it up a little by drawing tiny circles as I followed along the contour of the line.
STEP 5 – CREATE THE BOW

Like the candy canes, I used the two basic pen strokes techniques. Again I mostly used the parallel lines (aka Uniform Strokes) to define the edges of the bow and the pull-away strokes to fill in.
 We’ll start with the left bow tail. First define the dark line along the bend in the tail.

Next fill in the underside of the tail. I used pull-away strokes until it was at the desired darkness. Note that the picture shows the underside of both streamers burned in. You can do that also or wait to do the right side later.

Now work on the top section of the tail that touches the bow. Again I’m using pull-away strokes for the majority of this. Start the stroke on the seam edge where the tail touches a bow and pull it outwards towards the end of the ribbon tail

Once I have the strokes done for one edge of the tail, I rotate the board so I can easily work along the other edge while keeping the pen tip in optimal position.

Here I’m just finishing up with the top section.

Next I worked on the rest of the bow’s left tail. I first started by using pull-away strokes along the dark area where it’s coming out of the sharp curve.
 Then I just worked my way around the tail slowly filling.
Below are a couple of progress photos as I finish the tail.


The bow loops are very easy to do. First make the crease lines really dark and thick.

Then fill in the bow using pull-away strokes from the center origin towards the outer edge of the bow.

Lastly do some very short pull-away strokes along the outer edge of the bow towards the center origin. This will result in a lighter area near the edge of the bow to give it a curved look.

In this photo I’ve defined the dark creases (though I ended up going over them to darken them some more) and now I’m working on filling in the bow.
 Almost done with the short pull-away strokes
 Another bow loop and again the same process. Creases are darkened up and the bow is being filled in.
 Here the short pull-away strokes are being done.
 One more thing we need to do is add the cast shadows from the bow onto the candy cane. Go along the bottom edge of the bow and draw a very dark line onto the candy cane. Where the candy canes overlap, fill in a small area very darkly on the furthest back cane so it looks like the top candy cane is putting it in shadows. This is the spot marked by the red arrow.
Below is how the postcard looks up to this point.

 The center of the bow loop was done just like everything else. Dark creases at bottom darkened up and pull-away strokes were done at both ends.
The right side of the bow was done the same as the left except this time I did all of one step first and then moved onto the next step. First I did all of the dark creases and then moved onto the short pull-away strokes. I’m not going to show any pictures, because it doesn’t look any different from the other side.
 Here is how the postcard looks with the canes and bow completed.
STEP 6 – BURN THE HOLLY LEAVES
Taking care of the holly leaves is the last thing we need to do. They were a bit of an experiment. Especially the first couple, but then I found a look I liked so re-burned the first couple of leaves to give them the desired look. So I’m going to detail the process on 2 leaves and that should give you enough pictures to replicate the process on all of the leaves.
EXAMPLE 1 – –

Burn the center vein

Burn a very dark line along the outline of the leaf

Burn the side veins. Note that I did not extend the side veins all the way to the center vein.

Do pull away strokes from the center vein towards the outer edge of the leaf.

Start the strokes on the center vein and pull them towards the outer edge of the leaf.

Do pull away strokes from the outer edge towards the center vein. Start the stroke on the outer edge of the leaf and pull it towards the center vein. This will leave them a highlight or lighter area between the center vein and outer leaf edge
Below are a few progress photos of the above example leaf being finished up.

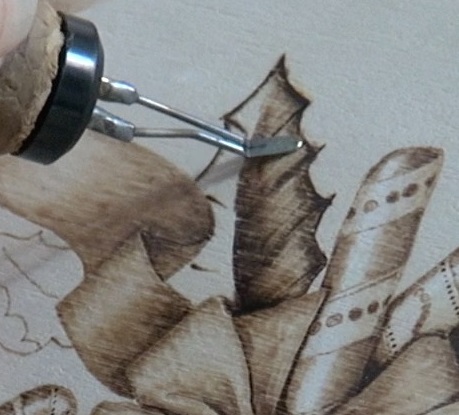


EXAMPLE 2
 Burn darkly the along the edge of the leaf.

Darkly burn in the side veins.
 Then burn pull-away strokes along both edges of the left.

Also burn pull-away strokes along the center of the leaf; starting each stroke on the center vein and pull it towards the outer edge of the leaf.
 Continued work.

Finishing up.
STEP 7 – WRITE YOUR NOTE
 Flip the postcard over, draw a couple of lines, and write your message.

I used Colwood’s Rounded Heel pen tip to burn in the thin lines I drew with a straight edge on the back of the postcard.
STEP 8 – OPTIONAL ENHANCEMENTS
I believe in giving you the instructions on how I create my artwork, but I strongly encourage you feel free to let your creative side out. With that in mind, I’m going to mention some ideas that you can use, or not, to customize your postcard.
- Add glitter. Christmas is always better with some sparkle. Carefully paint a thin coat of glue (like Elmer’s) over the candy canes and add some glitter. You can add a light dusting of glitter over the entire surface or just a beading of glitter around the edges of the postcard.
- Use colored pencils to give the postcard some color. Color the red in the candy canes, the holly leaves, the bow, etc. Little things to make the art pop. Just don’t burn over the colored pencil as the heat will melt it and cause it to spread.
- Drill a couple of tiny holes at the top (one each end) and hang your postcard like an ornament.
- Make a keepsake by putting the year on the front of the postcard.
- Create a garland my making several postcards and stringing them together.
IN CONCLUSION
That’s it. We’re all done with the Christmas Candy Canes. I really liked how this postcard turned out and I hope yours turns out just as well or even better. I plan to continue creating more Christmas postcards, but won’t post them until closer to next Christmas. If there is something you’d like to see just let me know as I always welcome suggestions and ideas.
Having said that please note that I welcome feedback as well since that’s the only way I will discover how I’m doing and what improvements I can/should make.
Now to answer a couple of questions I get asked frequently. This artwork was burned on a piece of die-cut plywood I bought from a local craft store. The piece of plywood measures 4 x 6 inches (10.2 x 15.2 cm) and it took me 4 hours to complete the artwork. That said this is not a race or contest. I only put how long a project takes me as I get asked that question a lot. You may get this done faster or slower, but that doesn’t matter. What’s important is you’re learning to create pyrography artwork, and hopefully having fun while doing so.
Until the next blog,
Brenda
12/24/2016
Want to subscribe?
- Click on the “Leave a Comment” field at the end of any post (blog) and a subscribe option will appear.
- Put something in the comment field (if you put “test” or “just subscribing” I won’t make your comment public)
- Fill in the sections for your email address and name, and then click on the “notify me of new posts via email.”
- You will get a confirmation email from WordPress confirming you want to subscribe.
- Click on the confirm button in that email and you’re done.
Please note that I do not send out emails. If you have a WordPress account there is a way to subscribe within the WordPress system, but I cannot provide specifics on how it works as I don’t know.
I love this!
Hi Ken,
I’m glad you like this artwork. Of the Christmas post cards it is my favorite so far. Granted I’ve only done two, but it does remind me that I should get another ready for “Christmas in July” as that is very popular in the northwest.
Brenda