 No one wakes up one day and discovers they are a master pyrography artist. Instead, it takes experience; lots of experience. Pyrography can be very challenging artform to learn, but I have five tips that I think will help you master this beautiful artform. I will share those tips and explain why I think they are important. Hopefully the tips will help you avoid some common problems that beginners experience.
 I do have a video version of this blog available on YouTube. The video will demonstrate concepts much better than I can verbally explain, so I highly recommend watching the video.
To watch, either click on the video thumbnail, or click on this link: https://youtu.be/87aKFEpIZNM
Tip 1 – Use quality solid wood boards
Almost every new pyrography artist uses cheap low-quality boards because they don’t want to ruin a board. I know that this was the case for me. Keep in mind that a quality solid wood boards can be recycled, and I will explain how near the end of this blog.
The problem with low quality board is that they can make it harder to get good burn results. Unfortunately, beginners lack experience to know what problems are due to the board versus insufficient pyrography skills. I personally think that it is so much easier to learn pyrography using a good quality solid wood board.
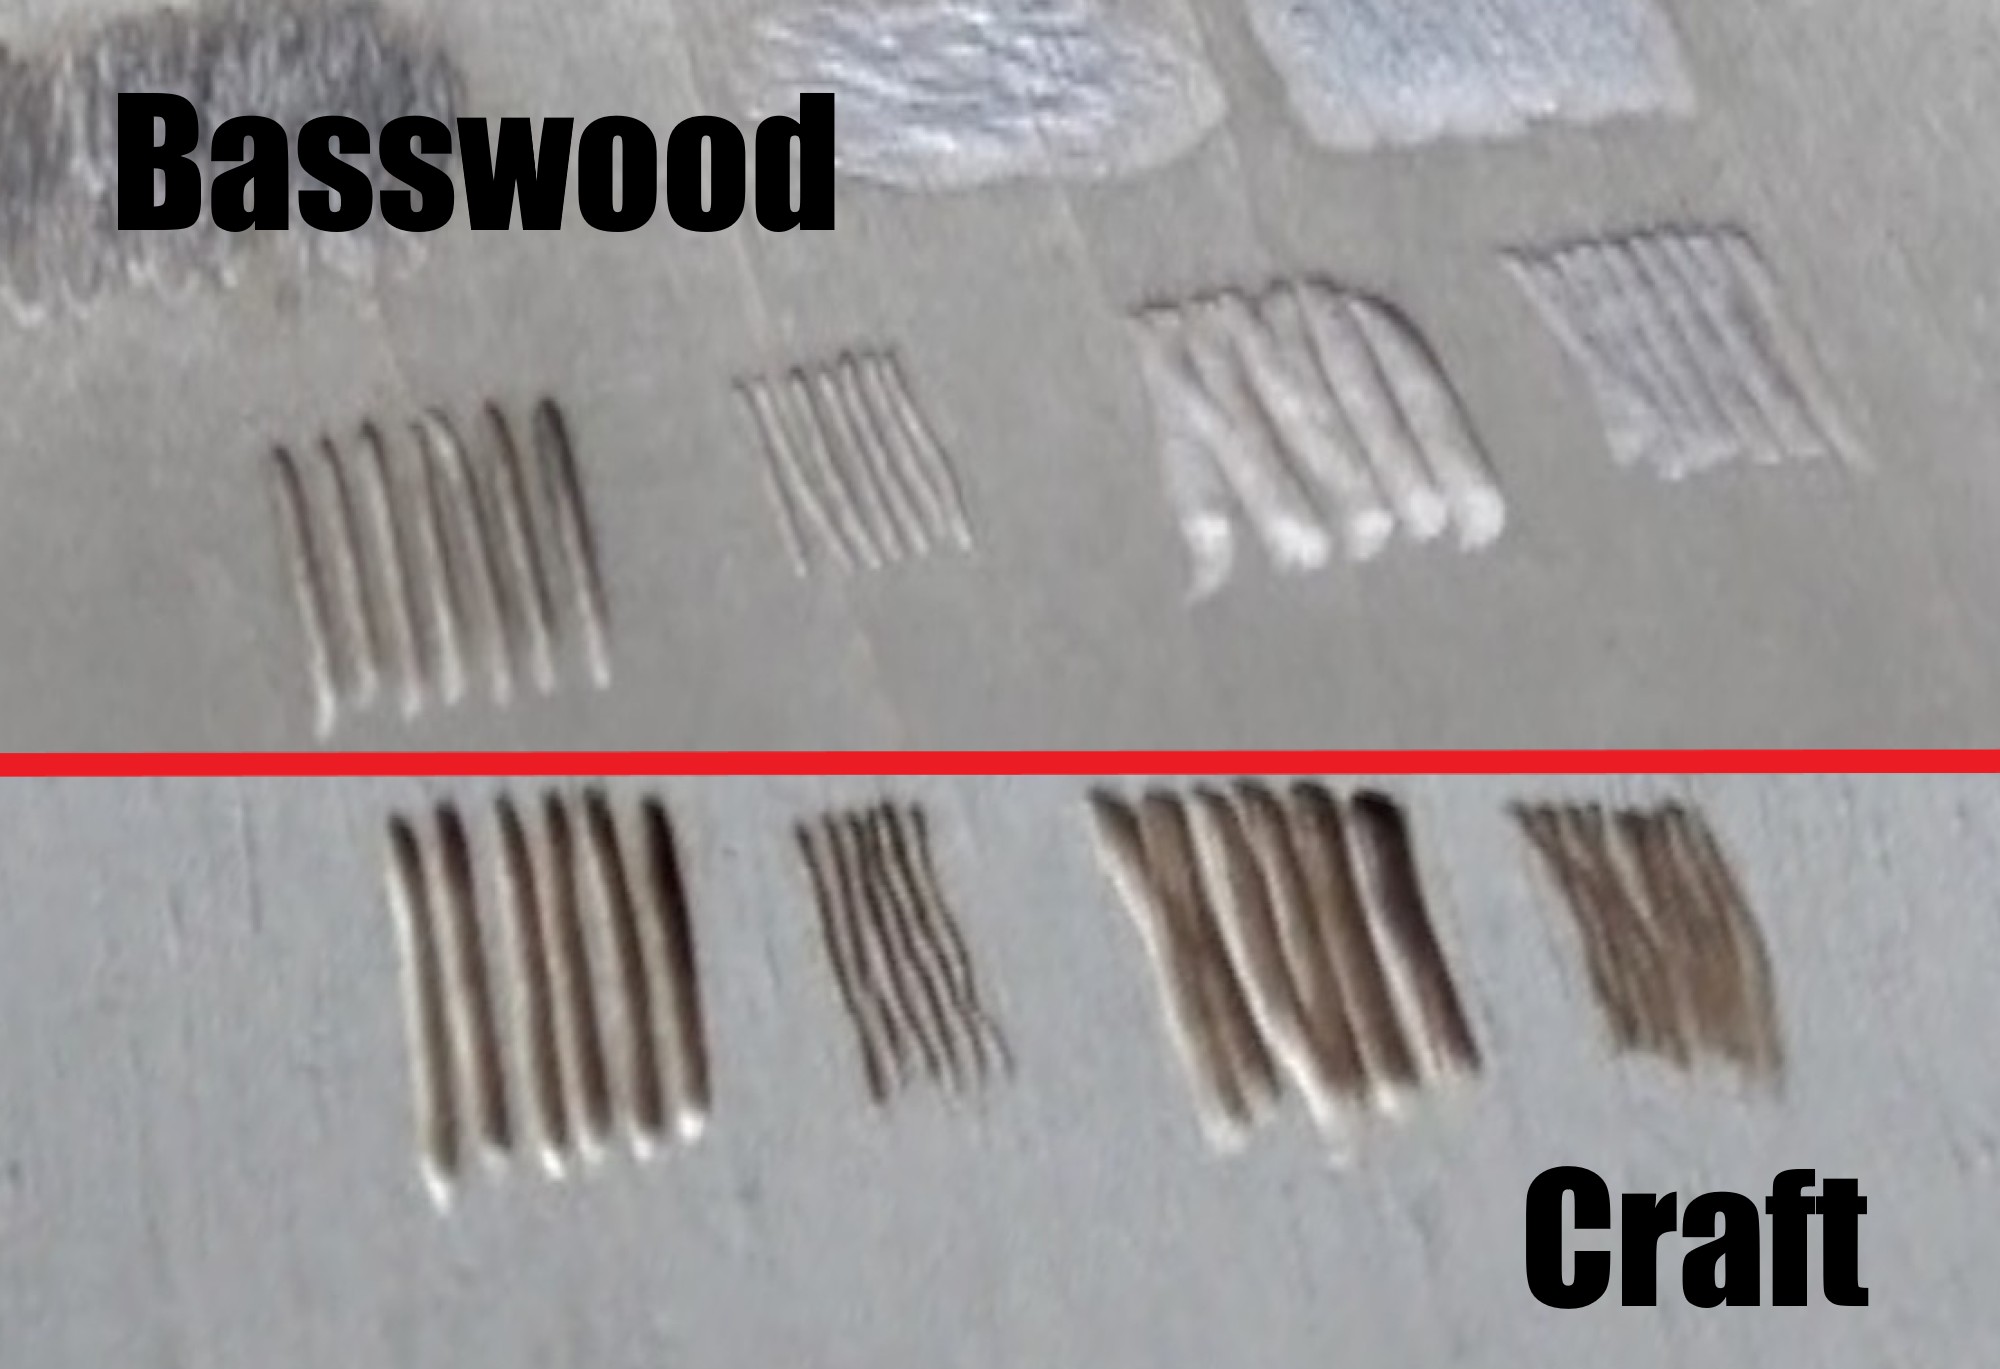
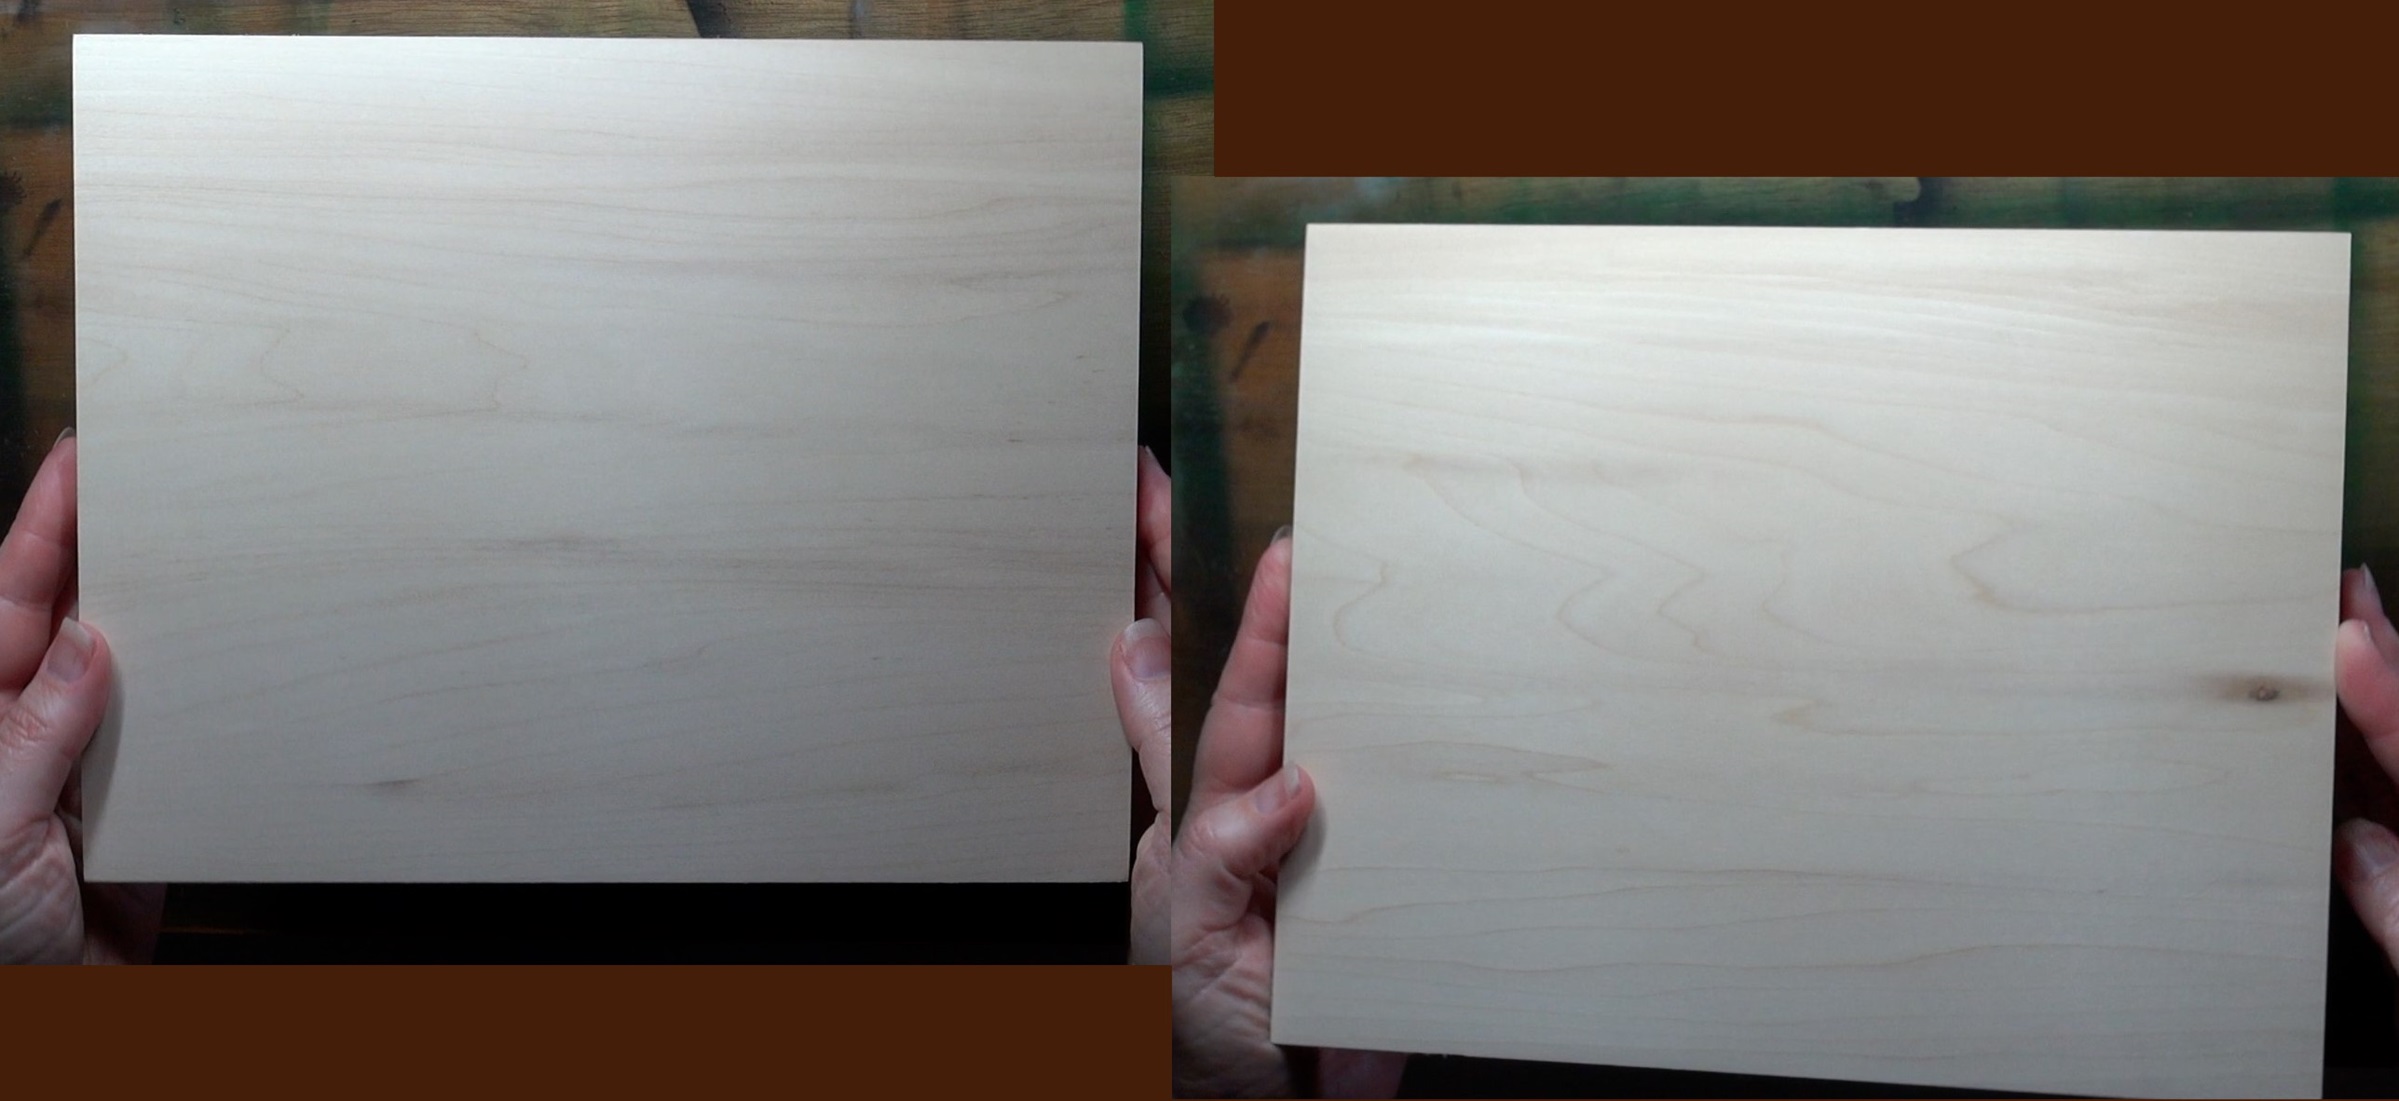
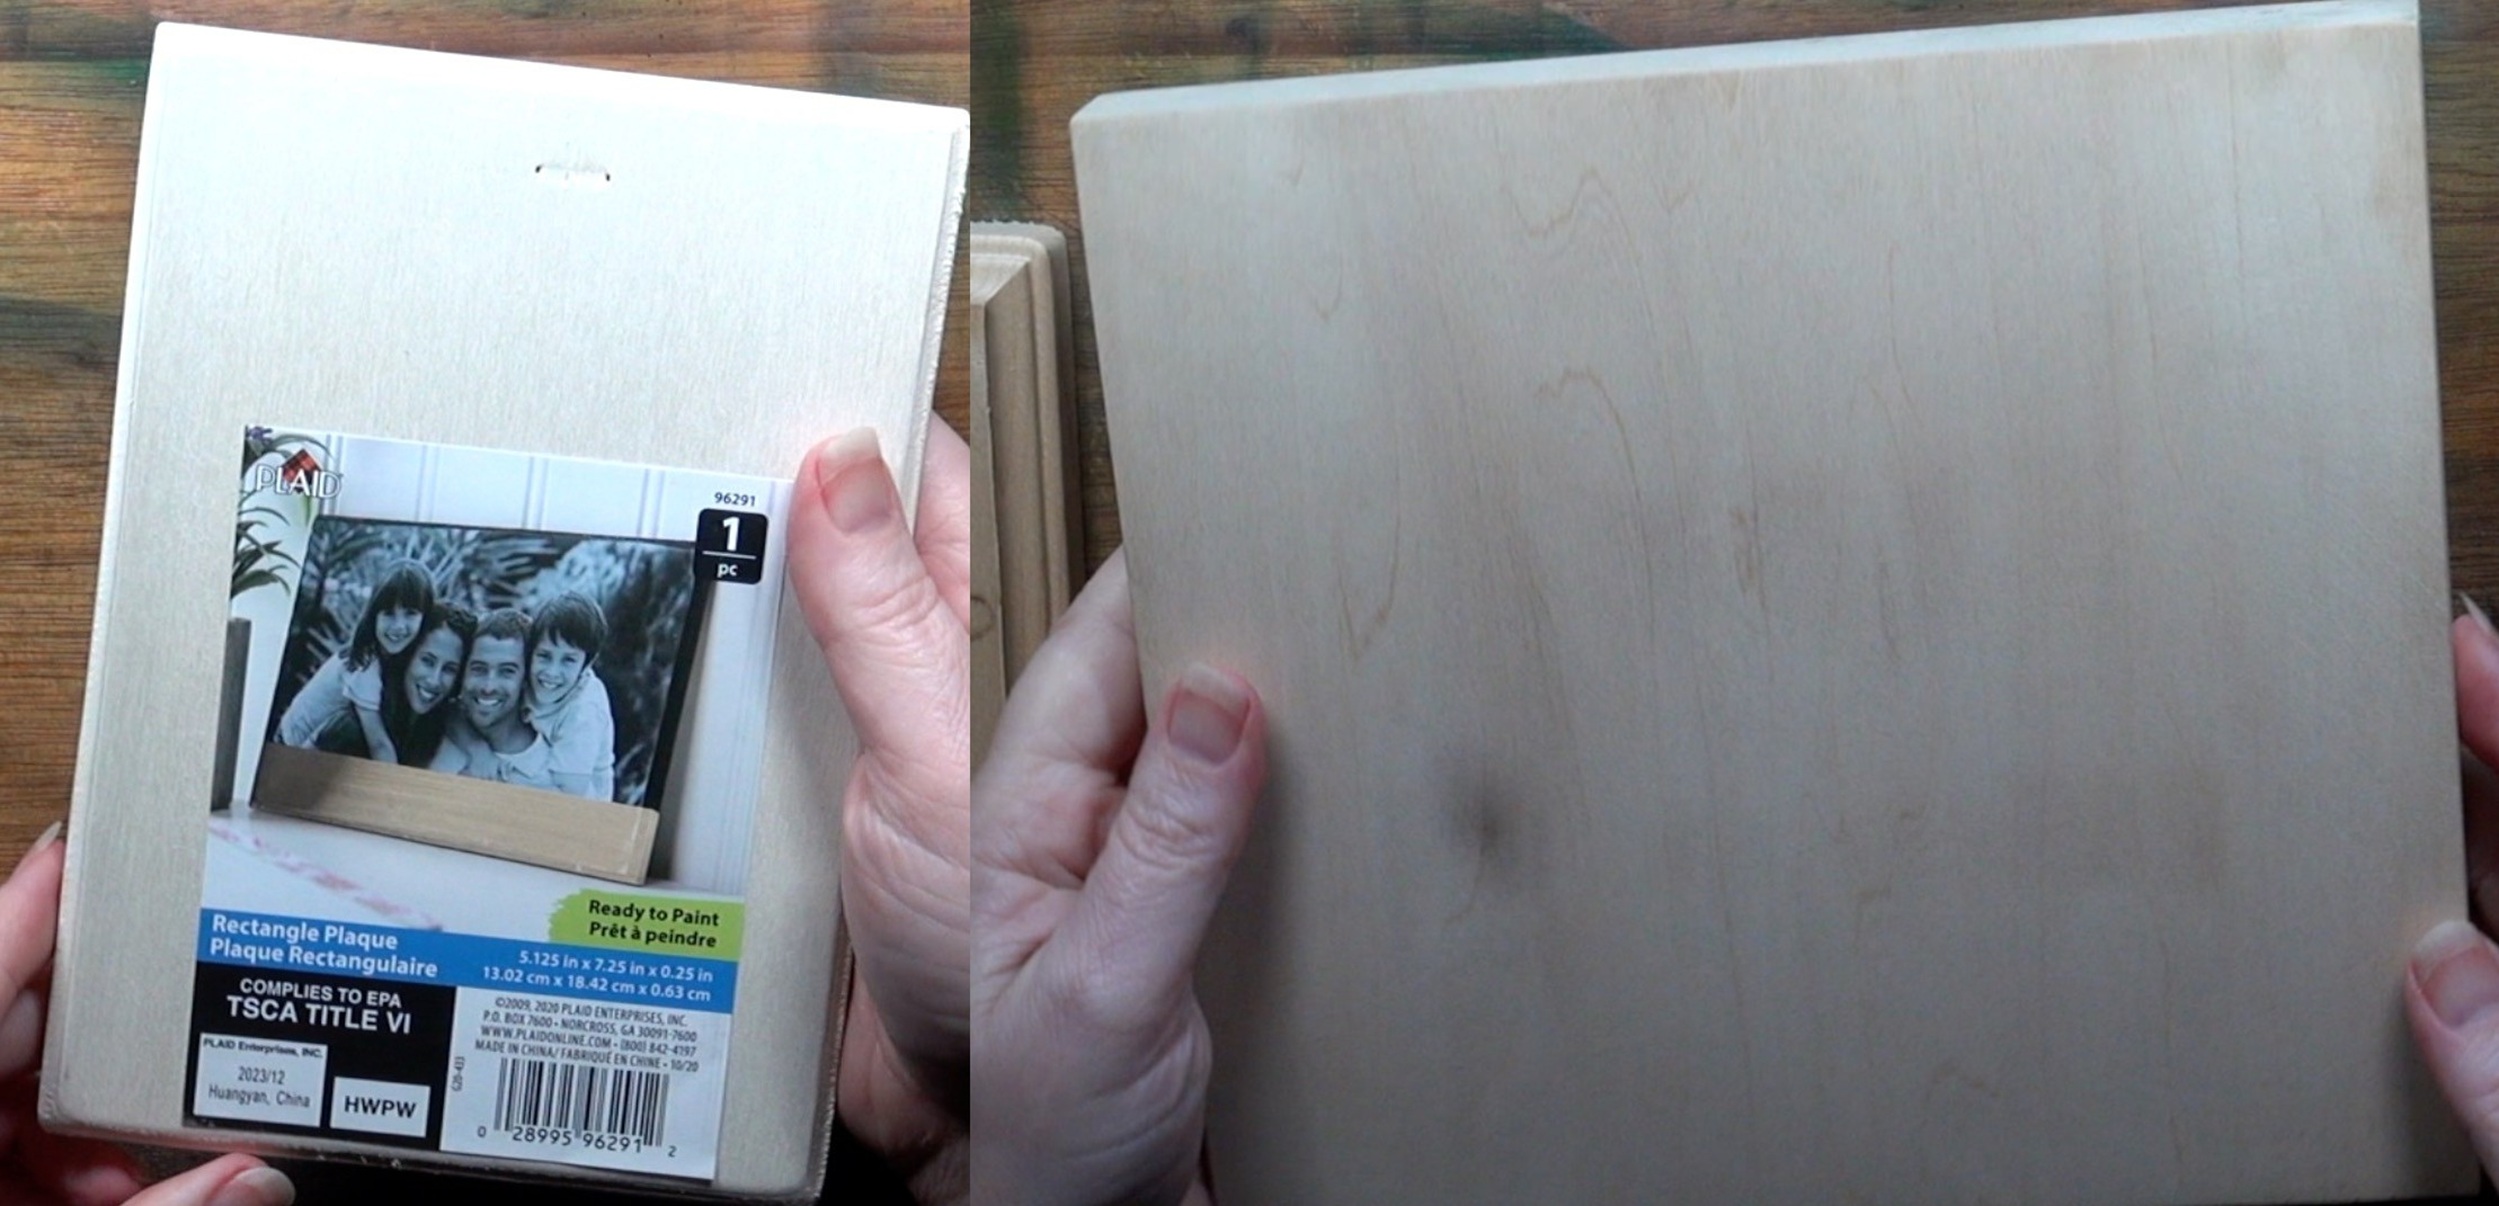 For my first demonstration will be comparing a craft board against basswood board. In the composite photo, the board on the left side is a craft board I bought at a craft store. I have no idea what type of wood the craft board is made out of. The label doesn’t say.
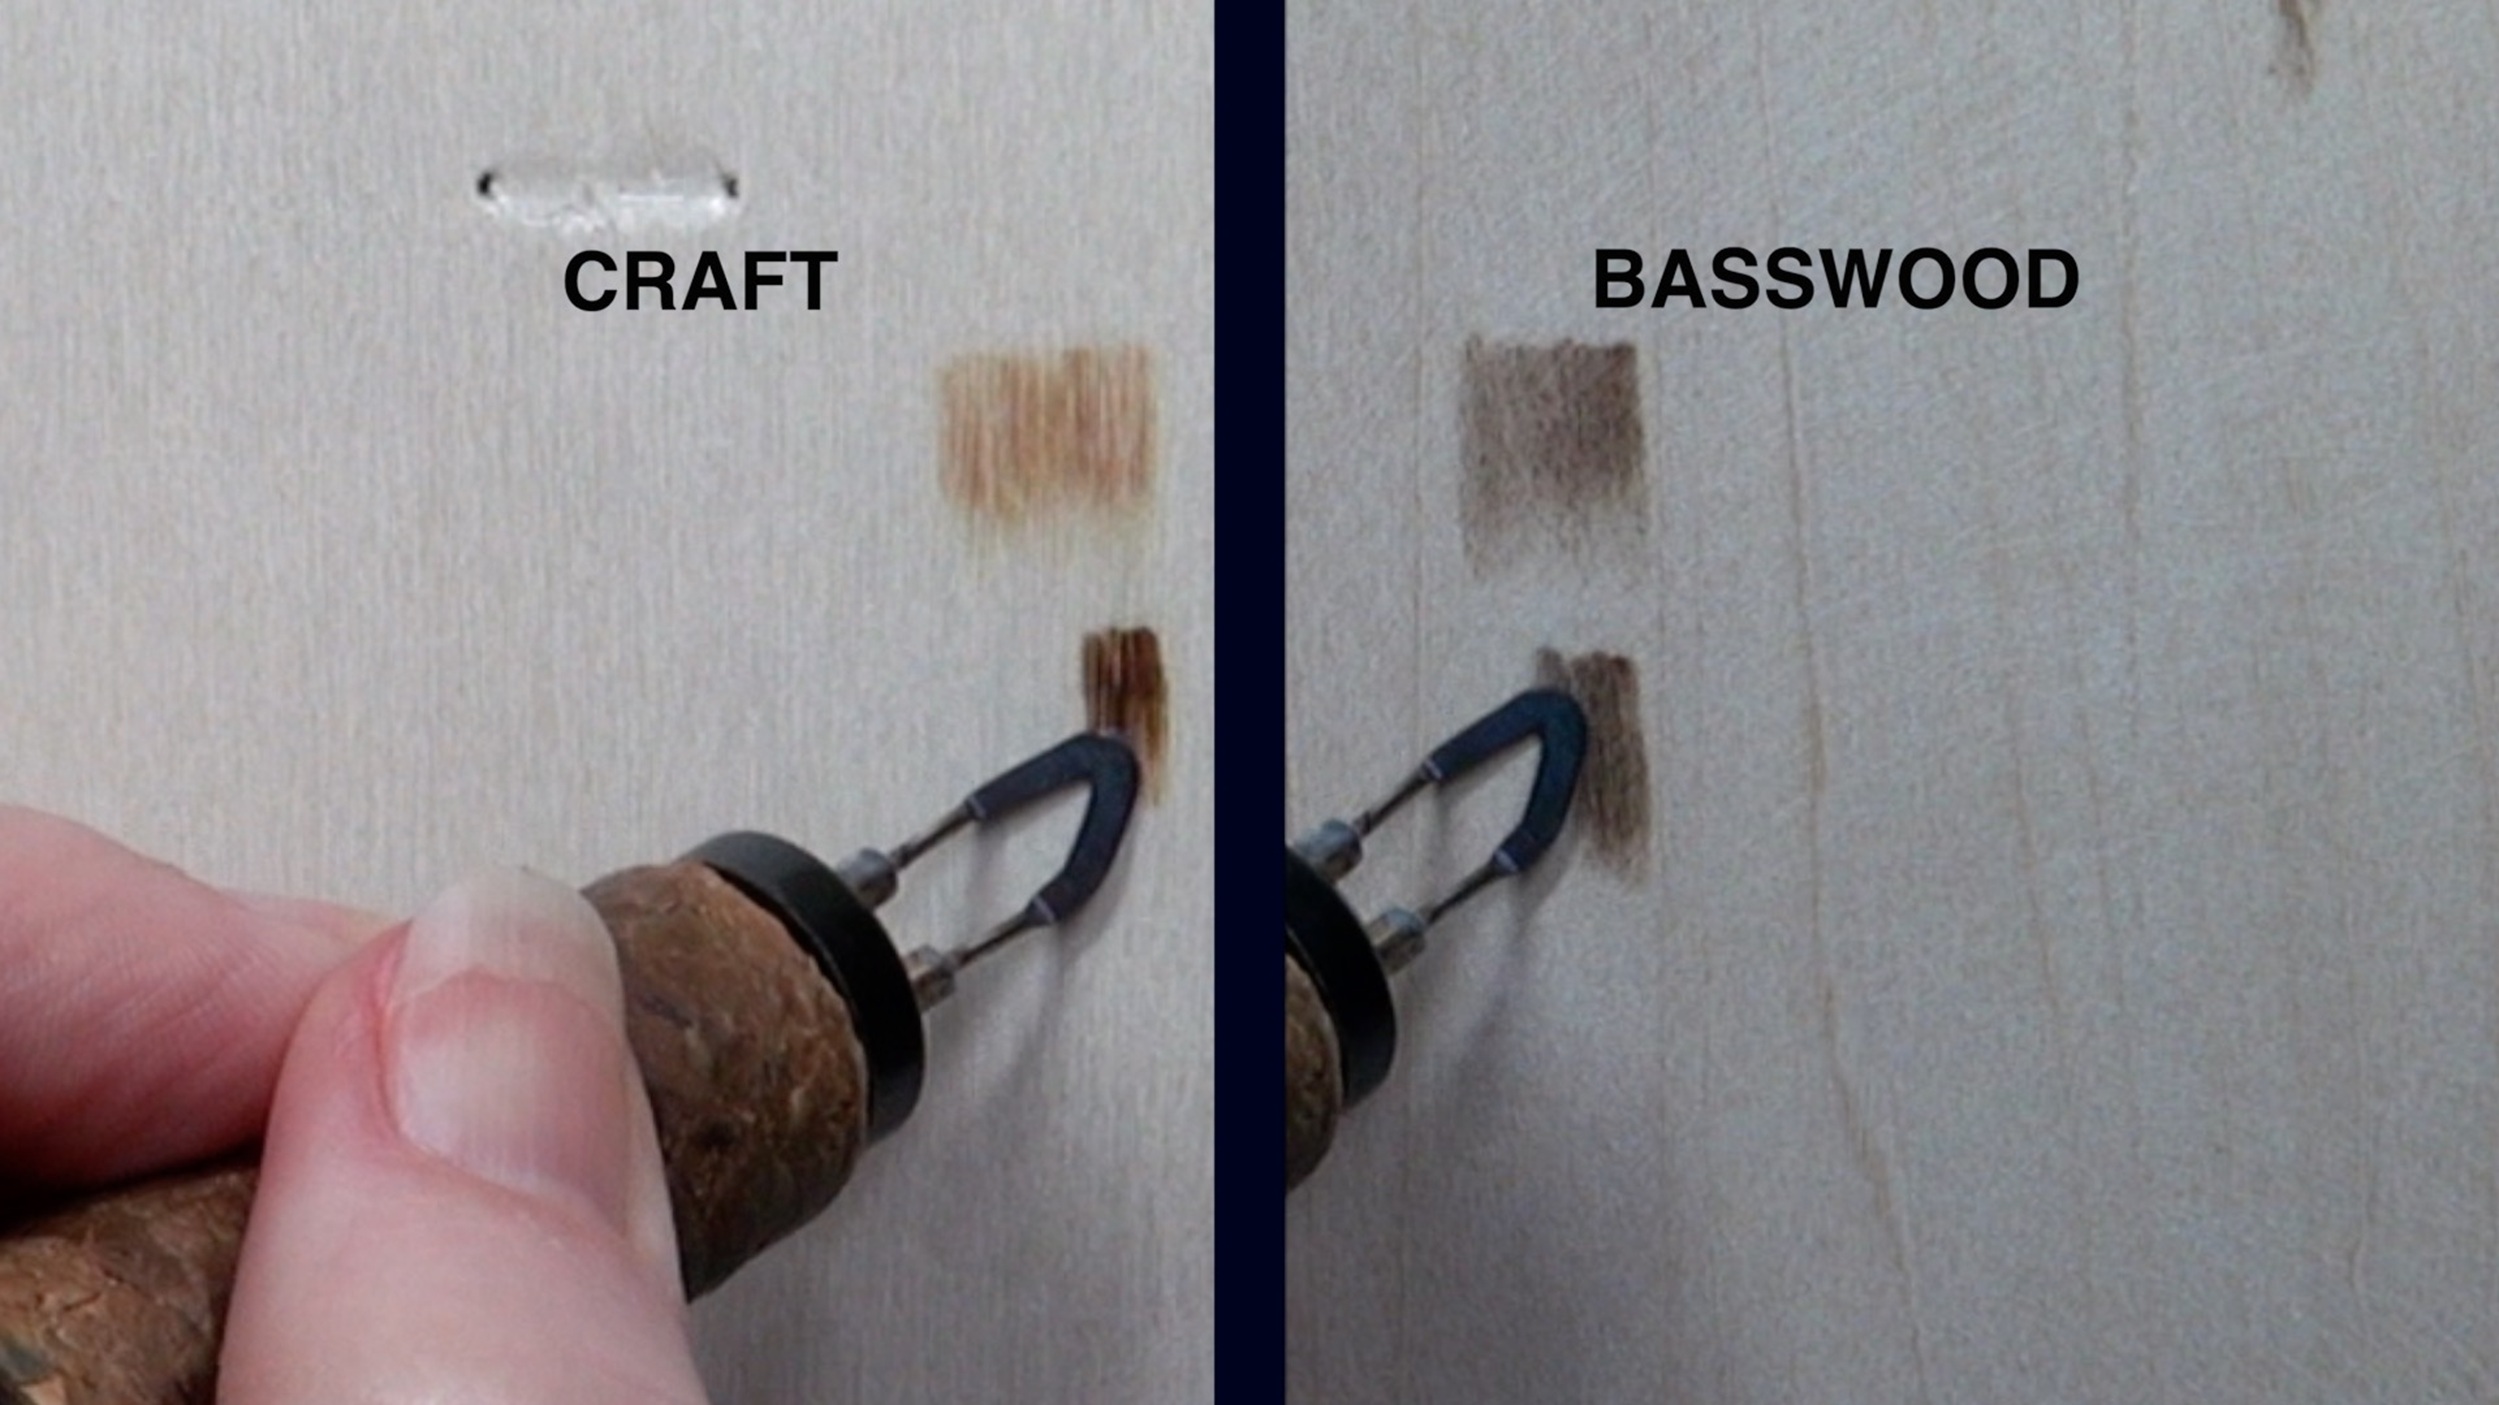 In this split screen shot, the craft board is on the left and the basswood board is on the right. I’m in the process of burning uniform strokes on both boards. With each burn patch I increase the heat setting on my burner.
The burns on the basswood board are much smoother looking than those on the craft board. The craft board has pale vertical lines running through it.
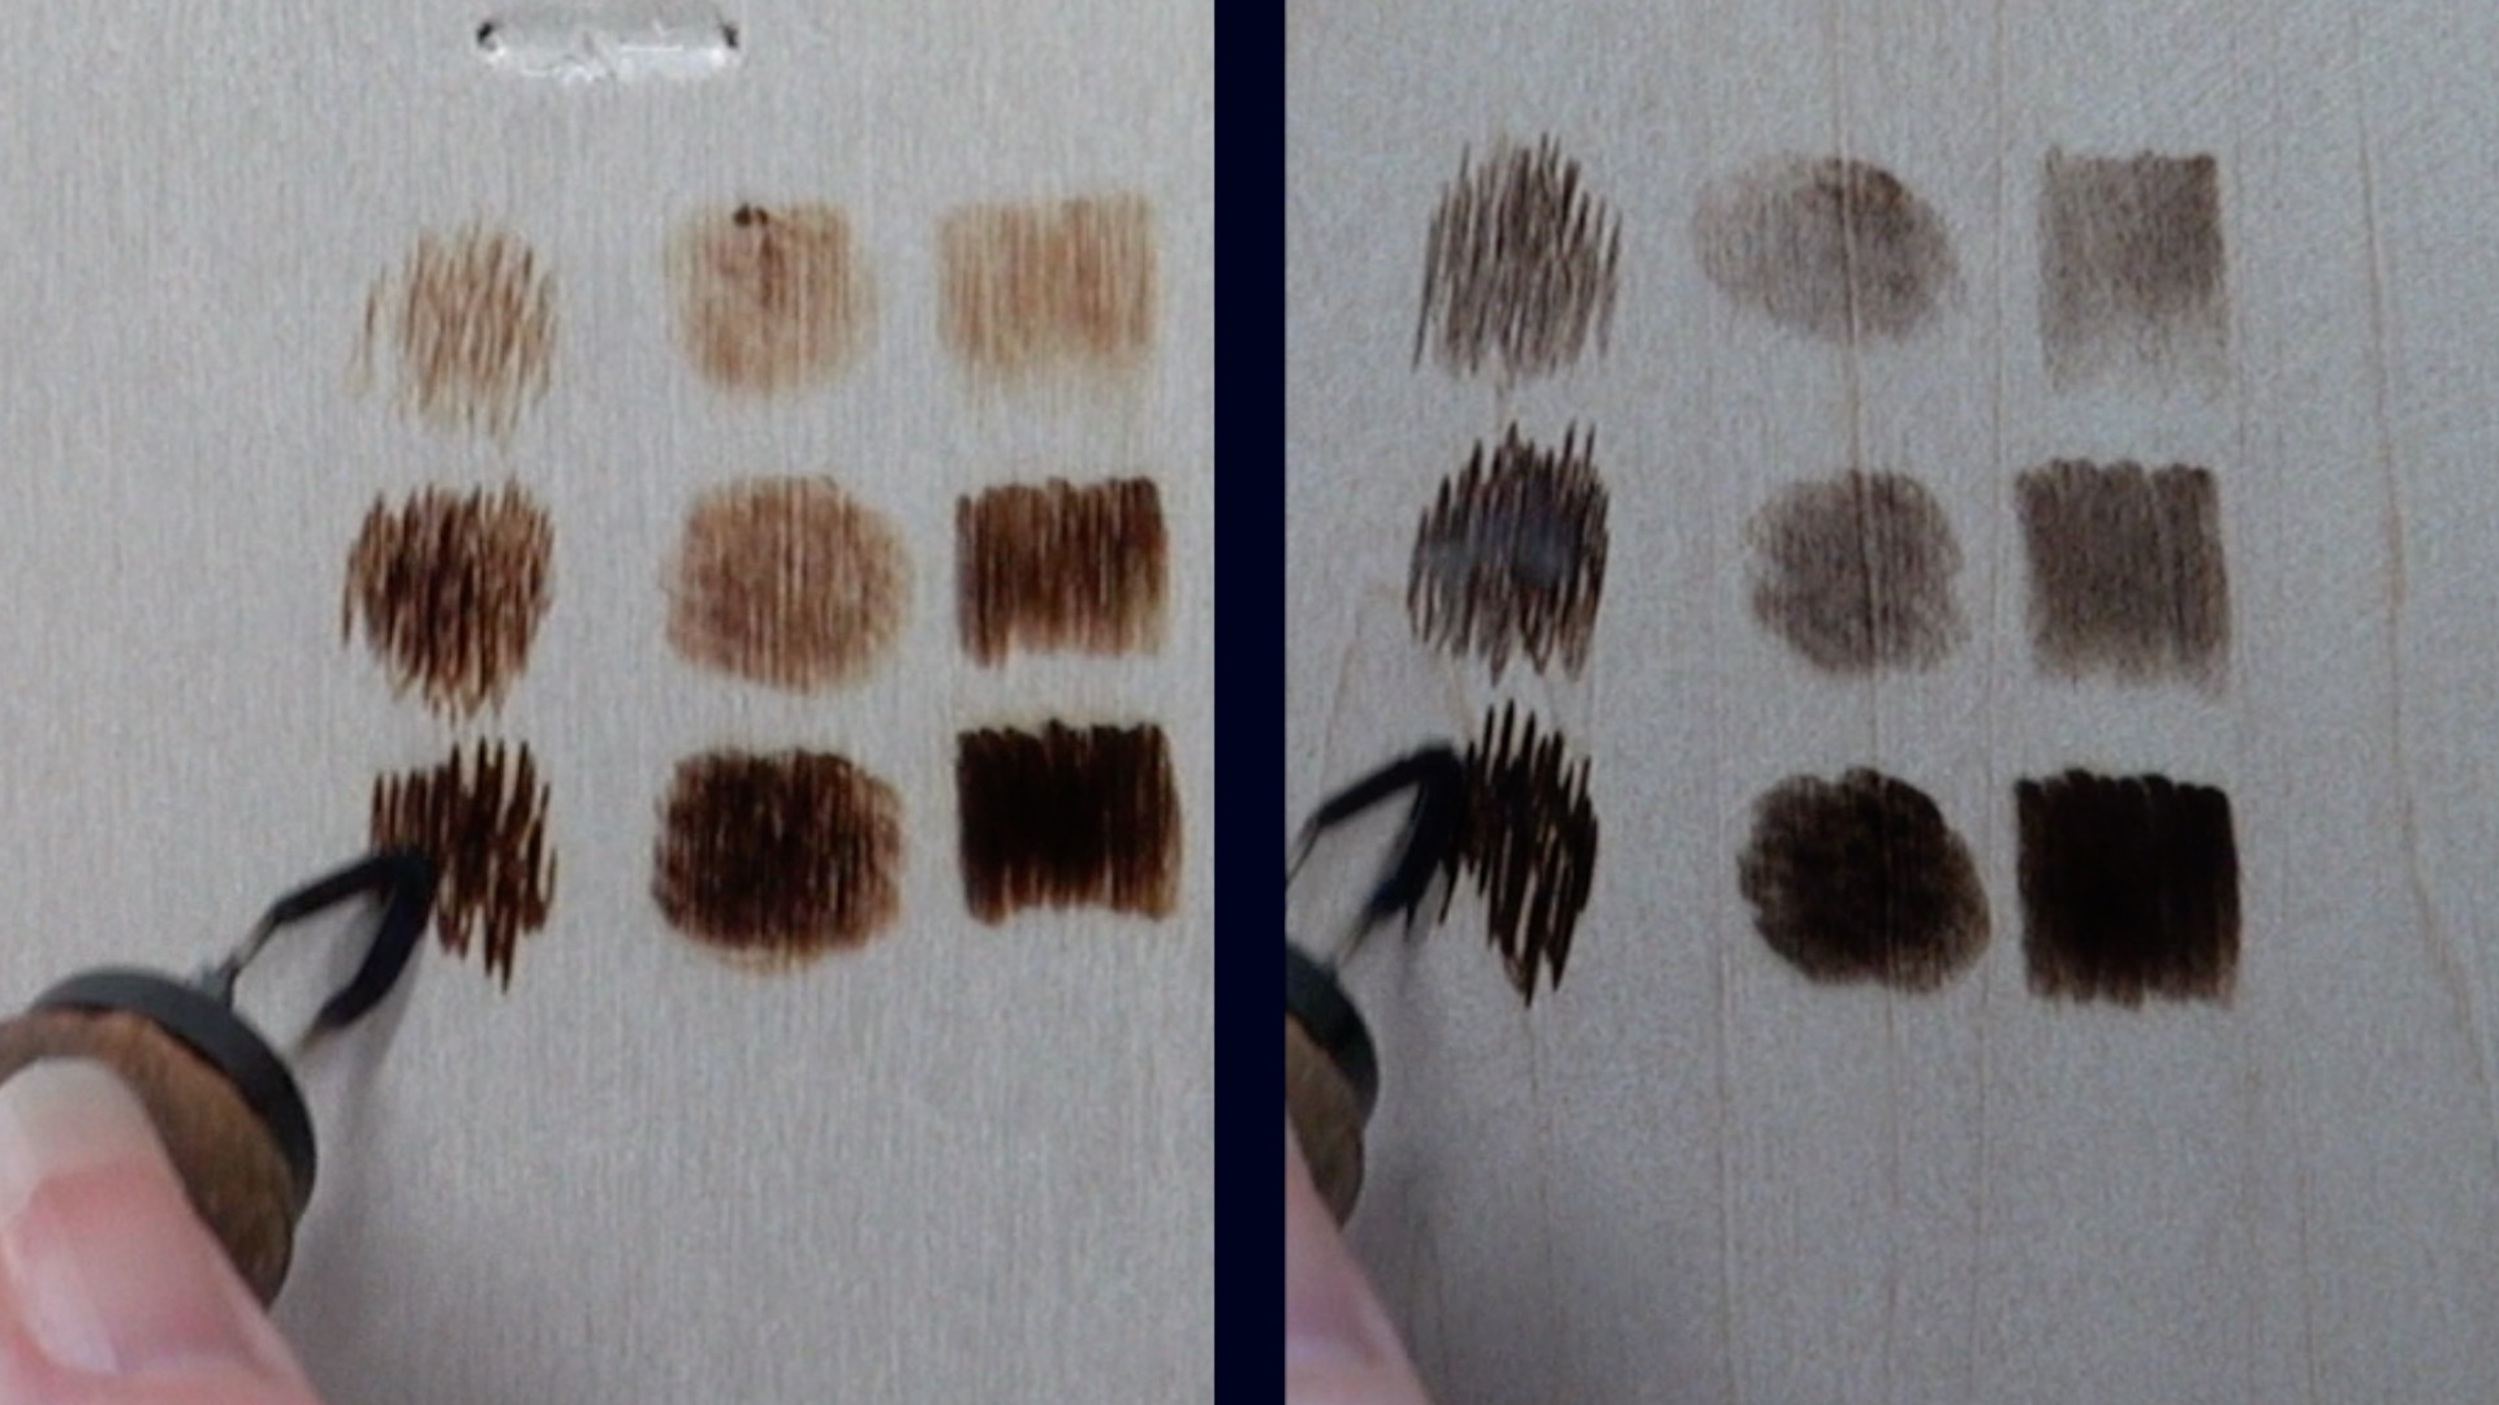 In this split screen image, there are three columns of burns on each board. The far left was made using uniform strokes. The middle column was made using circular motion. The left column shows the zigzag burn stroke.
Again, the burns on the basswood board (right) are smoother looking than the craft board. What is impossible to show in pictures is how difficult it was to burn the zigzag burn stroke on the craft board. The nib sunk down into the board. The nib kept wanting to follow in the rut of previous burn marks. My zigzag burn stroke is my main method of creating short fur and tree board. The burn stroke requires several layers of burns to achieve proper texture. Layering burn strokes was very difficult on the craft board.
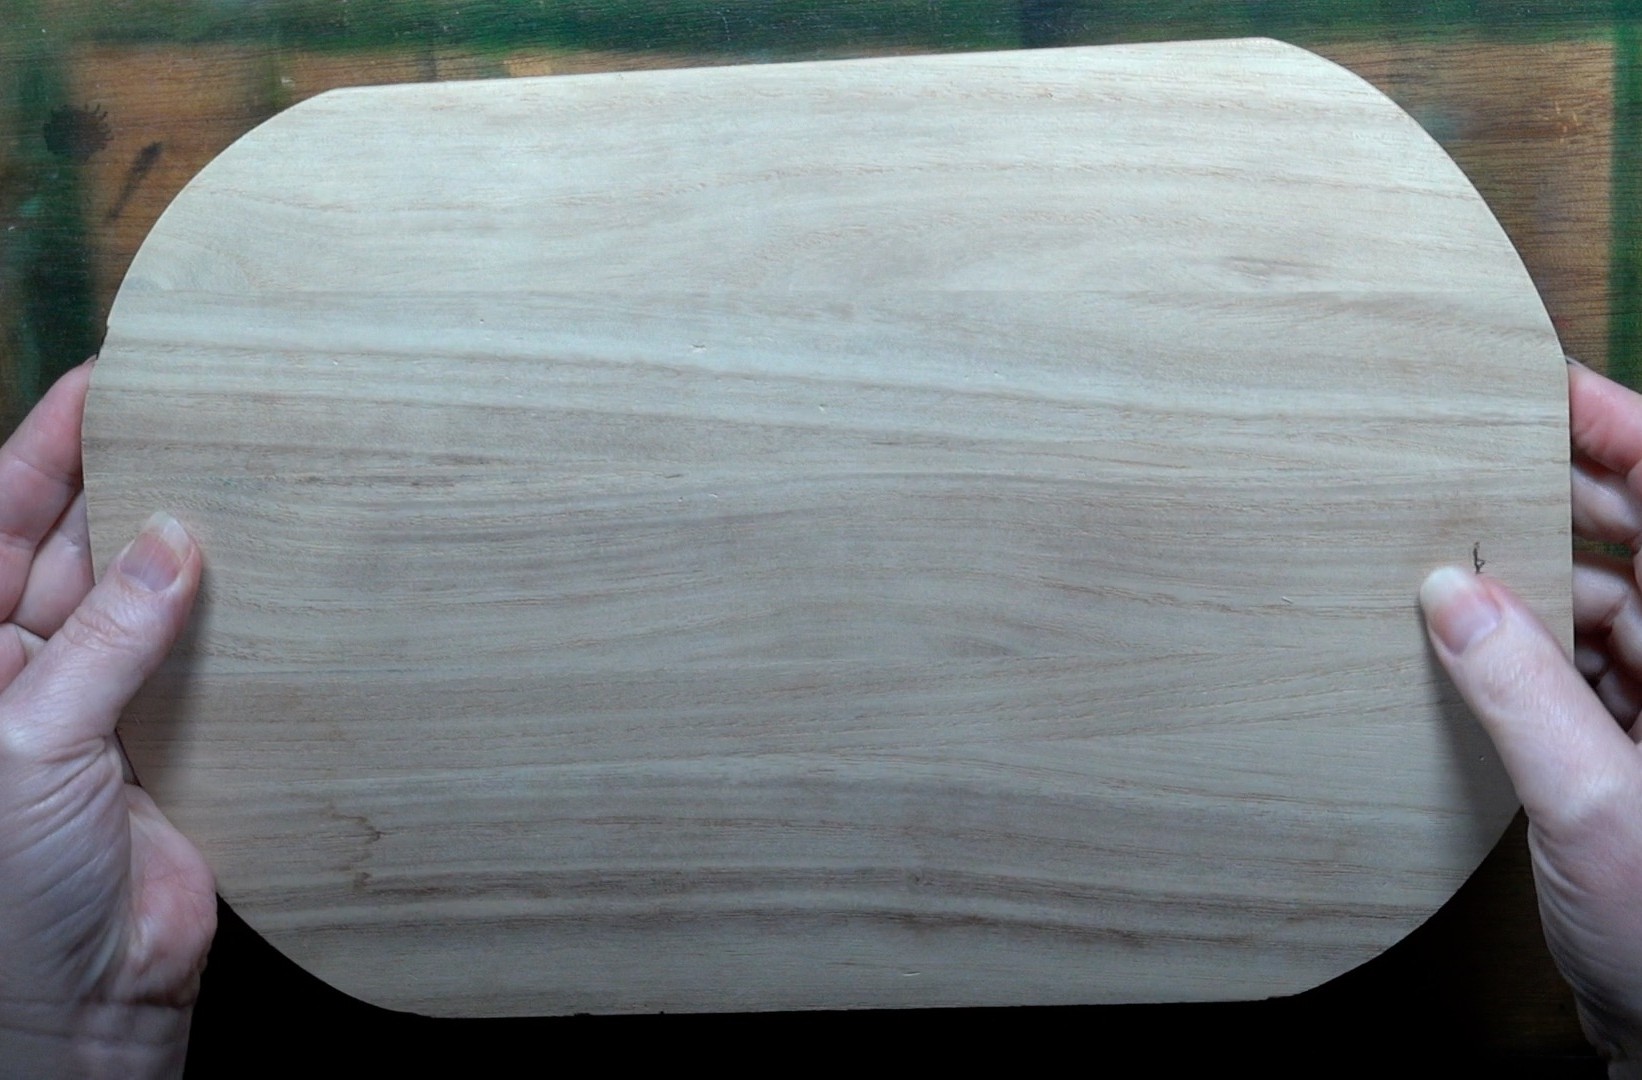 This is the board is pretty, but it’s unsuitable for pyrography. Again, I have no idea of what type of wood since this board was a gift from someone.
 The problem with this board is that it doesn’t have a uniform density. You can see this with the burns I did on this board. Look at how there are dark bans forming in the burns. The dark bans are created when I burn over soft grain. The soft grain darkens a lot more than the adjacent harder grain.
TIP 1 RECAP – use a quality board
*Quality boards will have a uniform density
*It is easier to get smooth burn results
*Easier to layer burn results
Tip 2 – Prepare the board surface
 At the very least, you should sand the board surface with 220 grit sandpaper. I personally use a 4-step process on all of my board; including plywood. Let me show the process and explain why.
 The steps are as follows:
1) Sand the board with 220 grit sandpaper.
2) Mist the board liberally with water. The board should be damp, but not soaking wet.
3) Let the board dry. This will raise the nap (grain) on the board. Once dry, the board will feel fuzzy.
4) Re-sand the board using 220 grit sandpaper. This will remove the nap that was raised resulting in an ultra-smooth board.
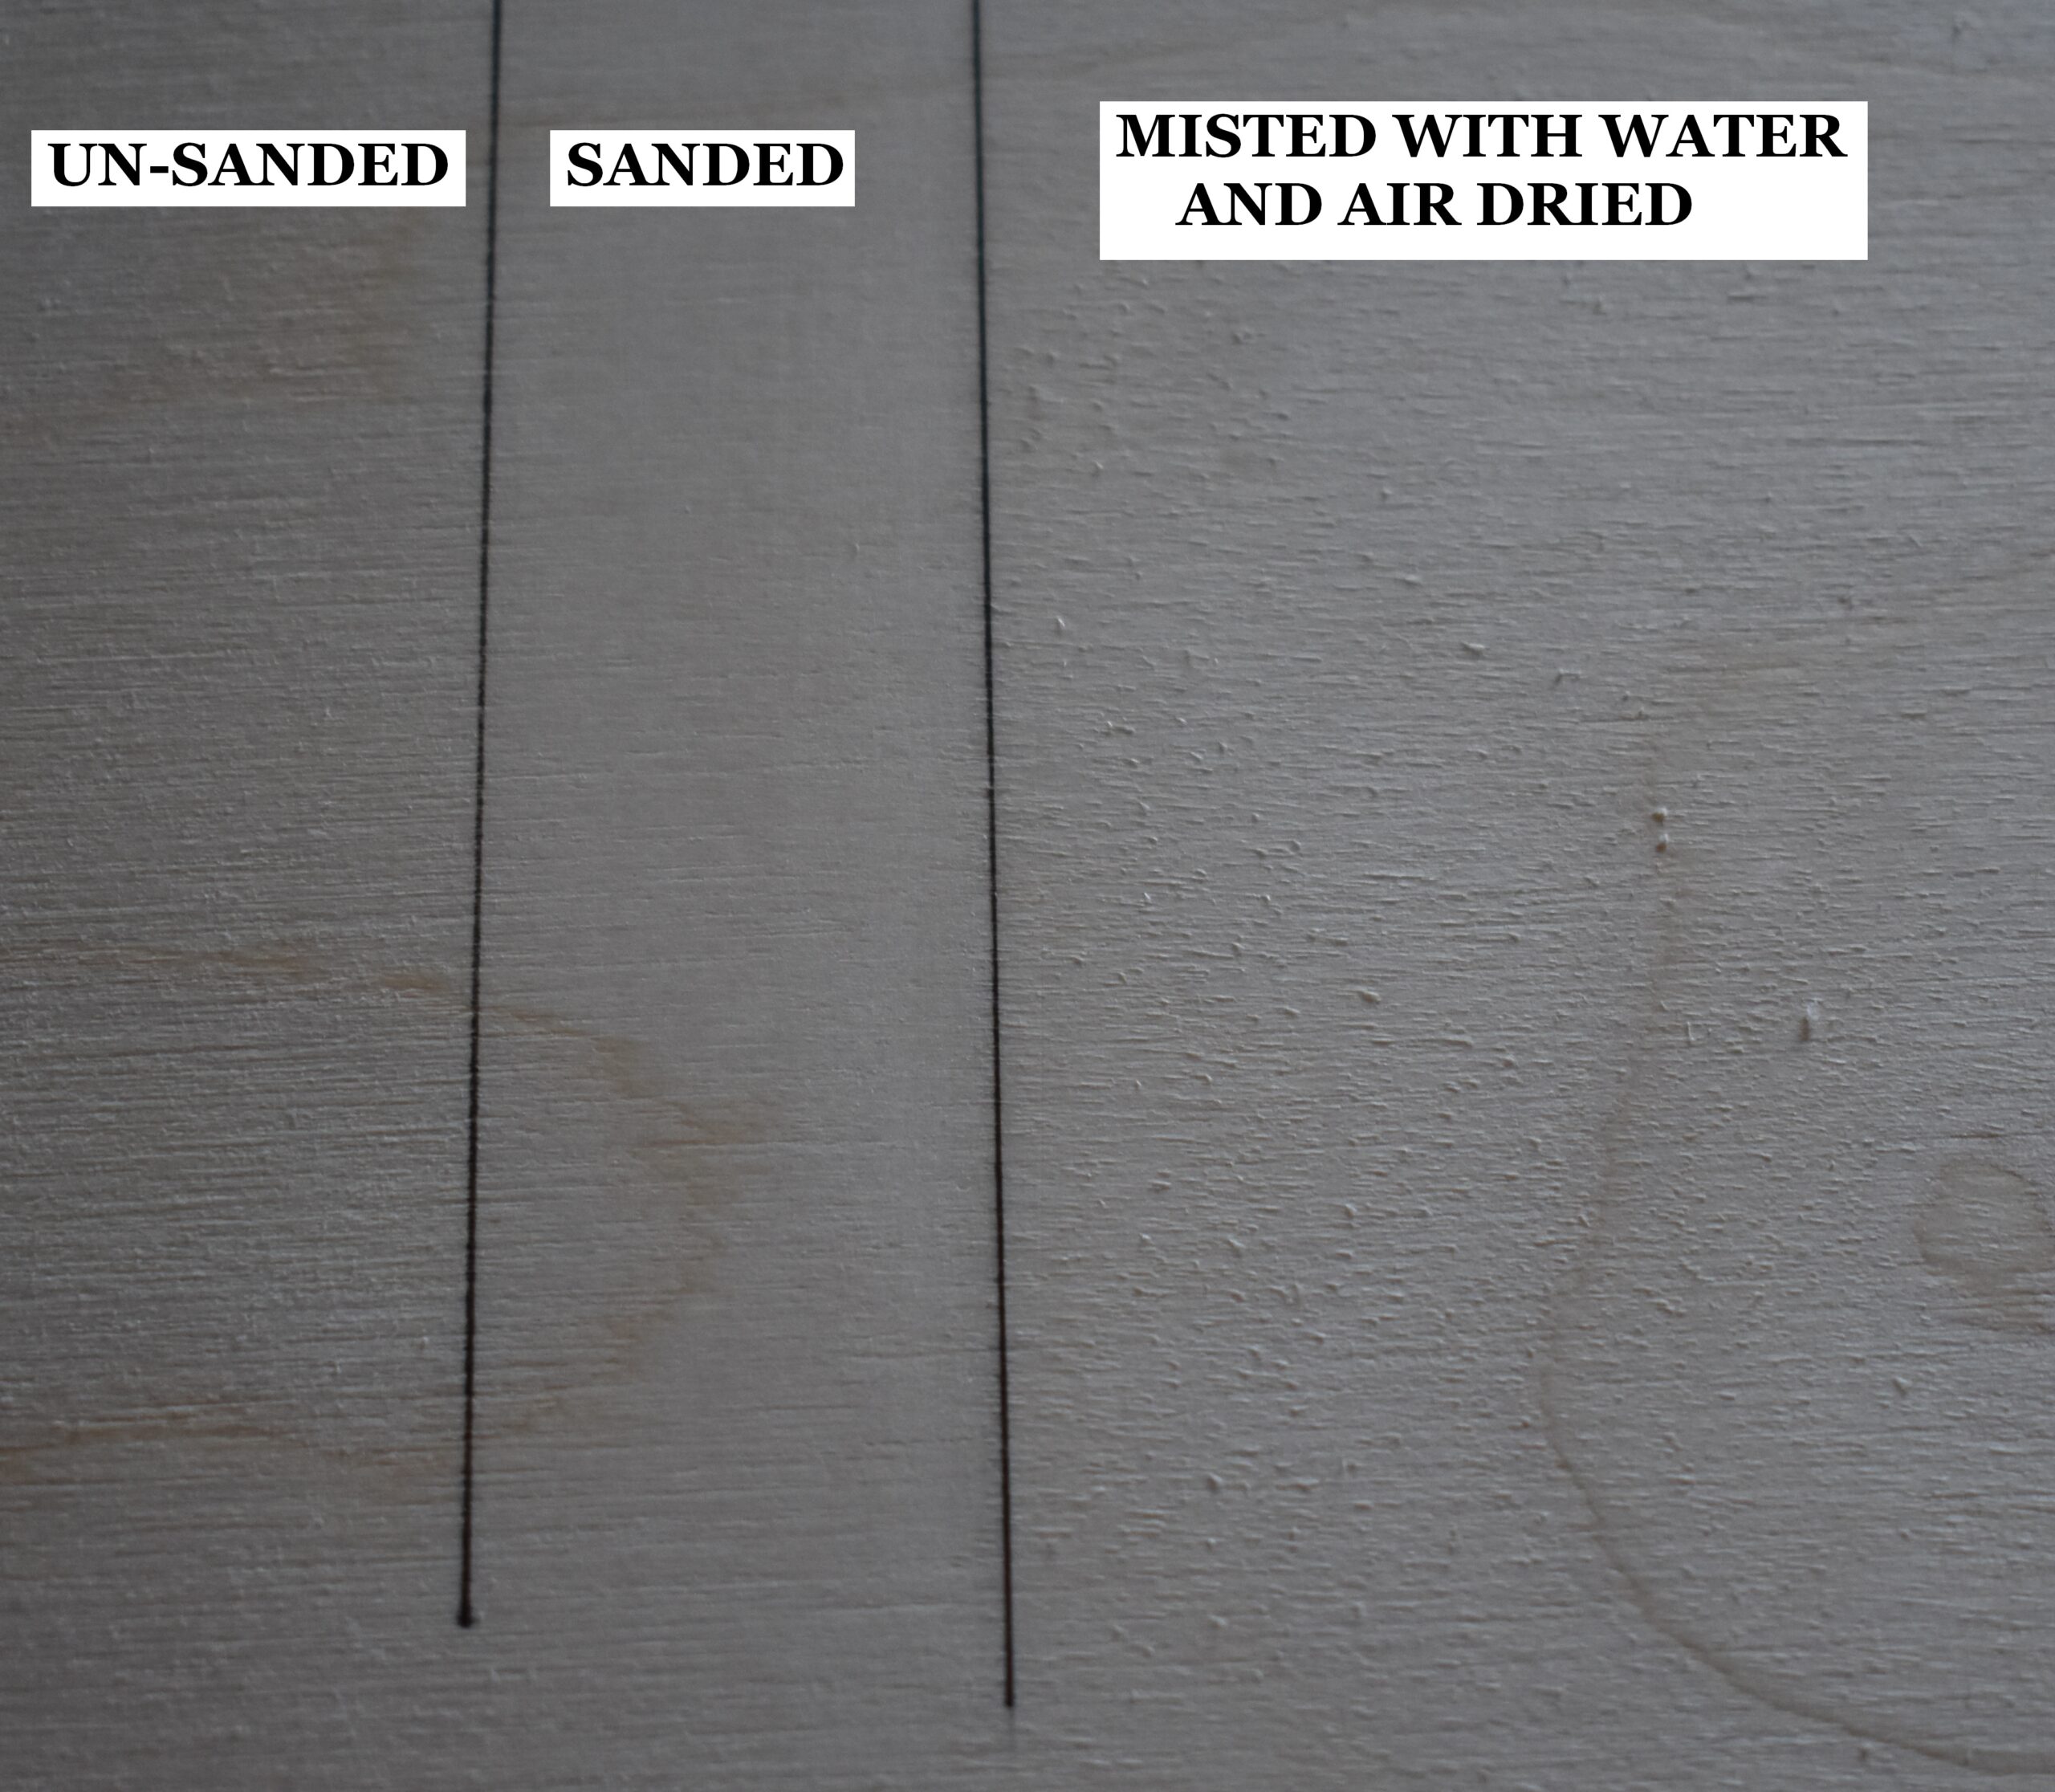 Here’s an image of a board that is broken into 3 sections. This image is broken down into three sections. The left side is un-sanded. The middle and right section was sanded. Then the right section was misted with water and allowed to dry. The right section is almost as rough as the un-sanded left section. That roughness is the nap, or grain, that swelled while wet and when it dried it sticks up slightly from the board surface.
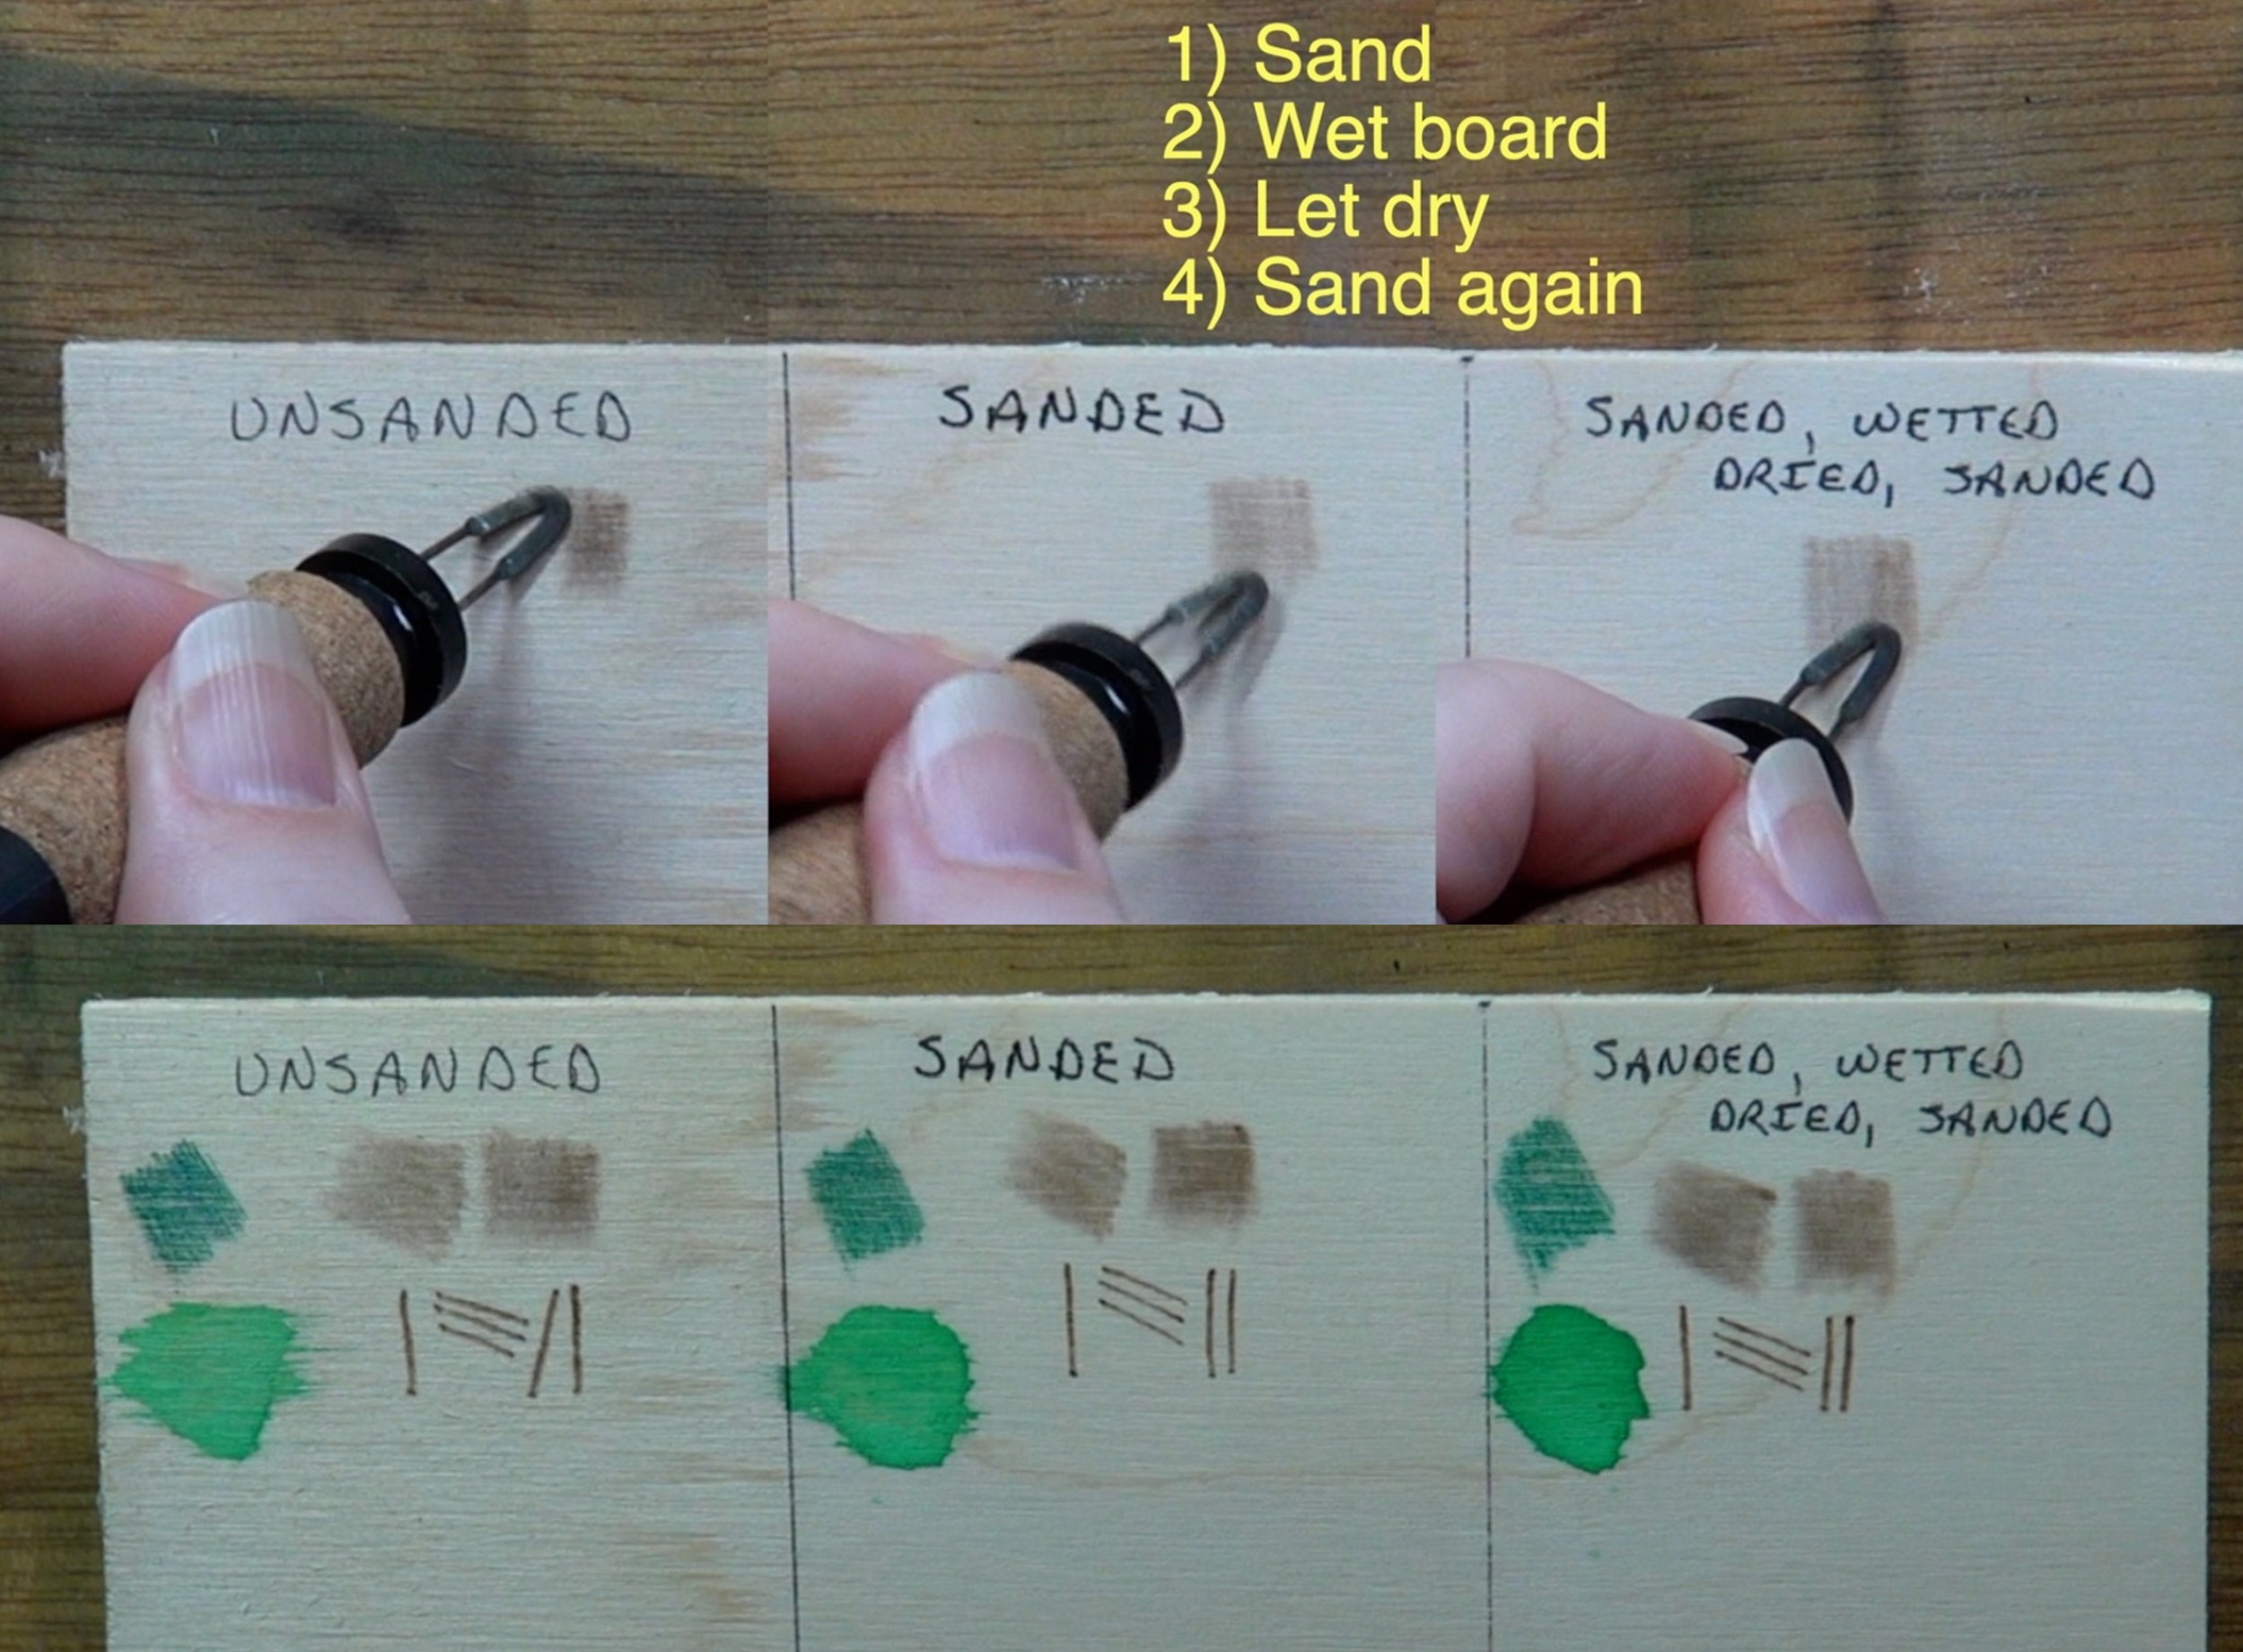 This photo shows a board that is broken up into three sections. The left section is un-sanded. The middle section was sanded with 220 grit sandpaper. The right section was given the 4-step process.
Why is the 4-step process important? There are several reasons for it.
1) The smoother a board is, the easier it is for the nib to glide over the wood surface. Plus, a smooth surface makes it so much easier to get nice smooth burn results.
If you compare the burn results on each section of the board you can see that the smoother the board surface is, the better the burn results are. The burns have more uniform color and they were easier to create. I know a photo and even a video doesn’t show how much easier it is to create smooth burn results on a properly prepared board, so I encourage you to test it out yourself.
2) Liquid mediums don’t bleed as much. I applied some green watercolor paint to each section. The paint on the left section, which is un-sanded, bleed quite a bit. The middle section shows a little bleeding. The right section has one or two minor spots of bleeding, but mostly I see crisp edge of dried paint.
3) If you add a liquid medium the board won’t get fuzzy when the medium dries. Liquid mediums include things like watercolors, water-based brush on wood finishes and stains, alcohol inks, etc.
4) Natural humidity changes won’t raise the nap on the board.
 My koala artwork took me almost 2 years to complete. Mostly the artwork sat on a shelf because I didn’t know how to create the fur texture on the koala. The board I used had been prepared using the 4-step method, so normal humidity that occur when the seasons change didn’t affect the board.
TIP 2 RECAP – prepare the board
*Sand with 220 grit sandpaper, wet the board, let board dry, sand again
*Removes surface imperfections that can snag nibs
*Easier to get smooth burn results
*Humidity changes won’t matter
*Board won’t get fuzzy if liquid colorants are added
Tip 3 – Use a light hand pressure
The hand pressure you use has a very big impact on your burn results. Burn results get worse the heavier the hand pressure is. For best results you want to use a light hand pressure. One that lets the nib lightly touch the board so that it can glide easily over its surface. Near the end of the section I will show you a test you can do to check your hand pressure. First, let’s see why hand pressure matters.
 I’m burning on basswood using a writer nib. As you can see there are four different patches of burn strokes. Let’s first talk about the burns within the blue box.
These two burn patches were made using the wide side of the writer nib. The right patch of burns was created using a light hand pressure. Notice how the burns are uniform in color and width. The burns on the left, that a yellow arrow is pointing to, where made using a heavy hand pressure. Notice how the color fades and the burn width isn’t uniform.
Now let’s talk about the two burn patches to the left of the blue box. These burn patches were made using the side or edge of the writer nib, so the lines are much thinner. The thinner and/or smaller a nib is, the higher tendency is has to sink down into the wood surface. The heavier your hand pressure the deeper the nib sinks.
Below the black line shows an angled view of the board so that you can compare how much deeper the lines created using a heavy hand pressure are compared to the light hand pressure burns.
 I repeated the same burn strokes using the same nib on the craft board. You can see that the same burn differences between using a light and heavy hand pressure. As before, yellow arrows are pointing to the burns made using a heavy hand pressure. Using a heavy hand pressure create burns that are not uniform in color. Plus, the nib sinks deeply into the board surface.
 In this split screen comparison, the basswood board is above the red line and the craft board below. Notice how much deeper the lines are on the craft board.
Low-quality boards are often made out of softer woods, so that’s another reason not to use them.
I once bought a board at a craft store that was in a clearance bin. I thought I had struck gold because the board was so cheap. When I started burning the board I was amazed at how deep the nib sank into the wood surface. I was able to press my thumbnail into the board surface. My bargain ended up being a waste of money!
 Now let’s examine how a shader performs and talk about layering burn strokes. Many of the textures I create rely on layers of burn strokes. Sometimes I layer different types of burn strokes. For example, I burn zigzags over a layer of circular motion to create tree bark. Other times I layer the same burn stroke. For example, creating fur texture requires numerous layers of zigzags.
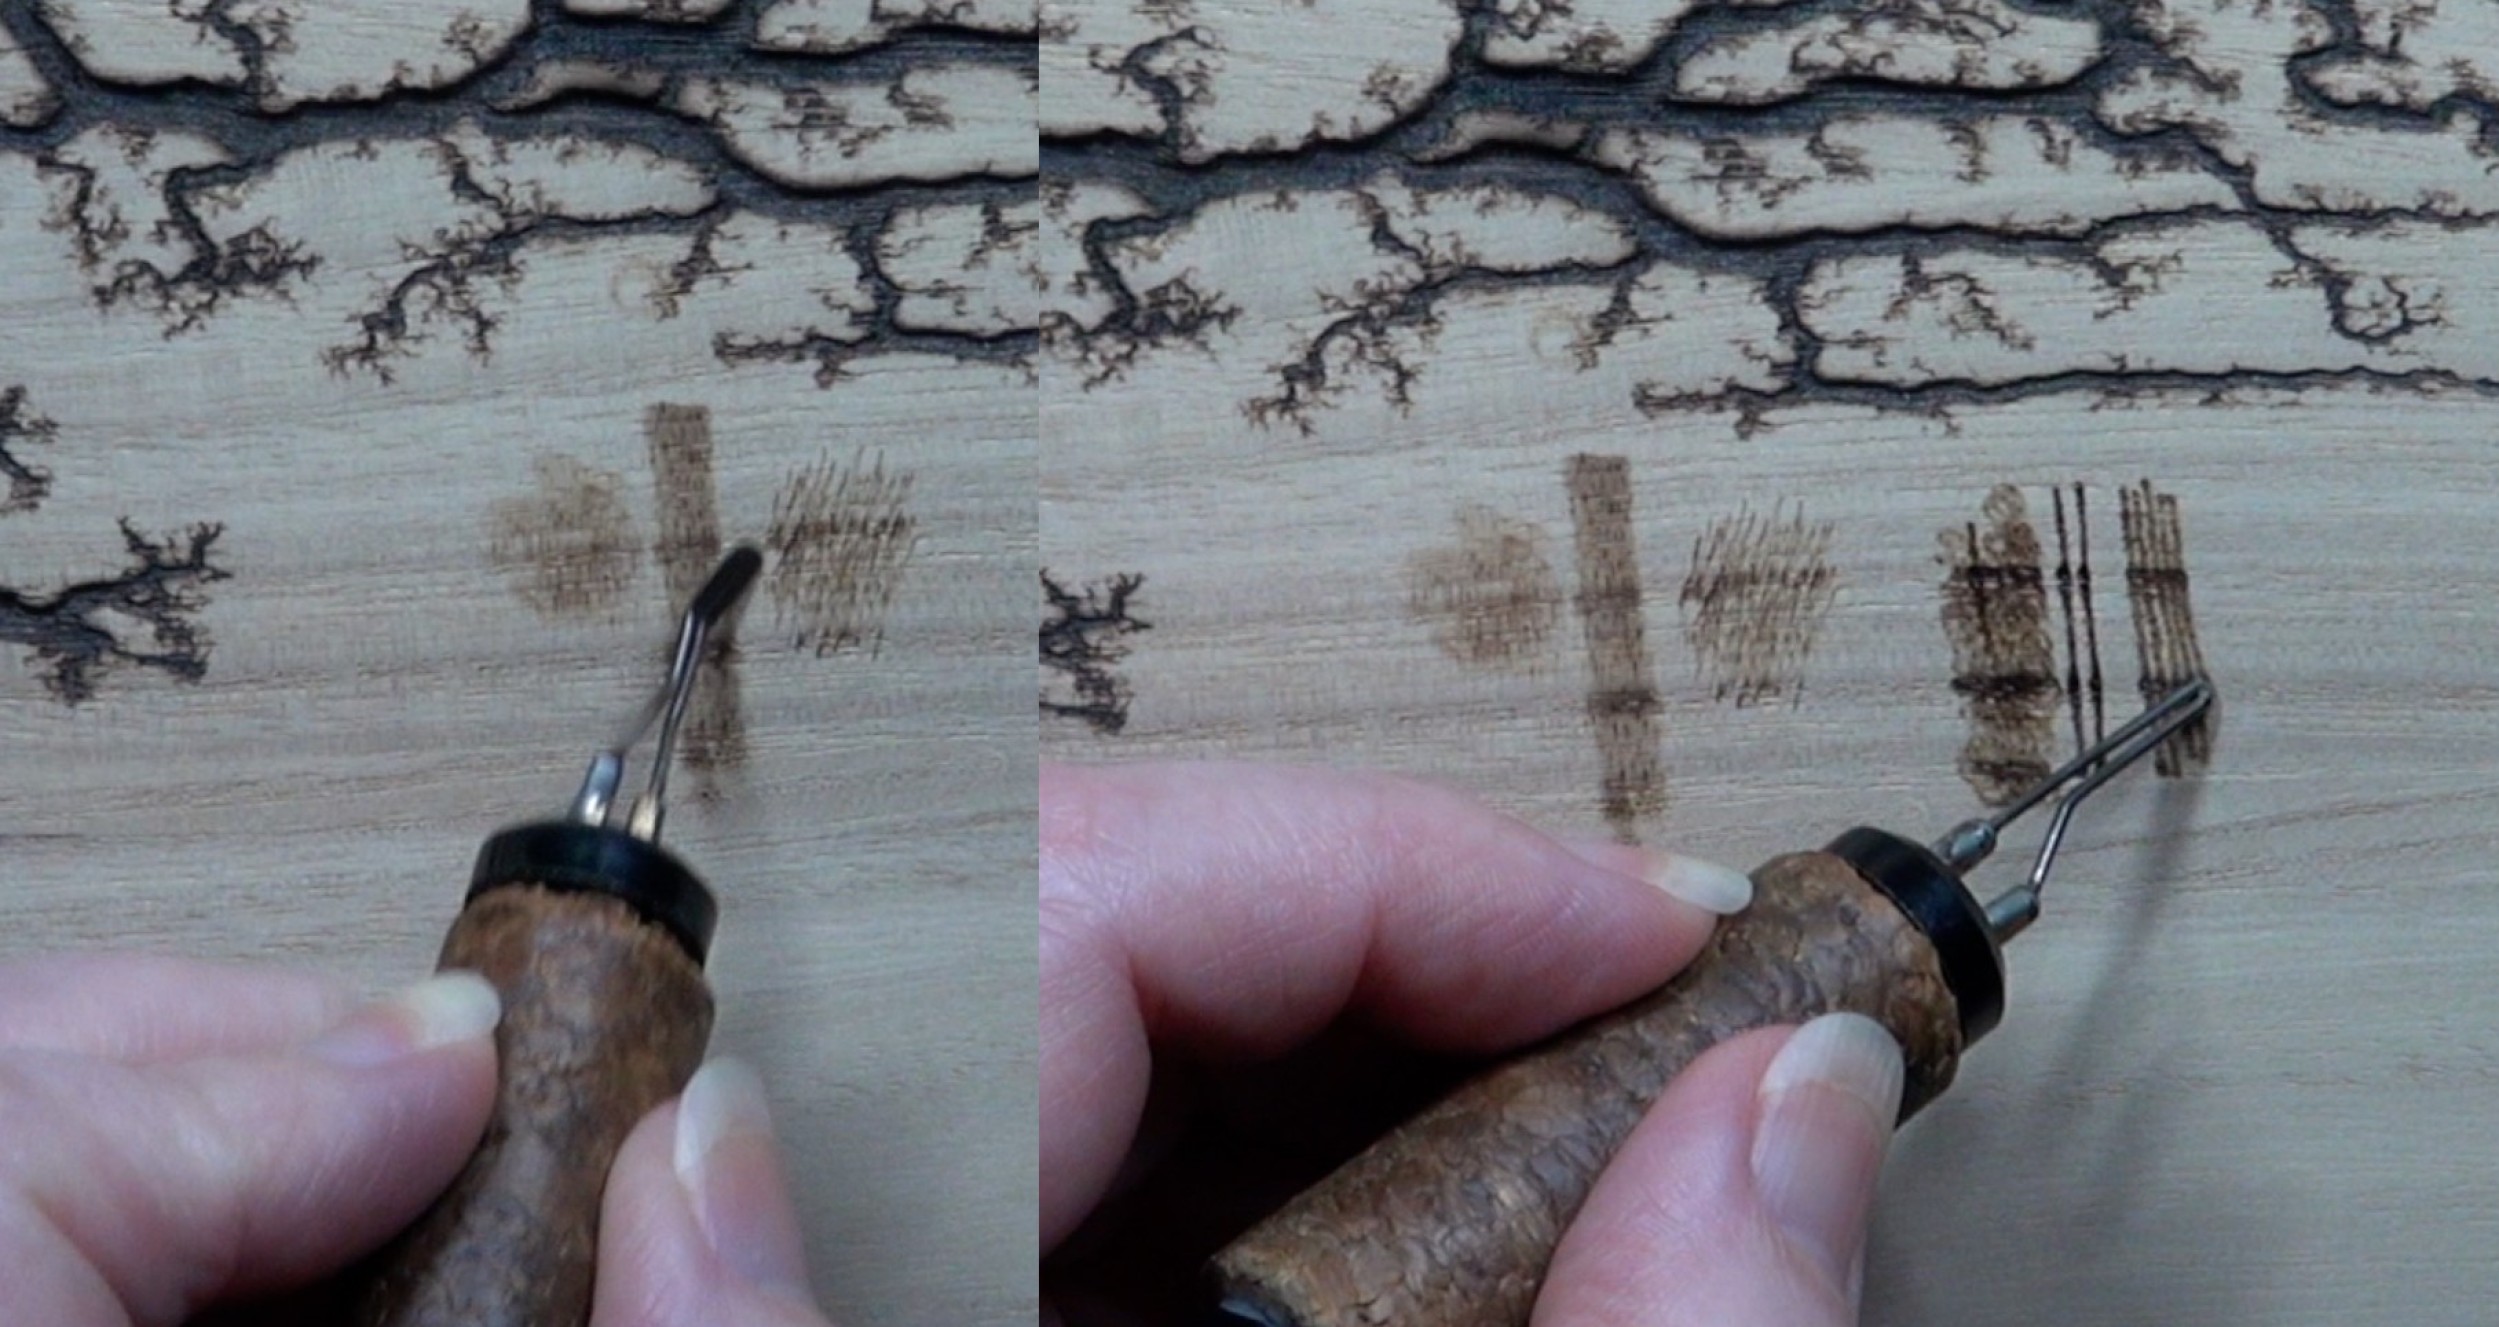
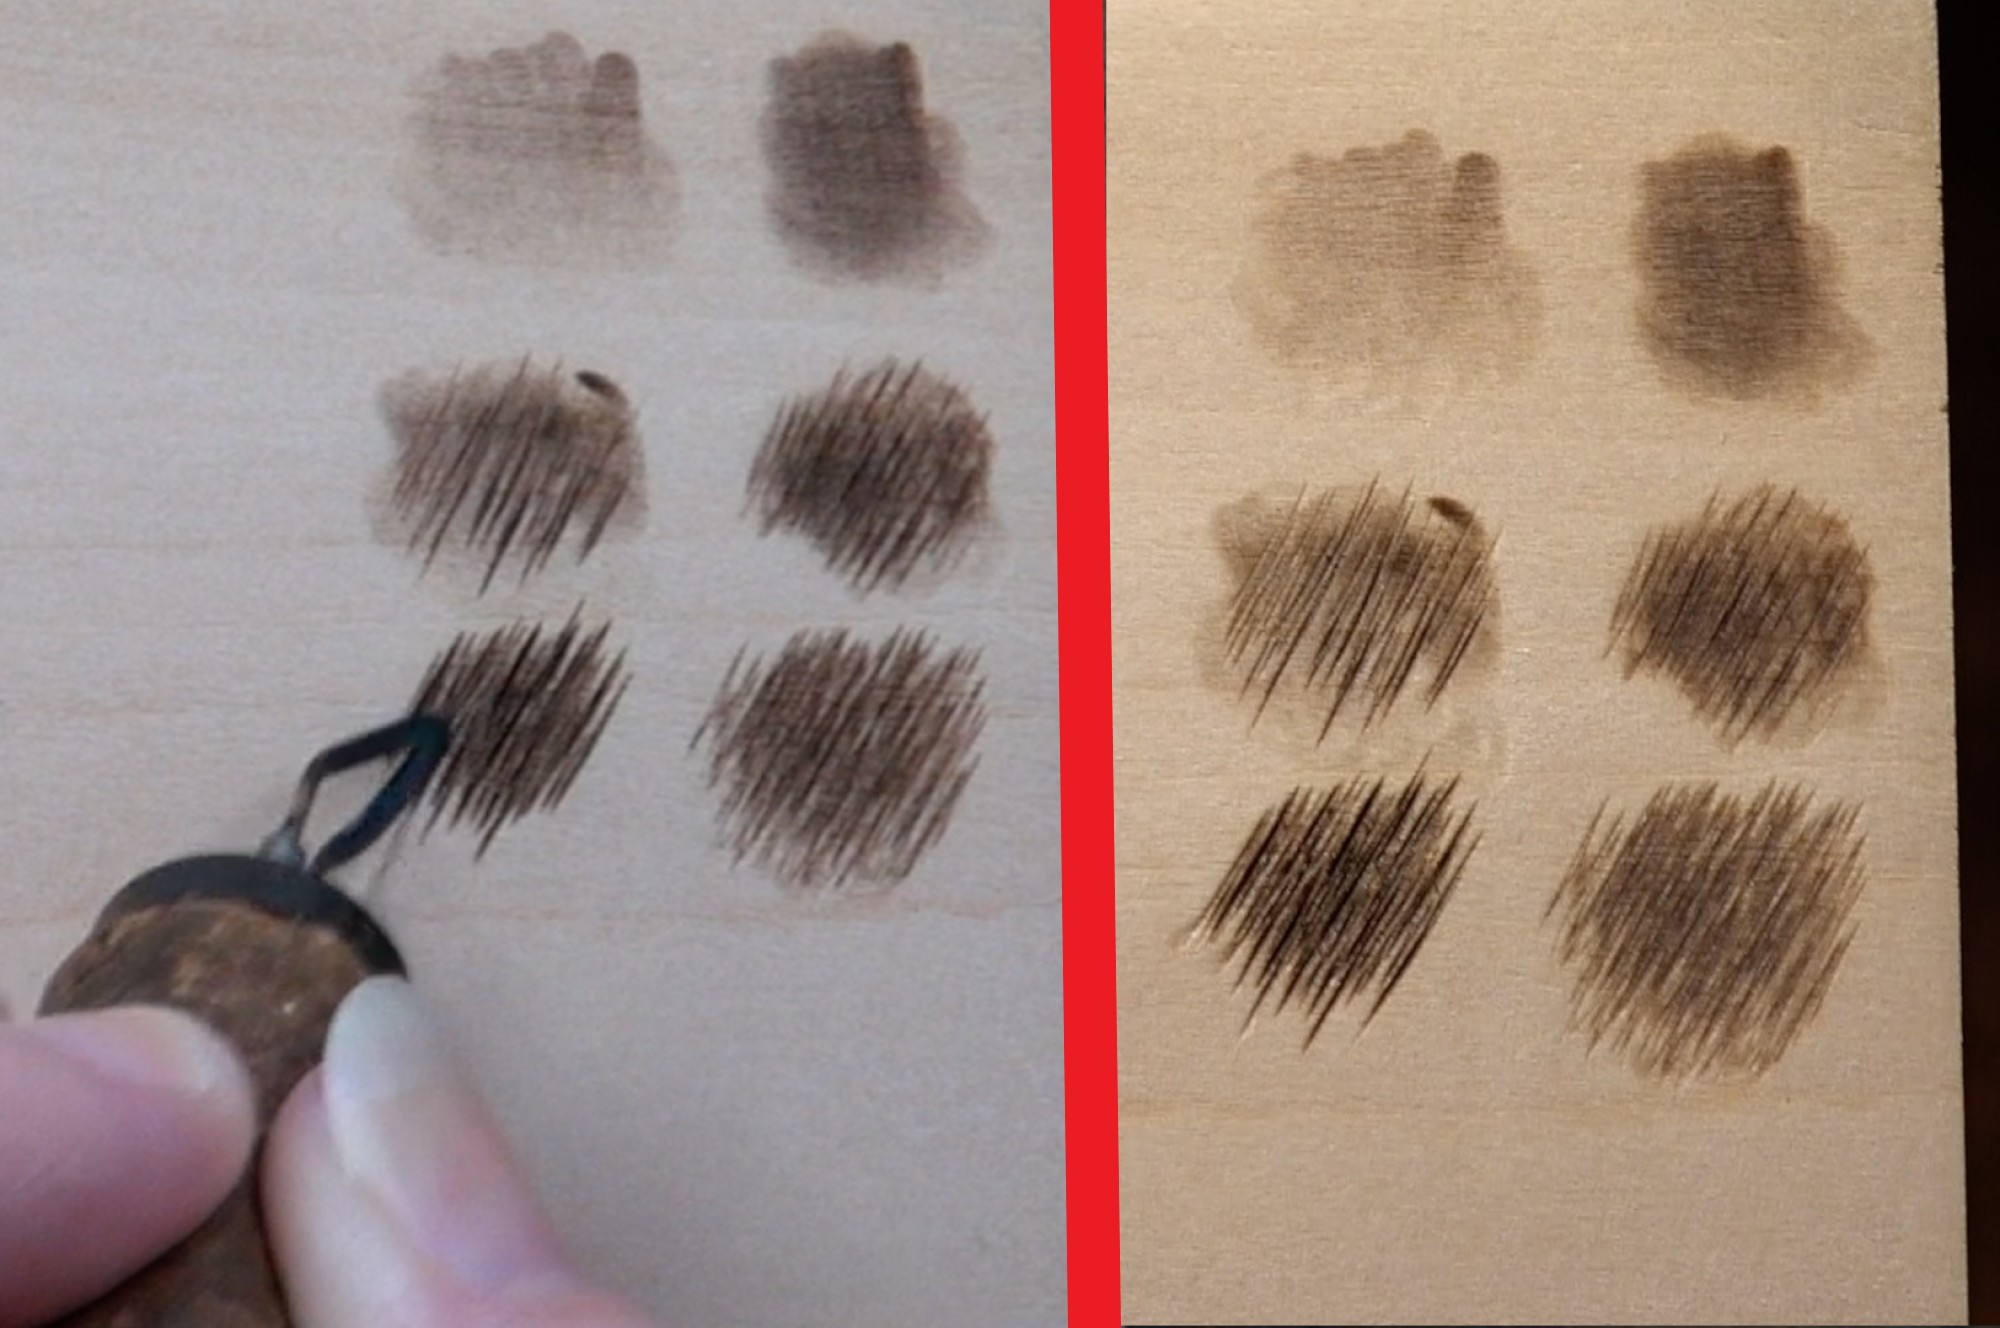
This photo shows three different styles of burn strokes done with both light and heavy hand pressure on a basswood board.
To the left of the red line, I’m actively finishing up the last burn style. To the right of the red line, shows a close up of the board so that you can compare the burn strokes.
The left column of burn strokes were created using a heavy hand pressure, and the right column was created using a light hand pressure.
The top burn was created by first burning uniform strokes, and then I reburned over the area using circular motion. On the left we see that color quickly fades out because it was created using a heavy hand pressure. Even though I burned circular motion over the left burn, the color didn’t darken much if at all. Compare that to the right burn, and the impact of hand pressure becomes very noticeable. I should mention that I used the exact same nib and burn temperature for all of the burns.
The middle burn shows a circular motion base with zigzags layered over it. Not only does the left burn have less color than the right, but the zigzag lines are embedded much deeper into the wood.
When I use the zigzag burn stroke, I’m using the side of the shader which is super thin. Because it is so thin, it is prone to sinking into the wood surface. This makes it even more important to use a light hand pressure.
The bottom burn is just zigzags. When I’m working on animal fur, I will burn 5-6 layers of zigzags to slowly build up the color and texture of the fur. For this test burn I tried to burn at least three layers on each patch. I didn’t have a problem with the right burn that was created using a light hand pressure, but I had a lot of problems with the heavy hand pressure burn on the left. The burn marks on the left were so deep that the nib kept falling into the rut of a previous burn mark. Adding more layers of zigzags resulted in those deep rut lines getting darker and deeper. I had a lot of difficultly trying to keep the nib out of previous burns.
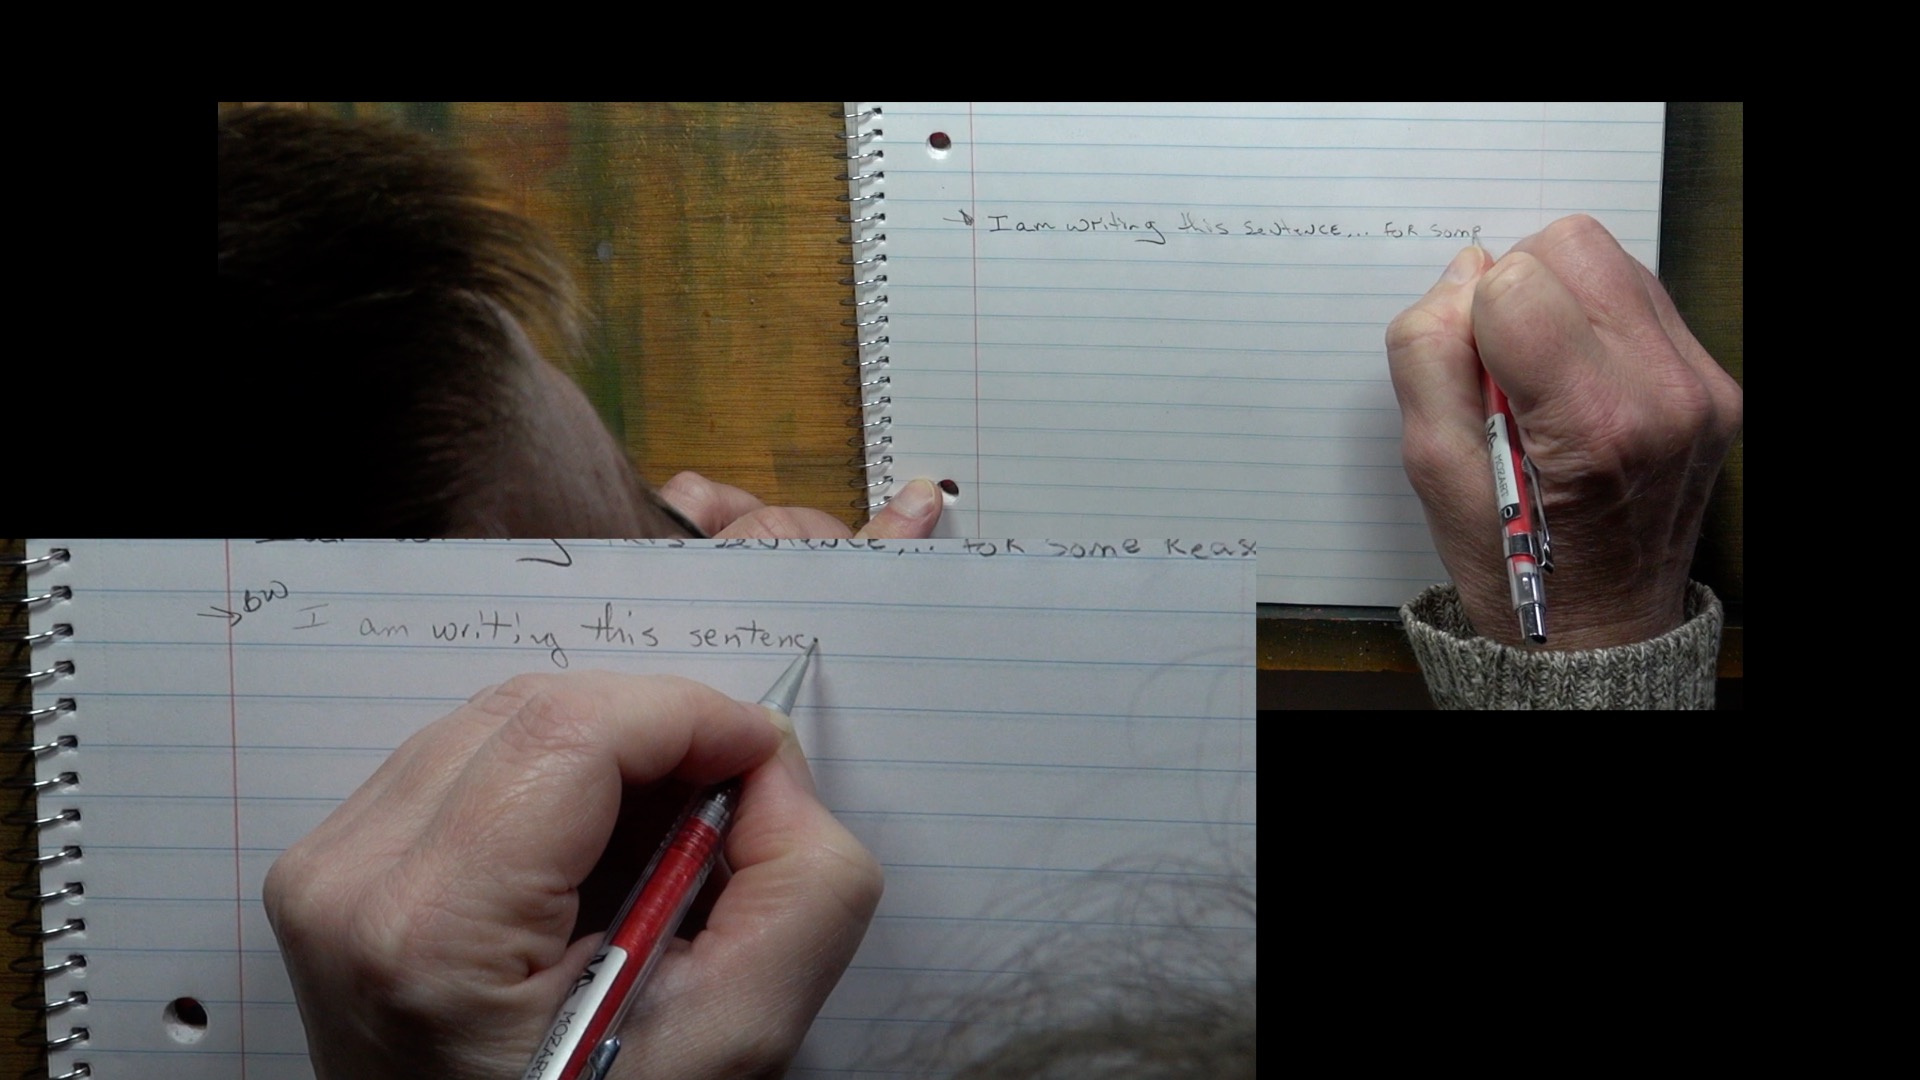 There is a test you can easily do to check your hand pressure. Write your name or a short sentence on a piece of paper using a pencil. Preferably with a couple of pieces of paper under it to provide some cushion.
In this split photo, Todd is writing a sentence on a piece of notebook paper in the top portion of the image. The lower image shows me writing the same sentence that Todd did.
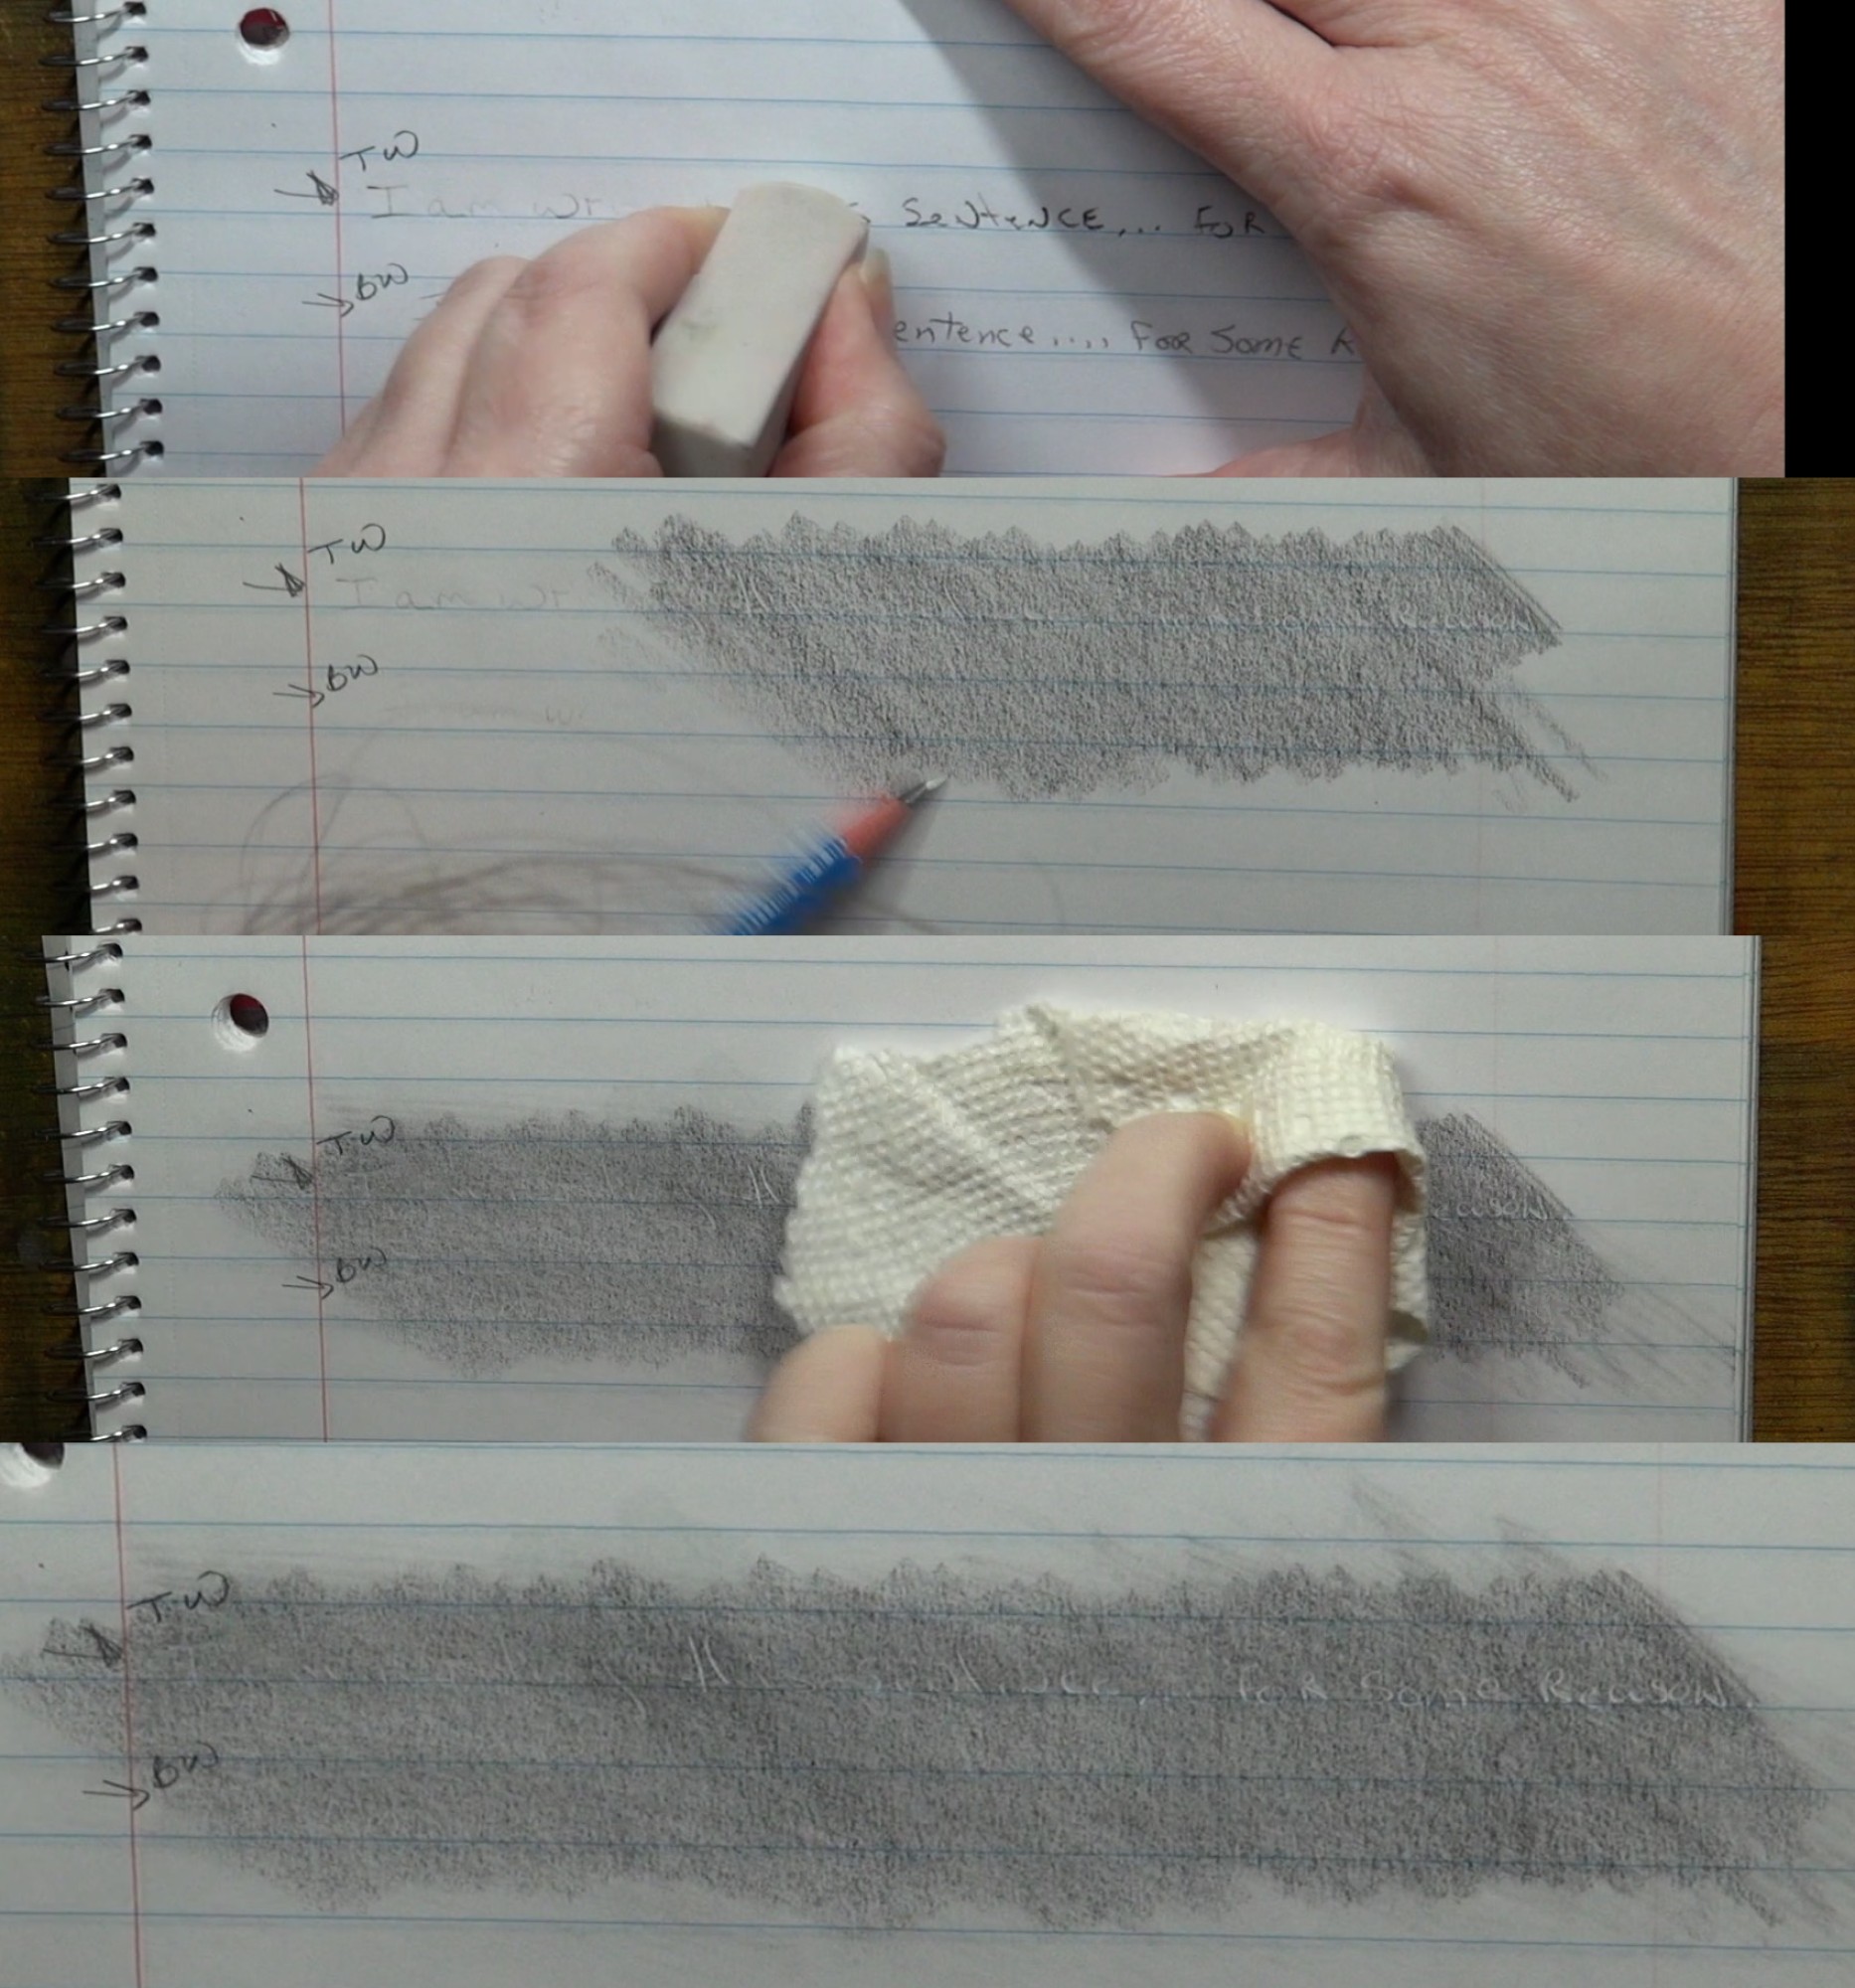 Now erase what you have written. Then gently color over the area using the side of a pencils. After that is done, gently rub over the pencil marks with a piece of paper towel to smooth out the graphite.
Can you read what you wrote? If so, then you are using a heavy hand pressure.
If you look closely at the bottom image of the photo, you can easily see quite a few words that Todd wrote. Whereas, it is very difficult to see any of the words I wrote.
The light hand pressure that I used to write with is the perfect hand pressure for pyrography. This light hand pressure allows the nib to just touch the wood and lightly glide over its surface.
TIP 3 RECAP – Use a light hand pressure
*Smoother burn results
*Uniform colored burns
*Consistent repeatable burn strokes
*Nib doesn’t sink into board surface
*Easier to layer burn strokes
Tip 4 – Use just enough heat
When you first start to learn pyrography, the inclination is to crank up the heat. Especially if you’re burning something to a dark color. If this is you, I highly encourage you to break yourself of that habit. Instead, you are better off using just enough heat to achieve the color you desire. This will prevent problems like overburn and carbon buildup. Plus, it will give you greater control over your artwork. Let’s explore this topic.
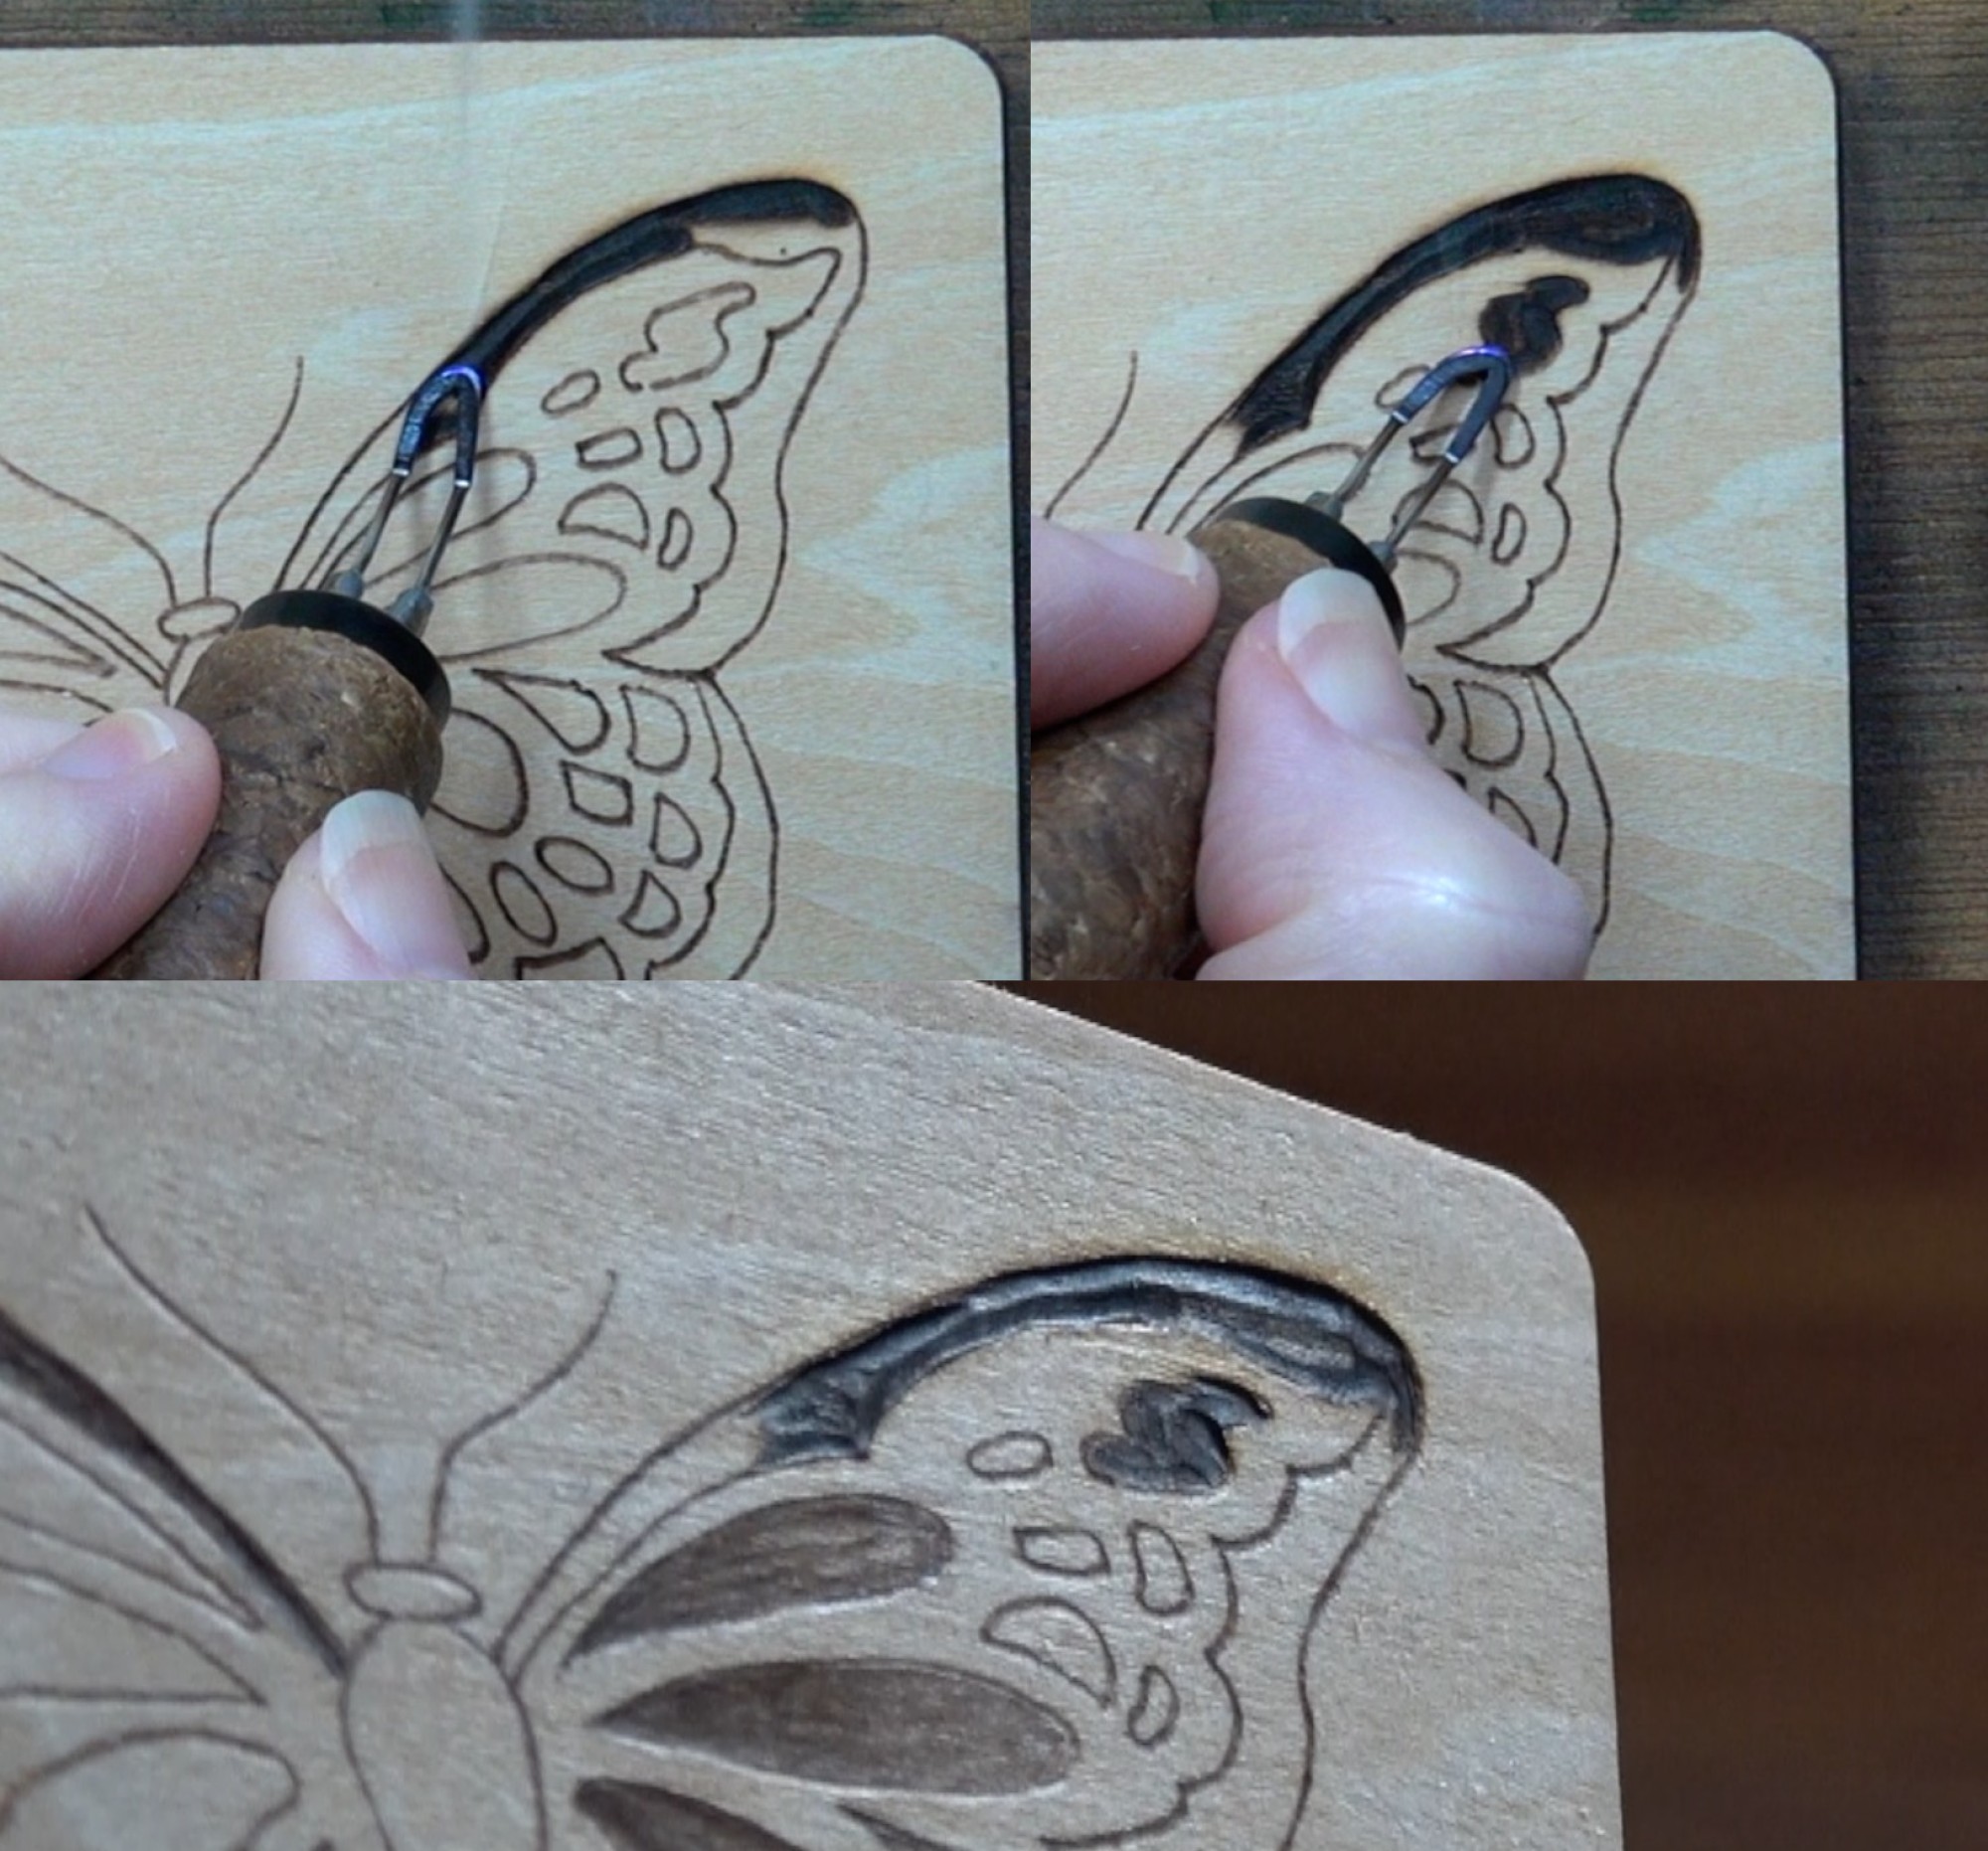 In this photo I’m burning a butterfly wing to a dark color. Notice how much smoke is being generated from the burns. Plus, there is some overburn just above the wing.
What is overburn? Overburn is when the wood adjacent to where you are burning darkens up. It is a sign that the heat is too high on your burner.
Another problem with excessive heat, is that it is hard to stay within the boundaries of small areas.
The bottom image of the composite photo shows the board at an angle. You can see the deep channel the nib made in the wood.
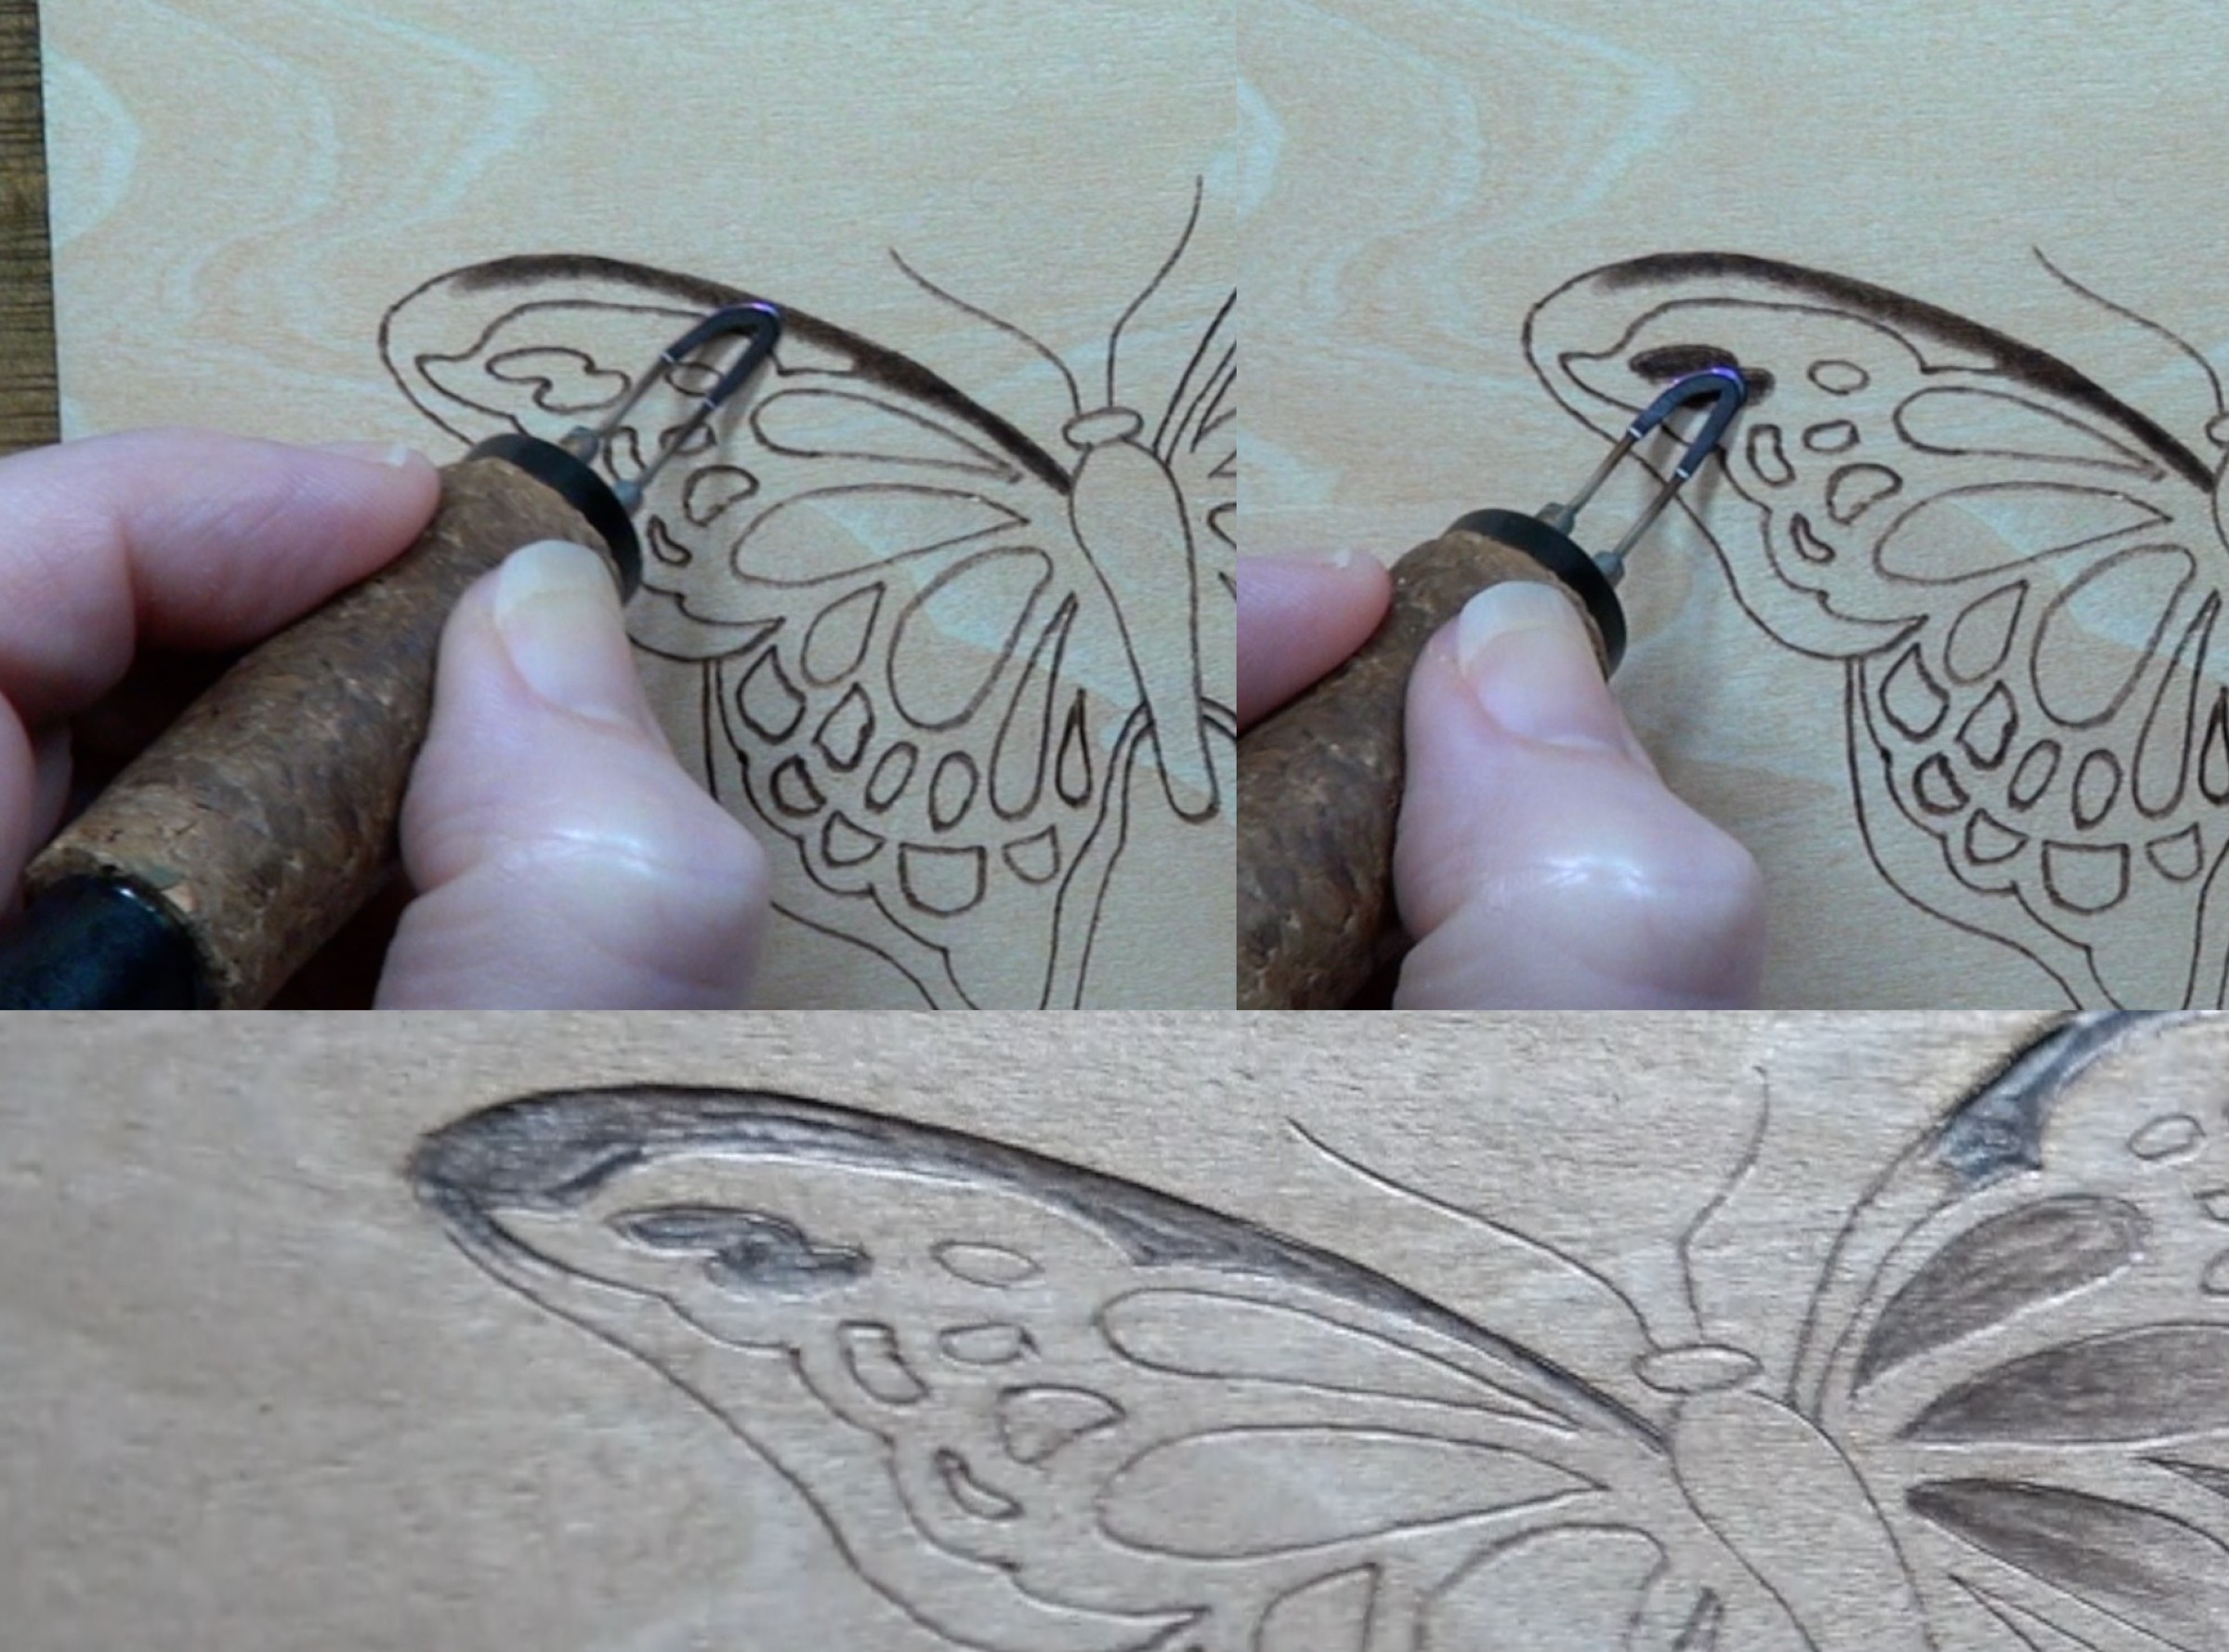 In this composite photo I have turned down the heat on my burner. Overburn is no longer an issue, and I can easily stay within the boundaries of smaller marking.
One thing to be aware of, is that I have to reburn over areas to get them dark. I personally would prefer to re-burn over areas than deal with overburn.
Another benefit of using a lower heat is that the surface texture of the burn results is much smoother looking. This may not be important to some of you, but for others it is.
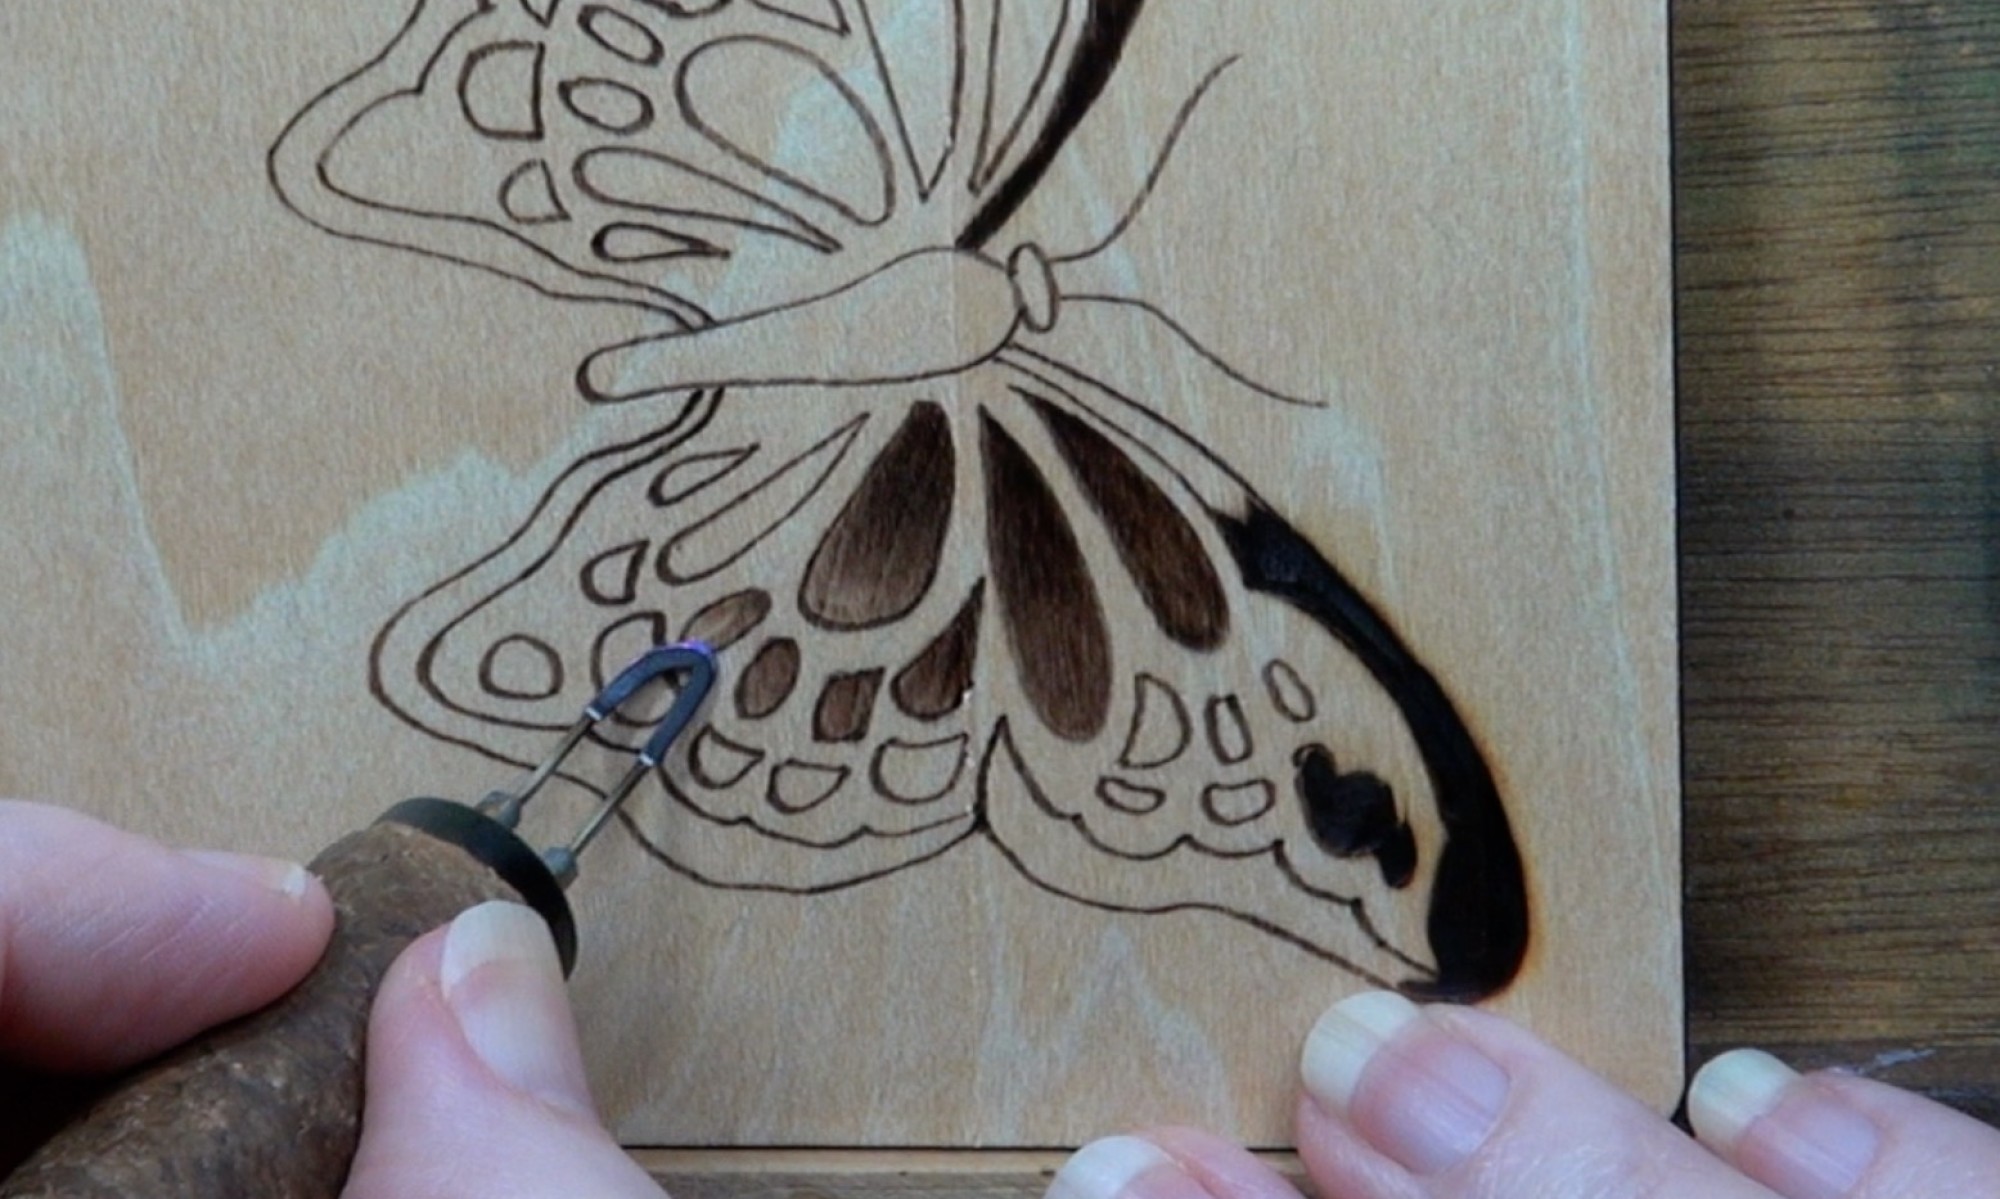 In this photo I’m finishing up a small marking. I worked from right to left, and with each marking I reduced the heat a little more on my burner. When I got to the last marking, I finally had a good heat setting.
How do I know this? Because I could easily get tan colored burn results.
When the heat is too high, it is difficult to get lighter colored burn results. That’s because you have to speed up your hand movement to get lighter colors. Once you slow back down to your normal hand speed the color darkens back up. This is not an easy way to control your burn results.
You will gain a lot more control over your burn results by working at lower heat settings. If you want darker colors, just reburn until it’s as dark as you want. Or, you can slow down your hand speed to get dark color. In fact, if you slow down your hand speed enough you can get dark results even when the burner is on a low heat setting. Quite truthfully, I lack the patience for this unless it is in a really small area. If I need to fill in large areas with a dark color, I will increase the heat setting on my burner. I do not increase it to the point where overburn is created.
 I often aim for a medium to dark tan color. That way I can still easily achieve light tan burn results, and use reburning or a slow hand speed to get darker ones.
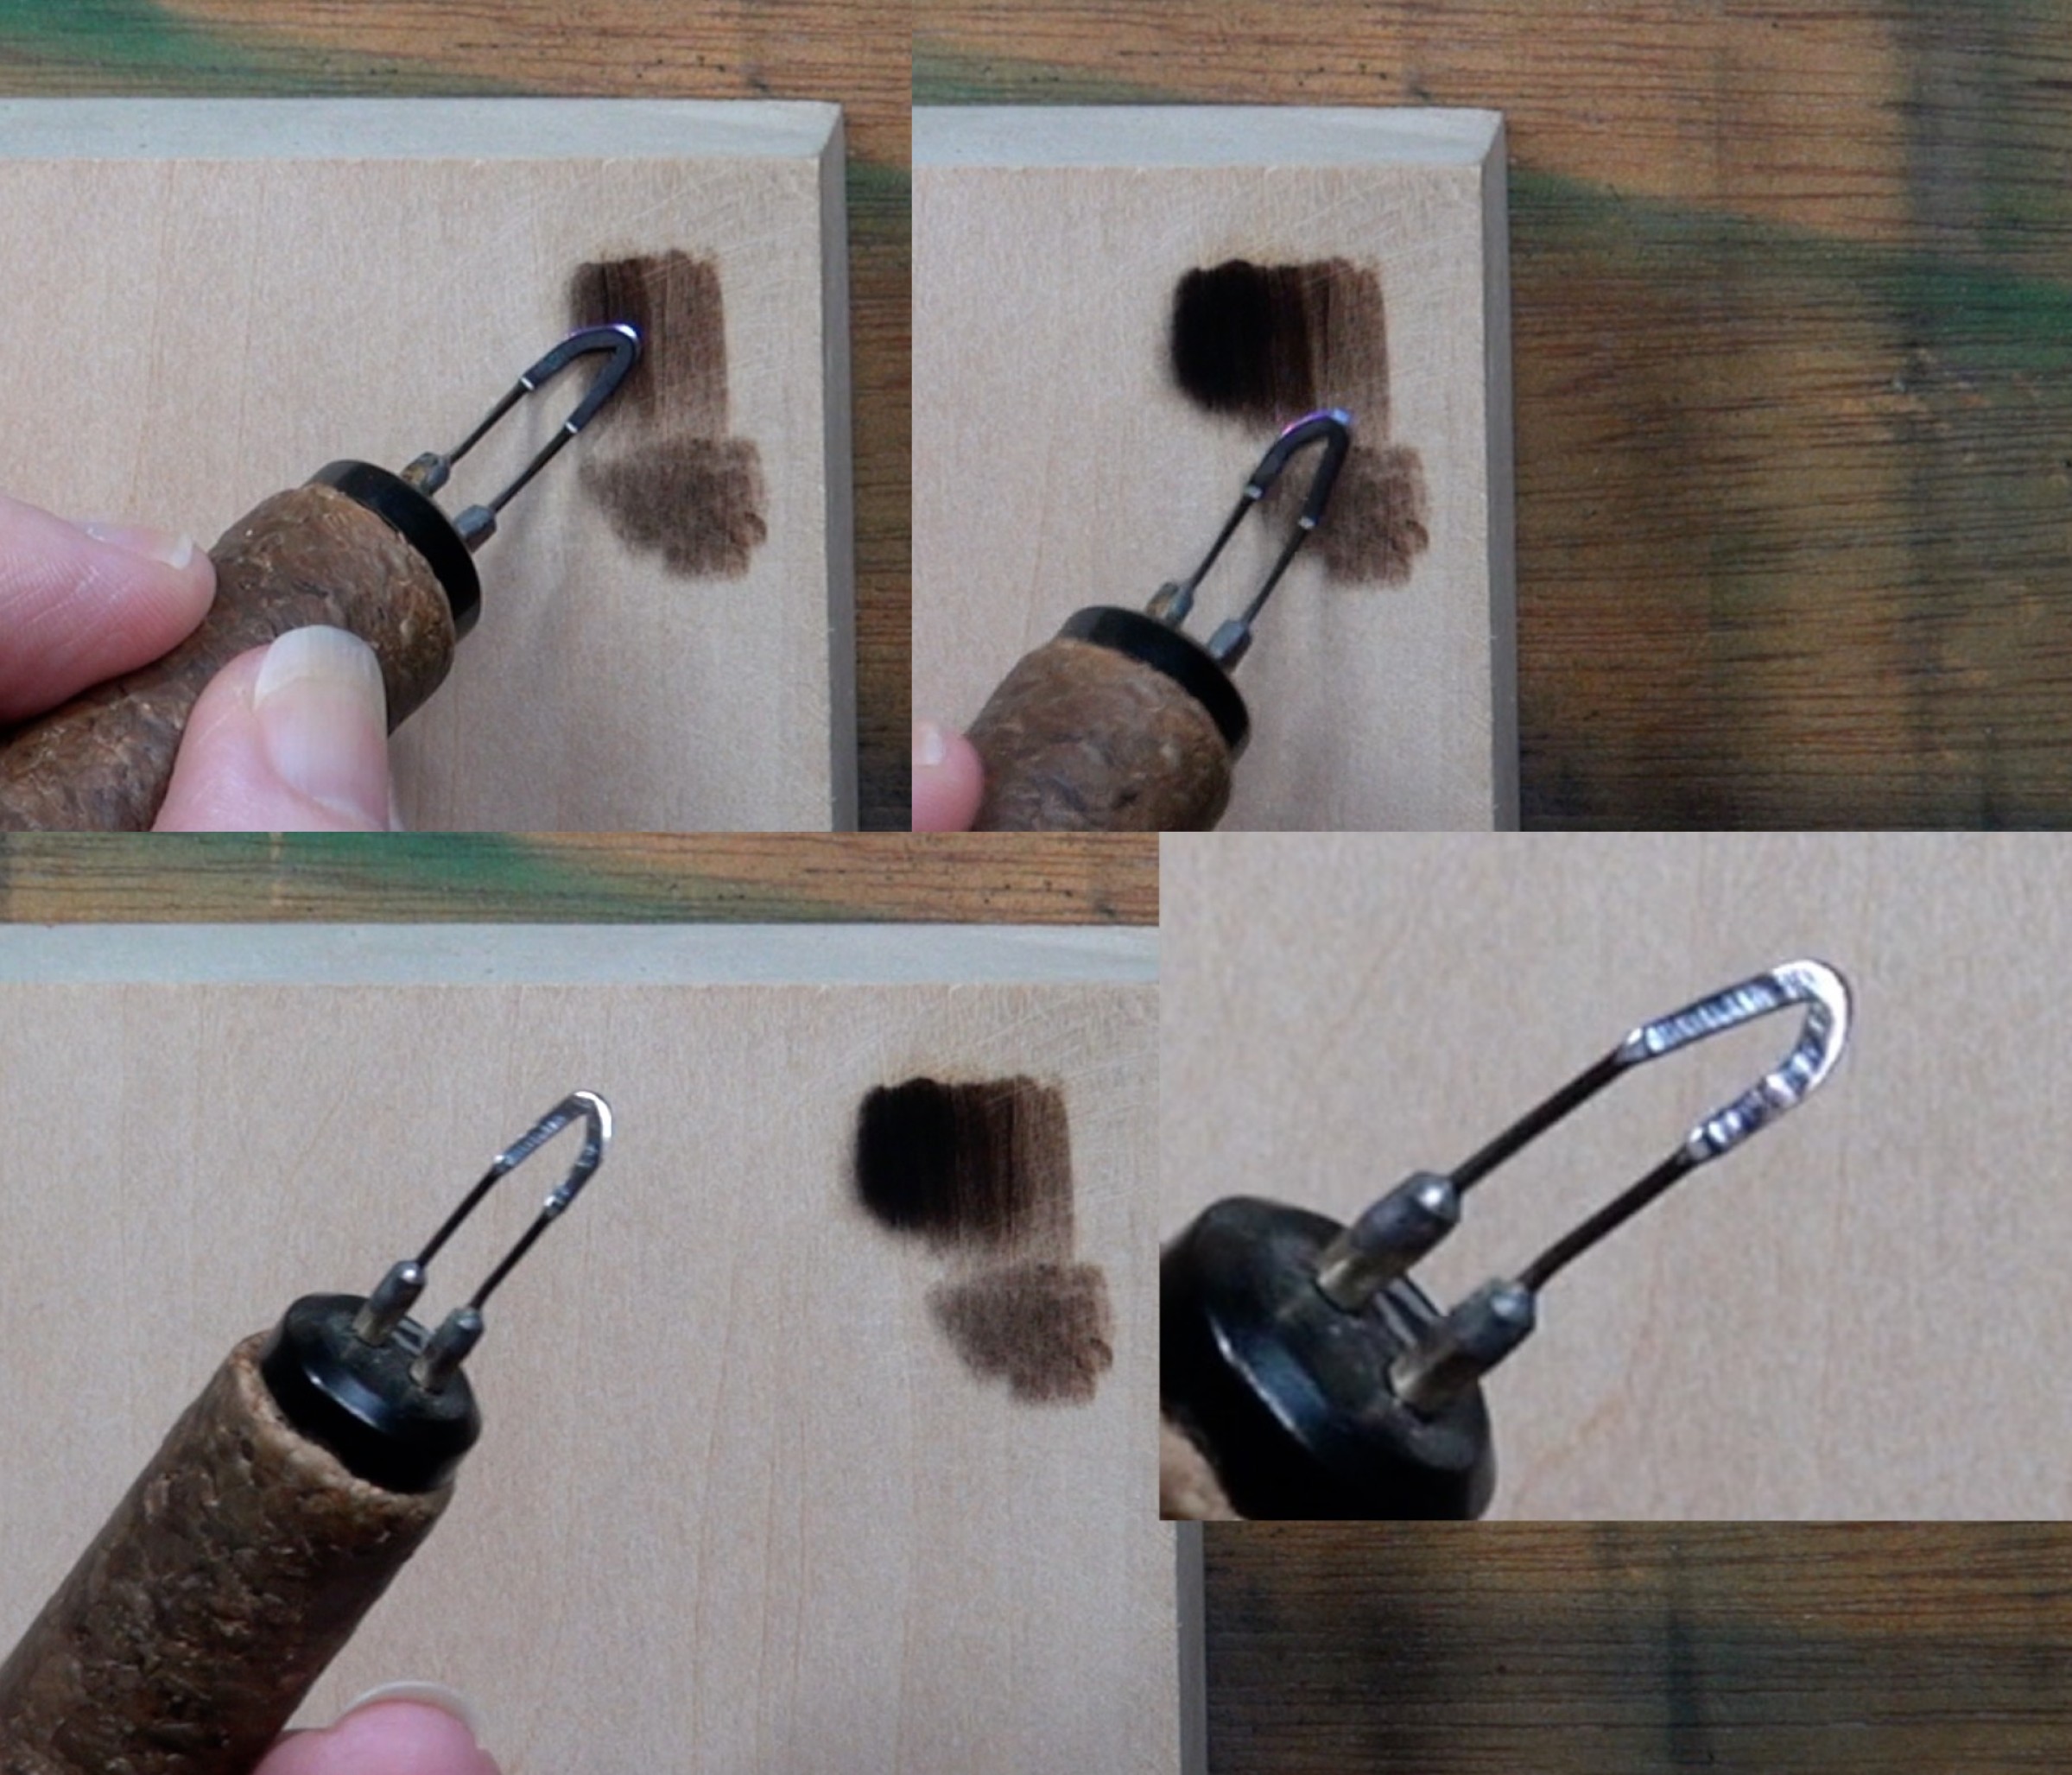 In this composite photo, I’ve done a number of different burns at increasingly higher heat. Since I wasn’t using excessively high heat, the nib remains clean.
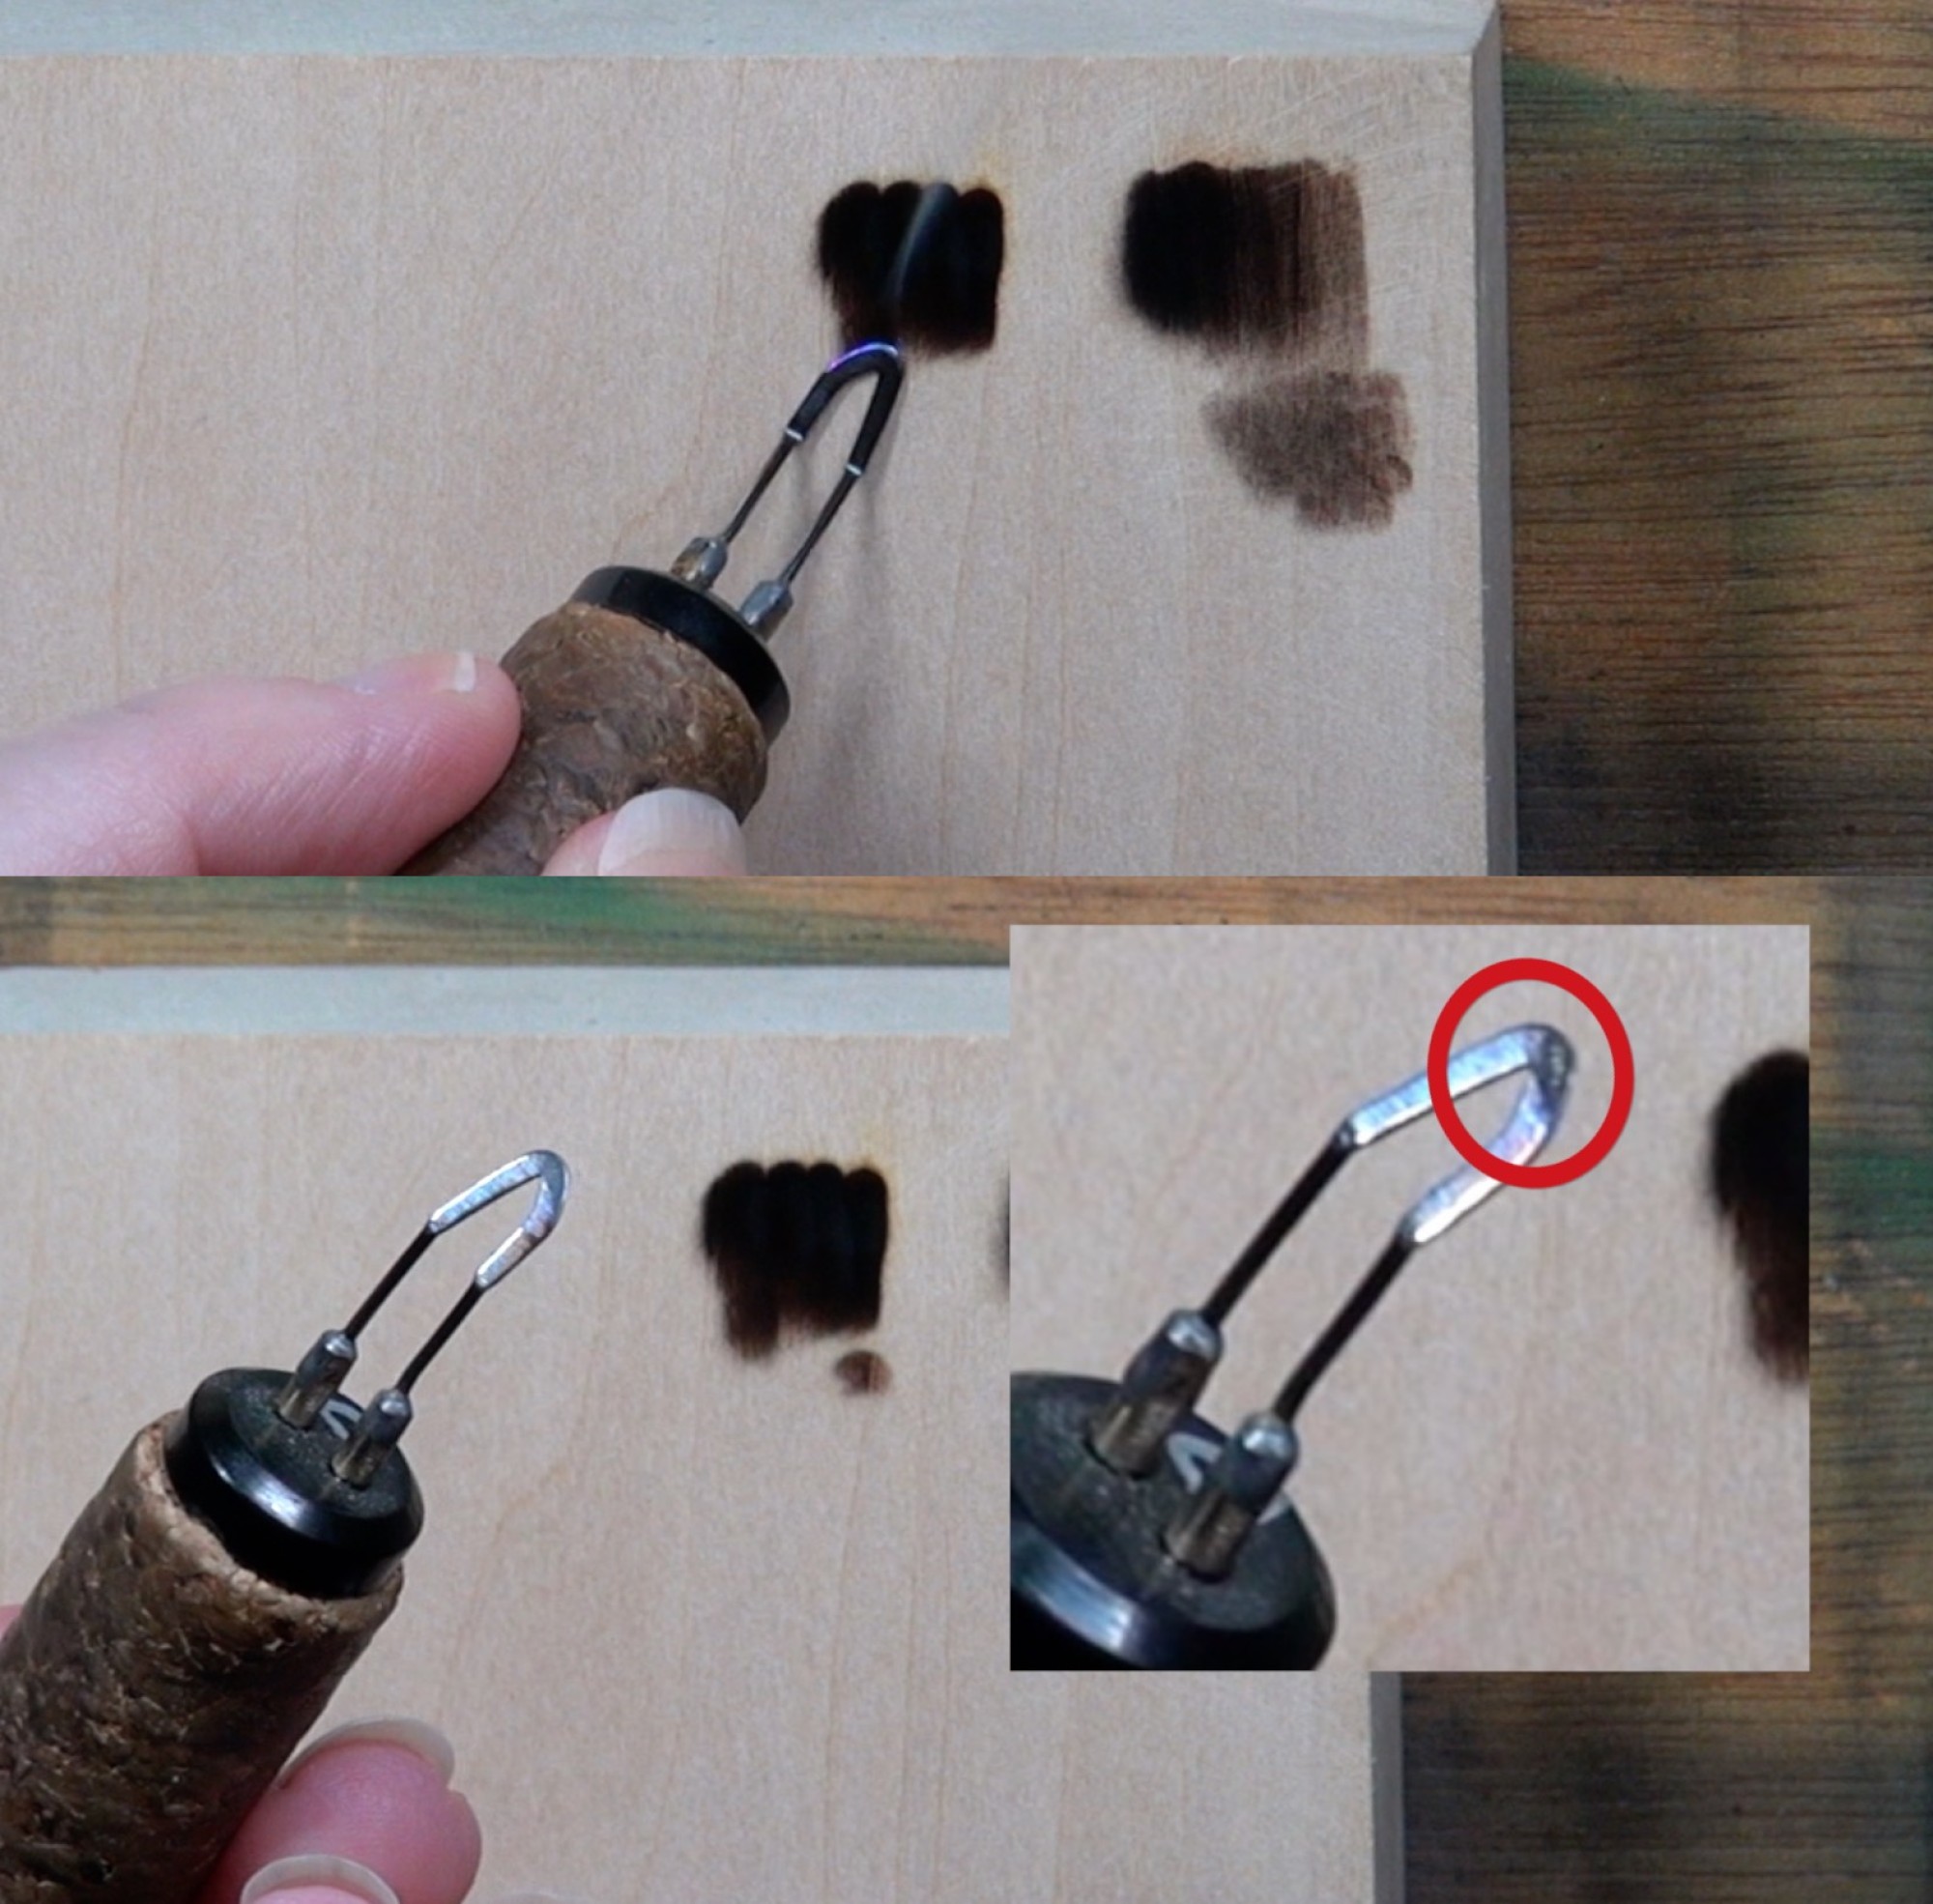 In this photo the heat setting on my burner has been significantly increased. As a result, there is considerable smoke coming from the burns, and overburn is appearing just above the area I’m burning.
After burning just four short burns, the nib has carbon build up as shown on the lower image.
Carbon build up is a problem because it acts as an insulator. This means it prevents the nib heat from reaching the board resulting in a lighter colored burn result. Often artists will compensate for this by increasing the heat on their burner. This results in more carbon build up, lighter burner results, and another heat increase on their burner, etc. All of this could be prevented by burning at a lower heat setting.
 In addition to carbon build up on the nib, there is a risk of carbon residue on the board.
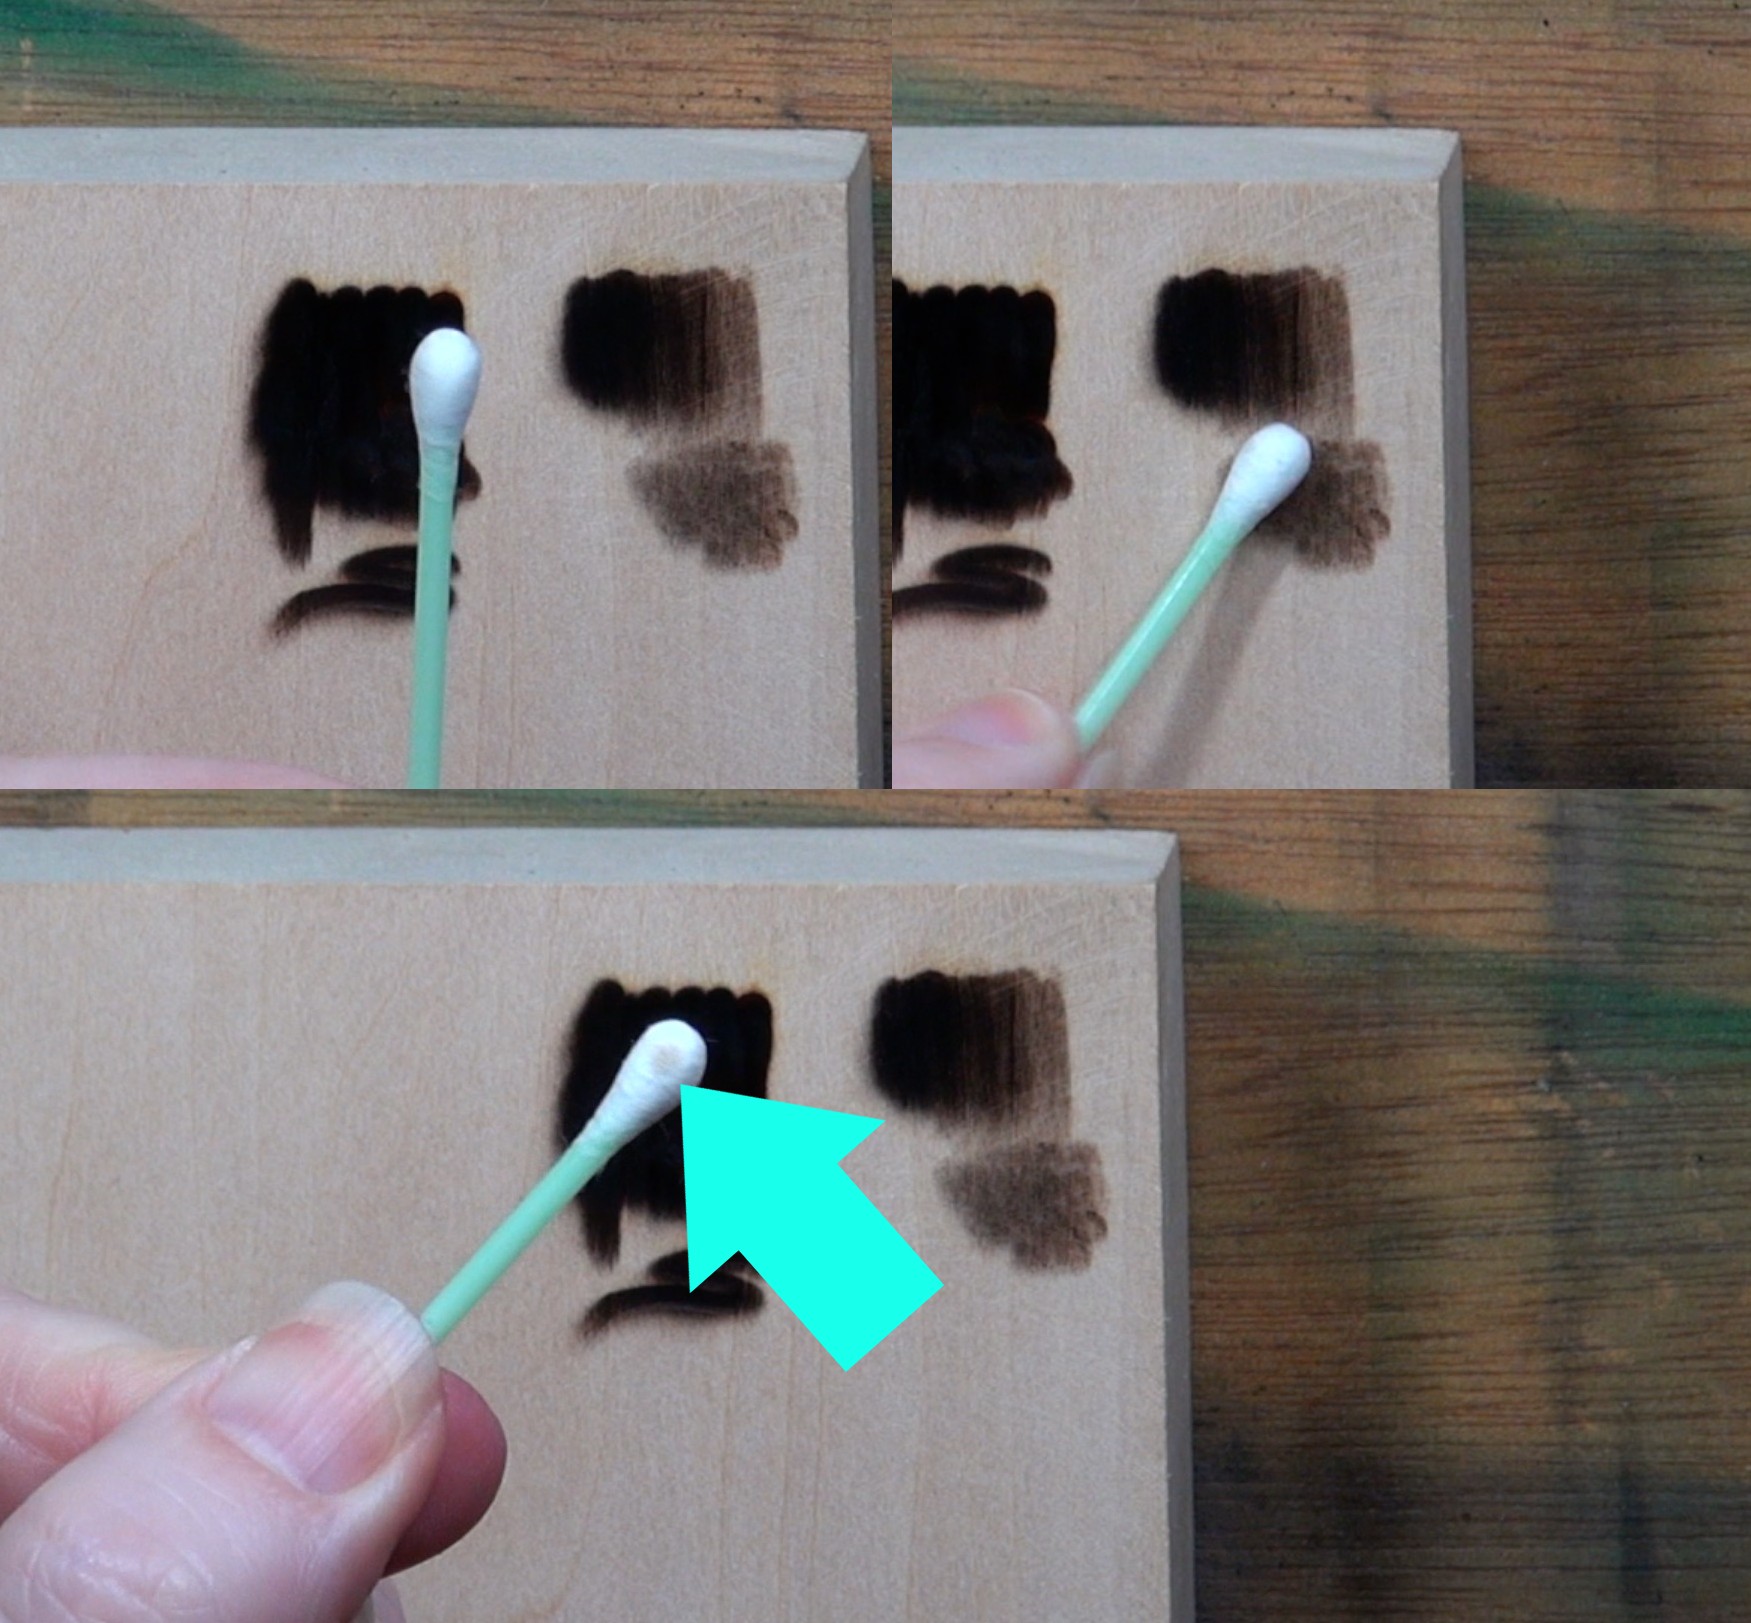
I’ve got a clean Q-tip and I’m wiping it over the first group of burns that were done at a lower heat setting. In the bottom photo you can see just the slightest bit of carbon residue was picked up by the Q-tip.
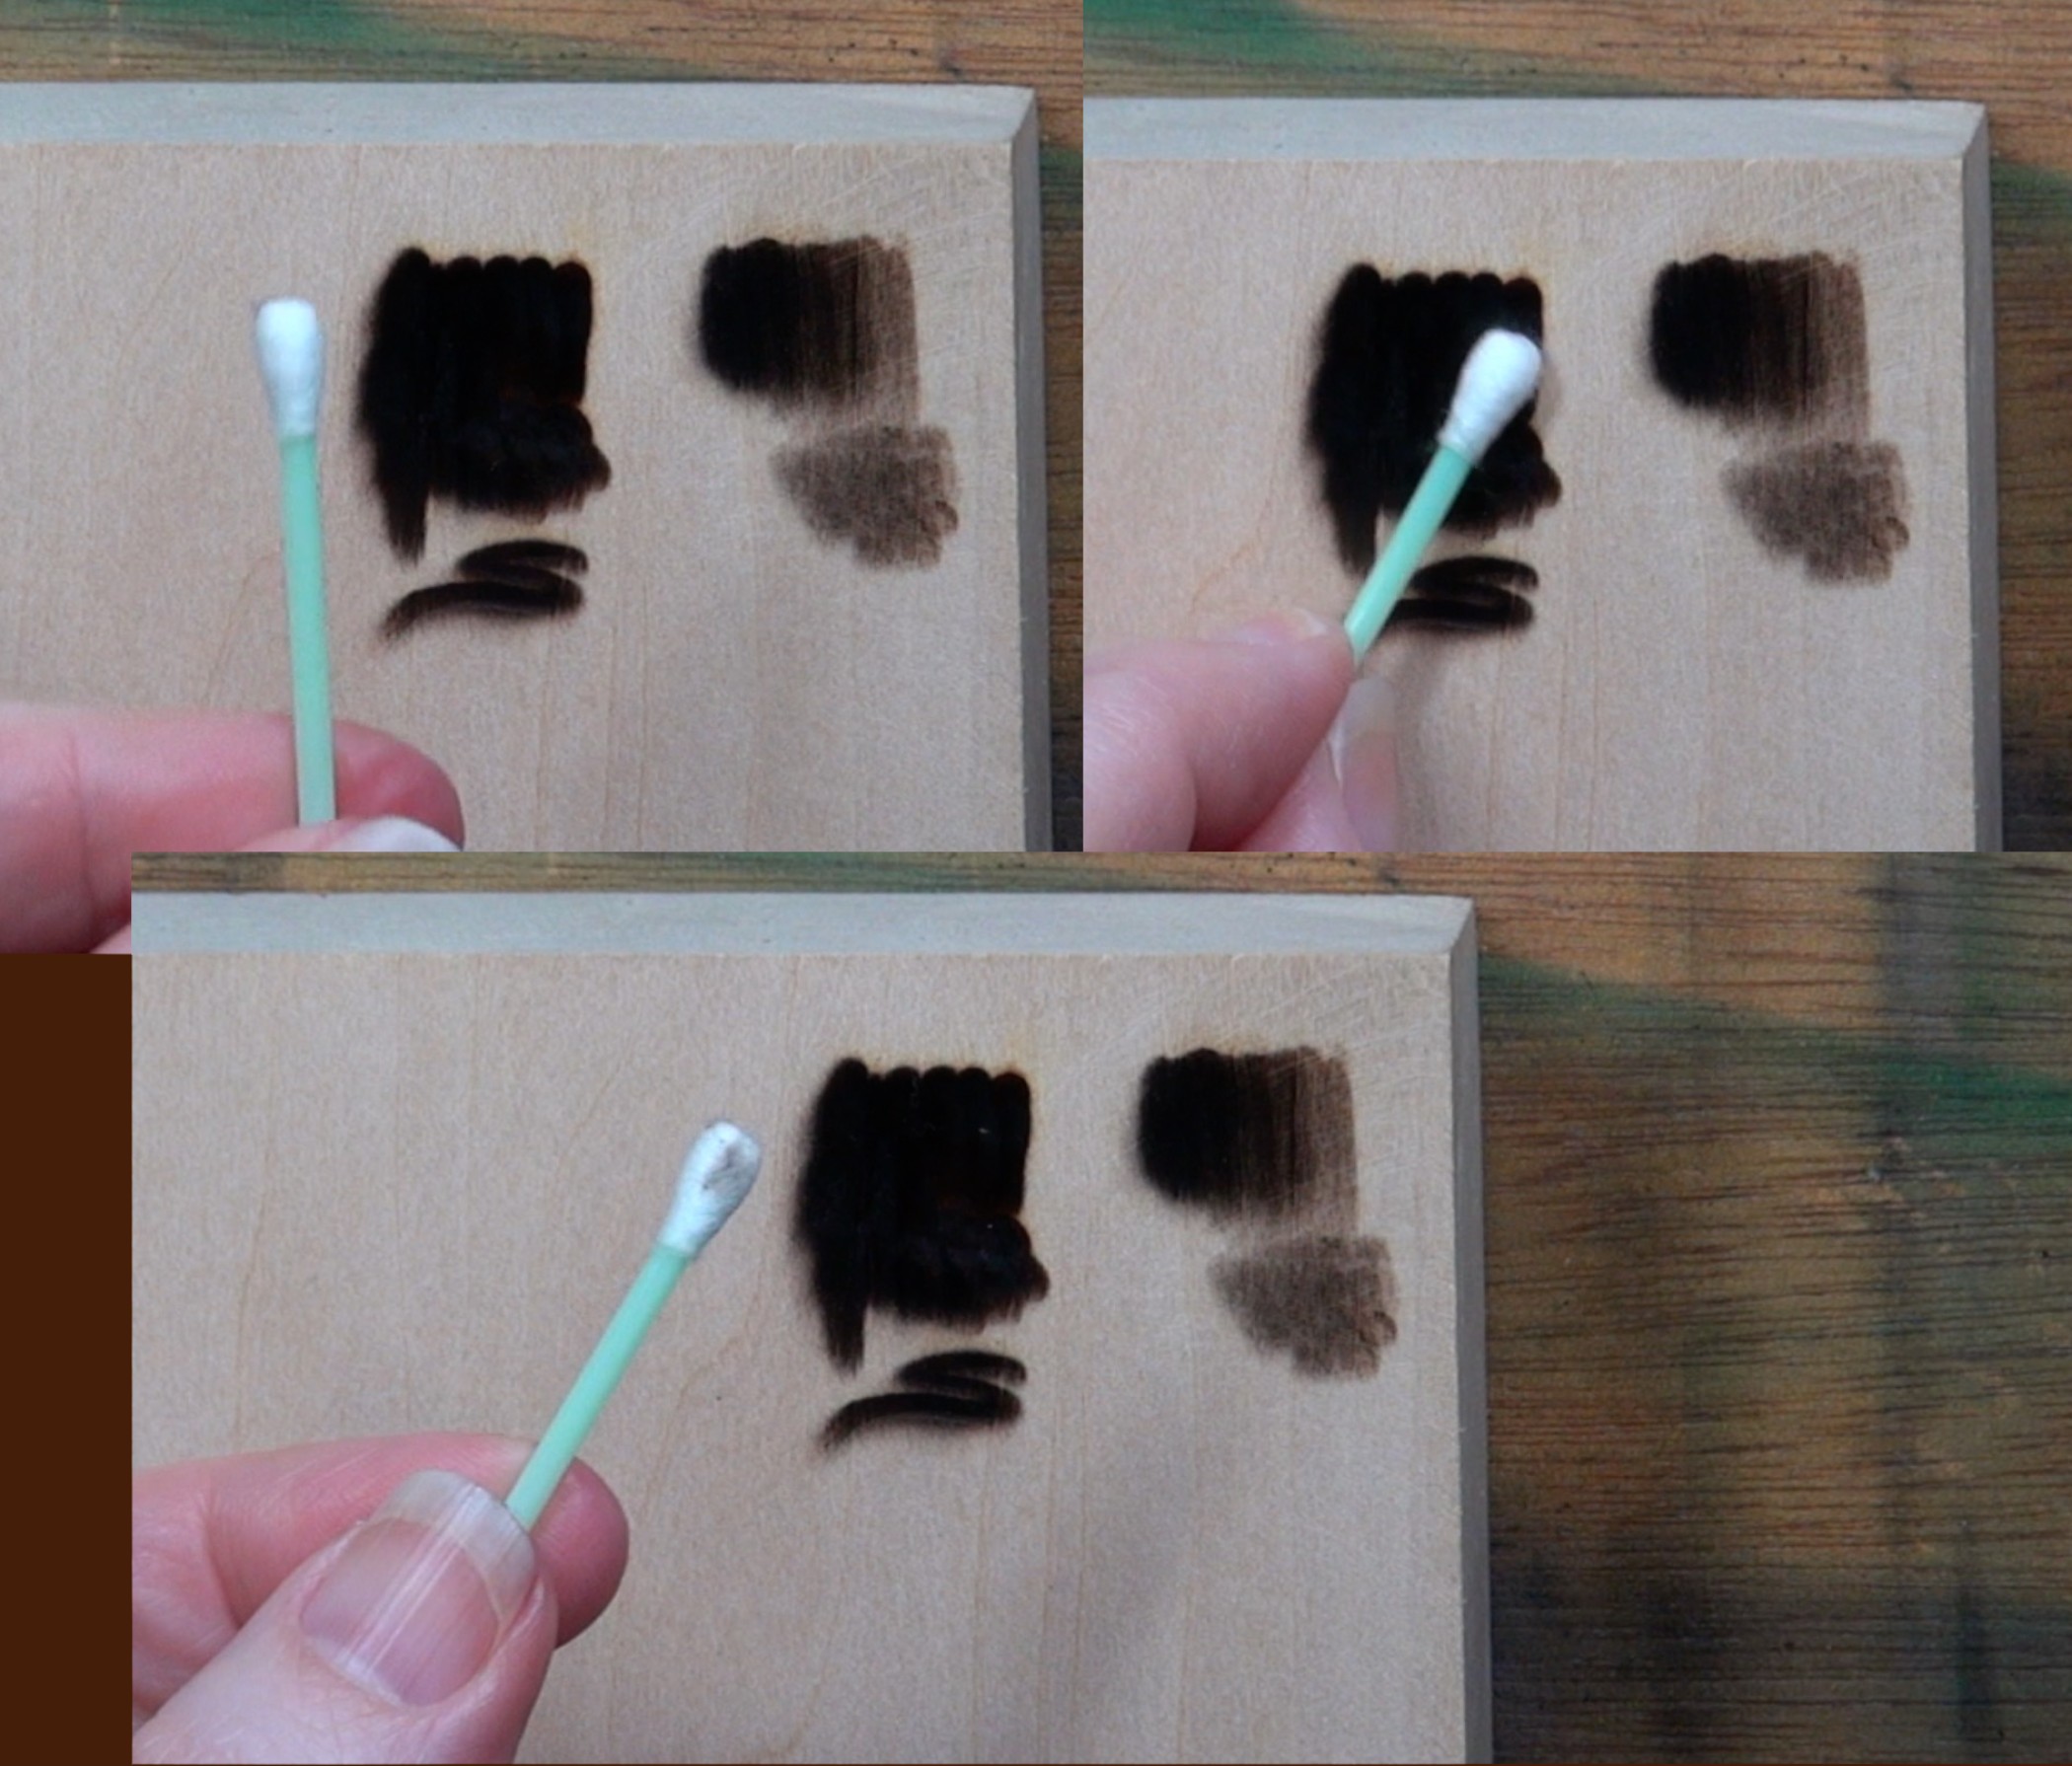 When I test the high heat burn, it is easy to see the carbon residue the Q-tip wiped off the board.
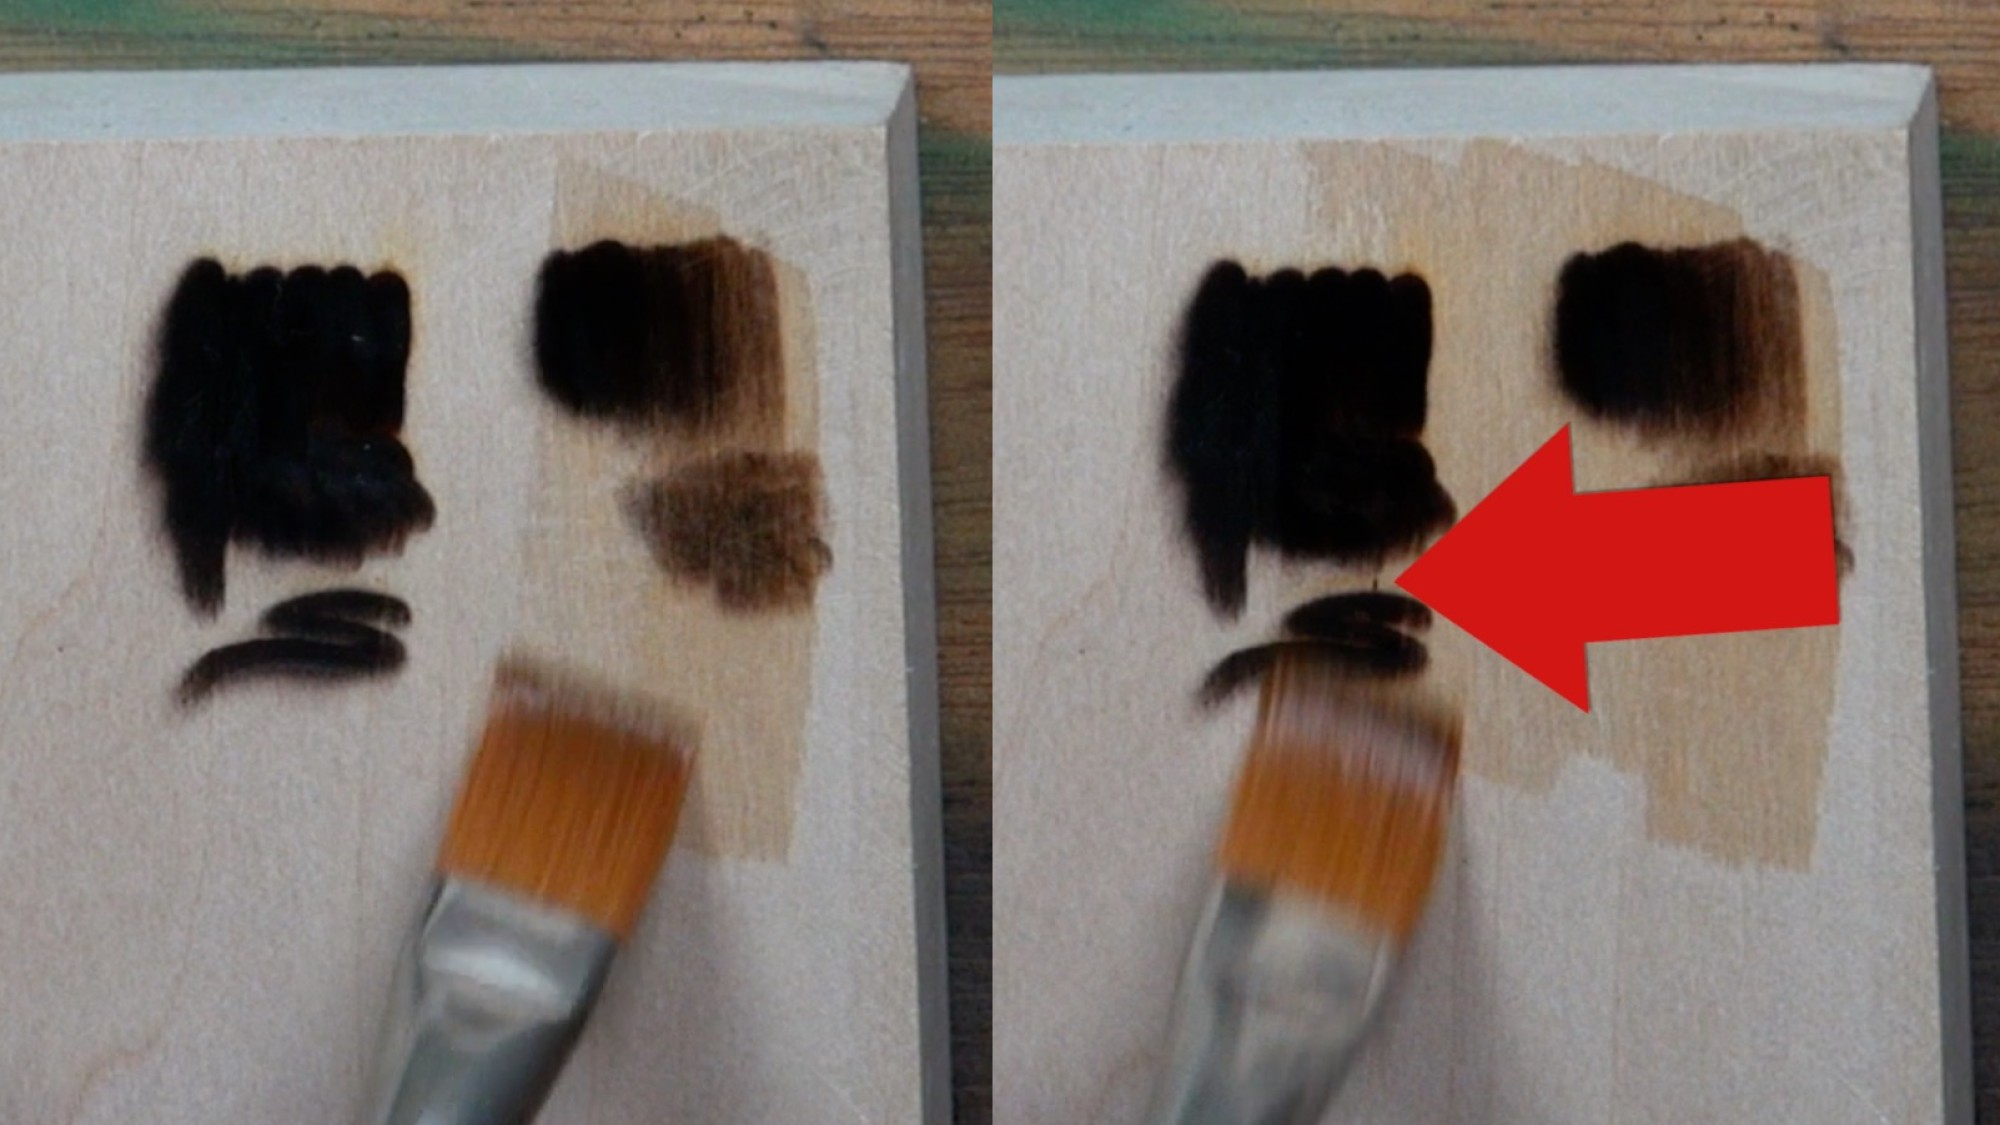 Carbon residue can be a problem if you are applying a brush on liquid.
The liquid can be something like watercolors or a wood finish. In this photo I’m brushing on plain water.
The red arrow is pointing to a bit of carbon residue debris that the brush loosened. These bits of debris can become stuck in the paint or wood finish. Depending on how much carbon residue there is, the smeared debris can be very noticeable.
I do have a shorts video on YouTube that explains how to remove overburn: https://youtube.com/shorts/uh0gsQCv0Tg
There are times when you need to burn at higher heats. I have a shorts video that explains how to remove carbon build up while you’re still burning: https://youtube.com/shorts/QIIVWEnufr0
TIP 4 RECAP – Use just enough heat
*Can work in a slower more controlled fashion
*Can achieve a wider range of tonal values
*Surface textures of the burns are smoother
*Nibs stay clean longer
*Reduces overburn
*Reduces carbon build up and carbon residue
The slower you work, the lower the heat setting should be on your burner.
Tip 5 – Use minimal number of nibs
I know when I was first learning pyrography, I kept buying nibs. I was searching for the perfect nib that would let me burn like the artists I saw on the internet. I wasted a lot of money, and I don’t want you to do the same thing. Instead, you only need two nibs; a writer and a shader. I would highly recommend sticking with these two nibs until you get really comfortable with them.
Why? By concentrating on a few nibs, you learn those nibs. You learn how to position them to get the burn results you want. You learn what their working temperature is. You get comfortable with the nibs, so that you can concentrate on creating artwork instead of messing around with the burner.
There are a lot of nibs available, so here are my recommendations.
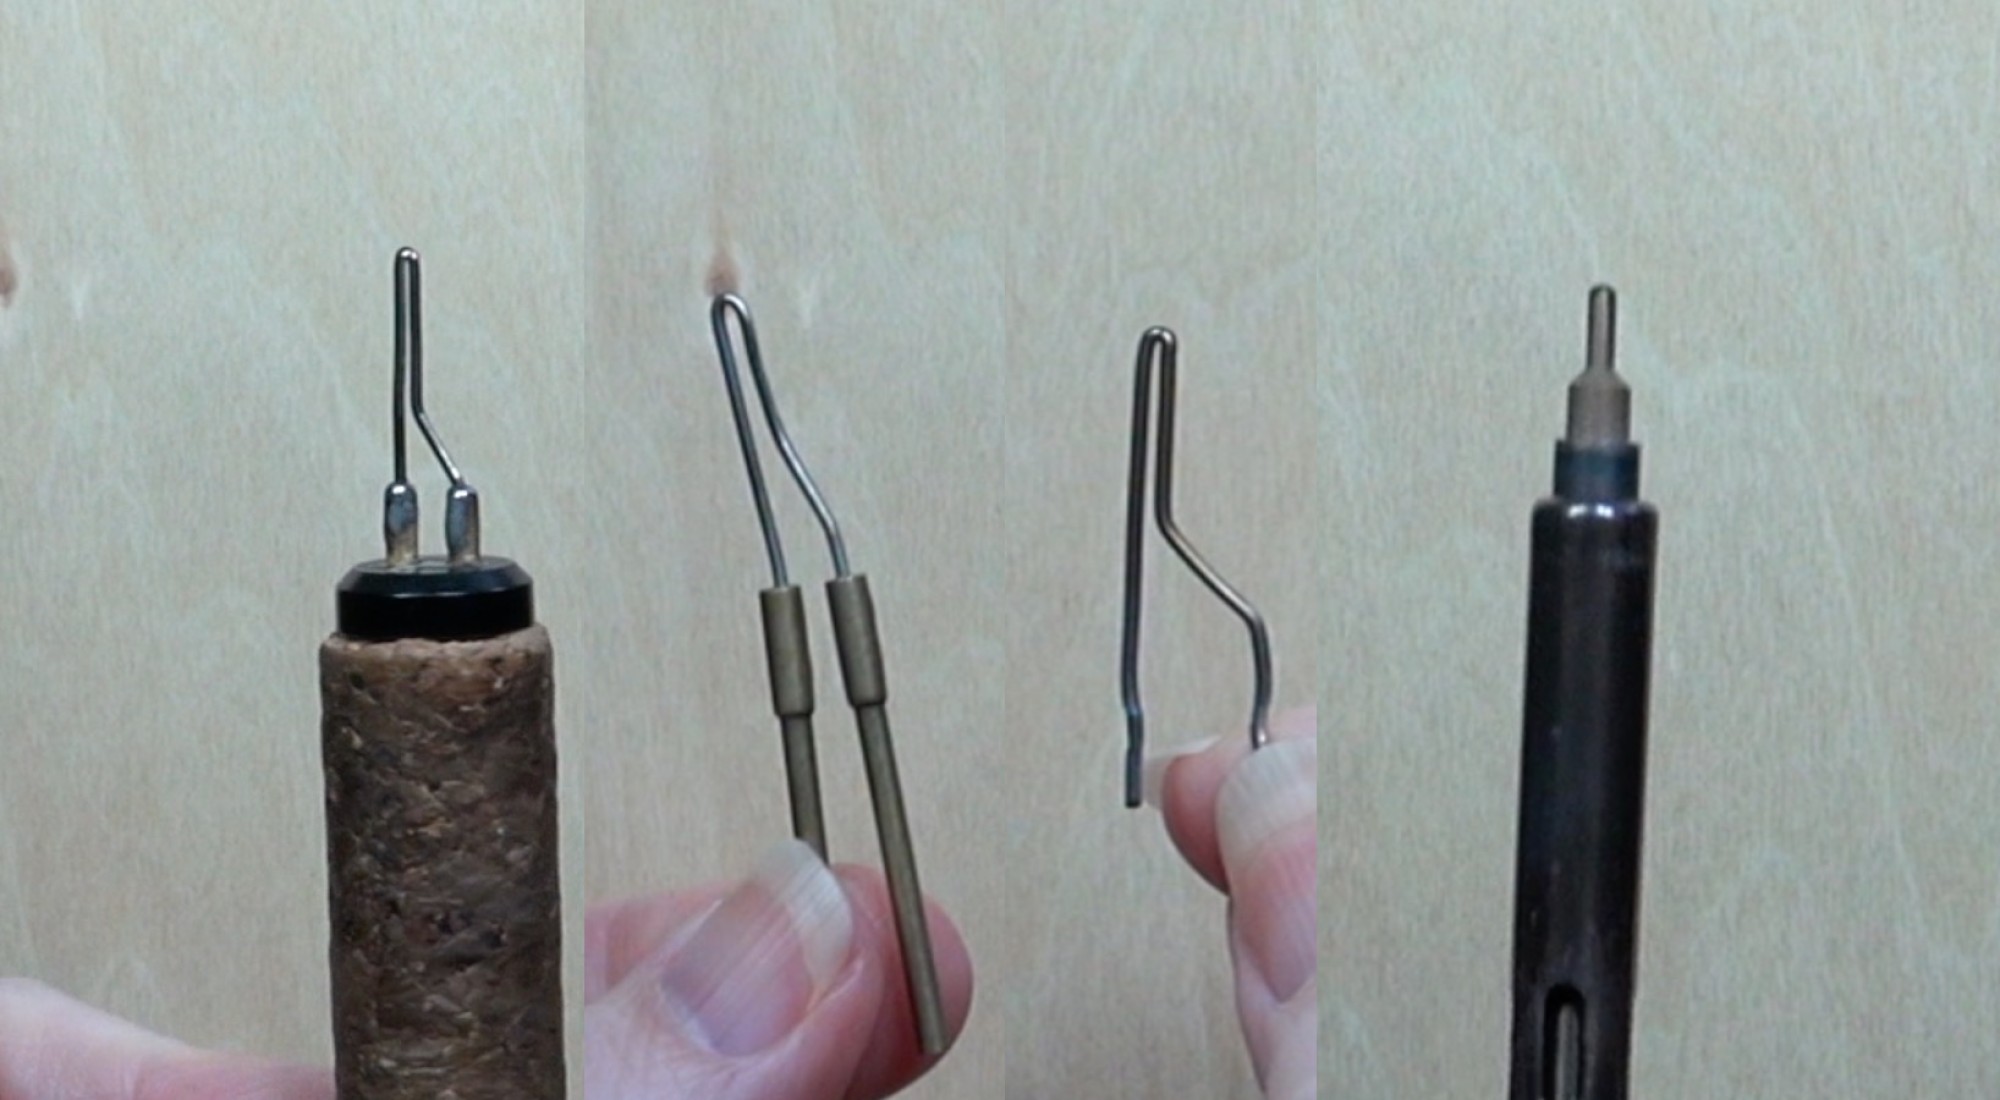 First up a writer nib. Every brand of burner has one. If you use brass nibs, I would select one similar to the one shown in the photo.
From left to right the nibs are Colwood standard writer, Burnmaster writer, unmounted wire nib writer, and a brass nib.
 Writer nibs are excellent for burning lines that are consistent in width.
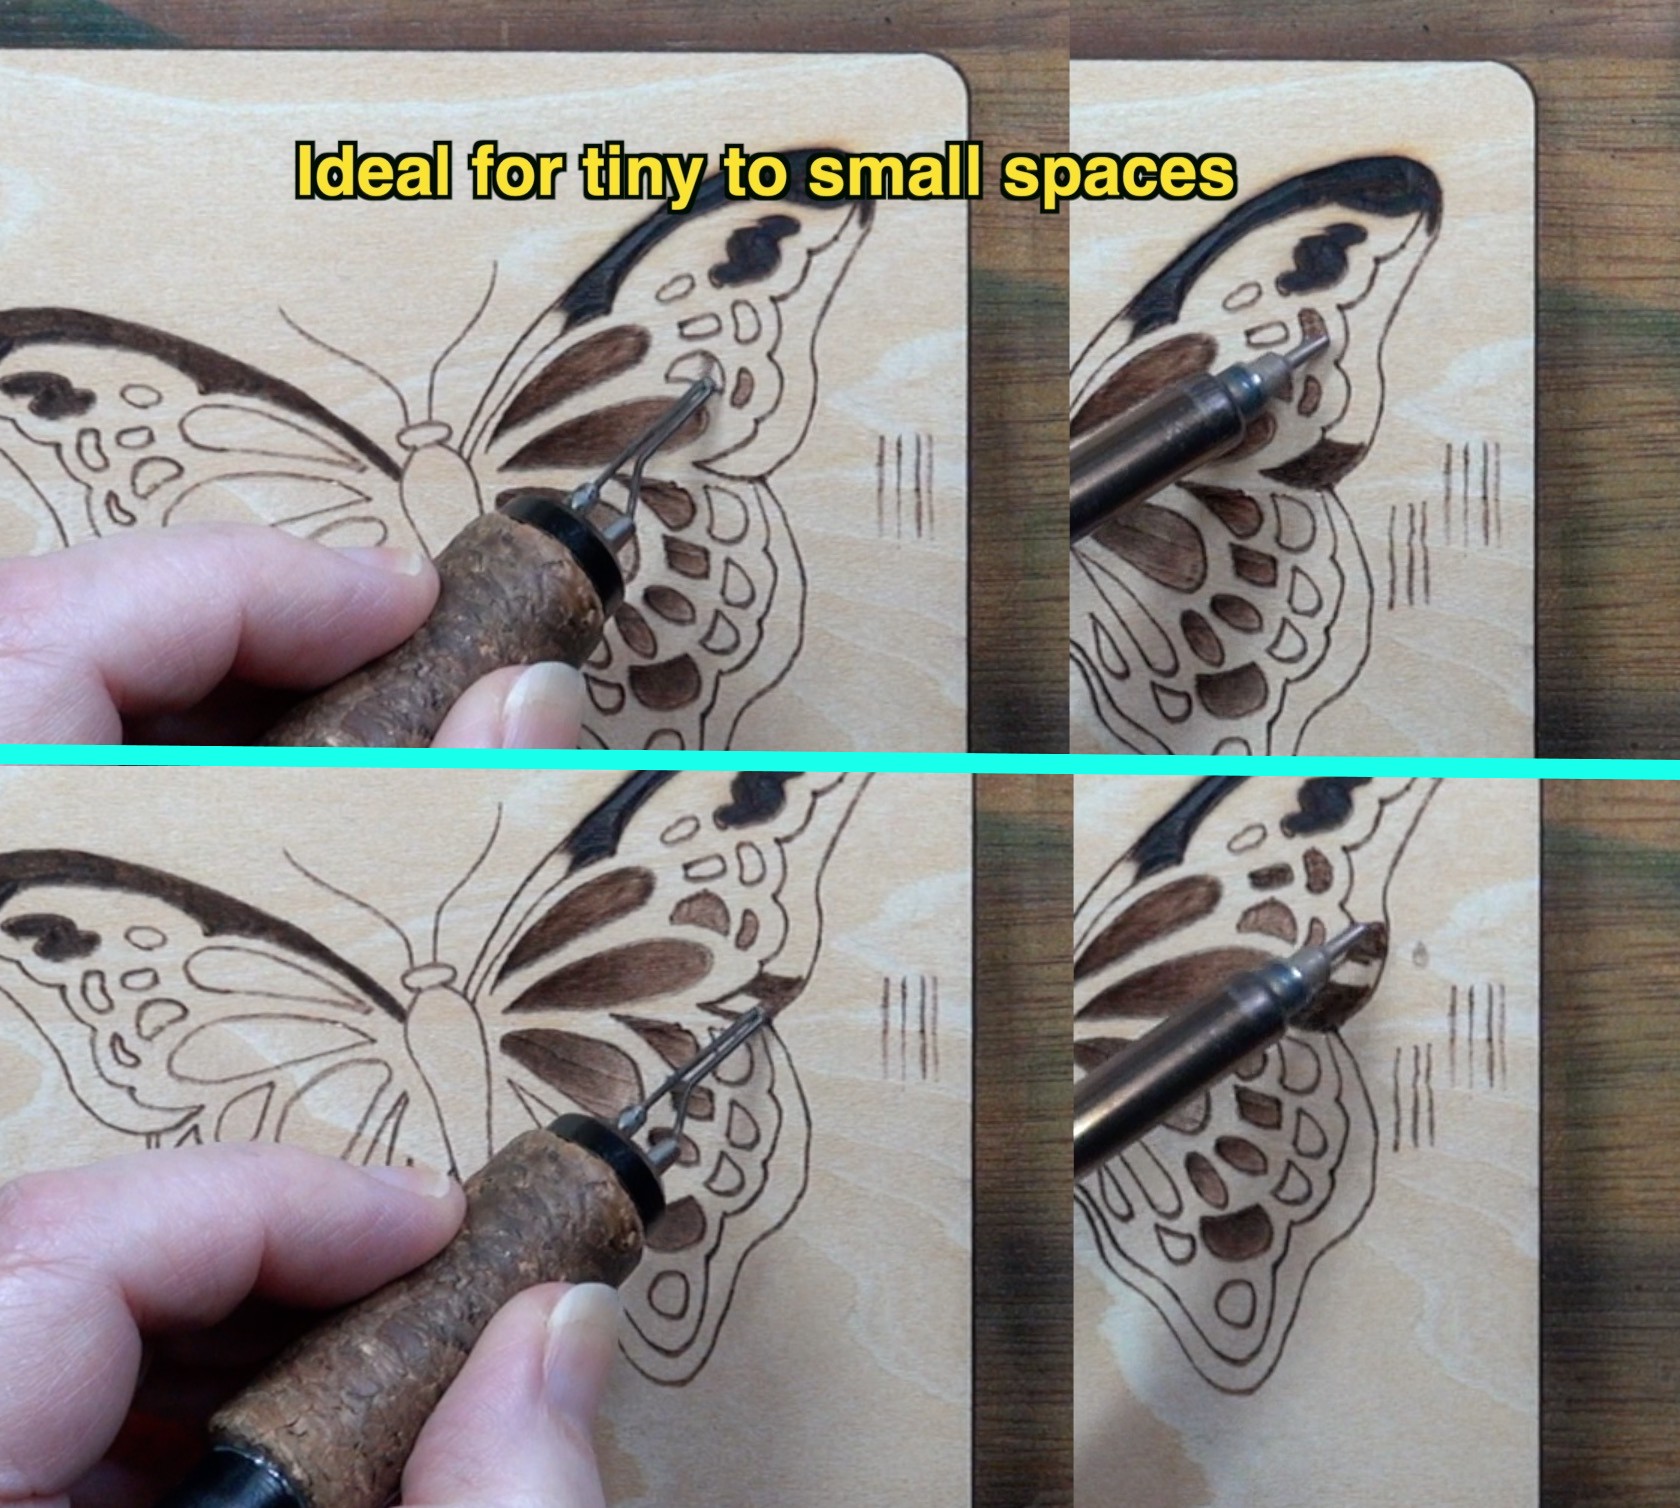
Writer nibs are perfect for working in tiny to small areas. While they can be used in larger areas, it is often easier and quicker to use a shader.
 I do have a tutorial that explain how to create this Easter chick artwork using nothing but a writer nib.
The tutorial is extremely beginner friendly.
Not only do I show you a number of simple textures you can create with the nib, but you end up with really cute artwork that you can use as an Easter decoration. My artwork measures 8 x 10 inches (20.3 x 25.4 cm) and it took me 7 hours to do. Considering the size and that I only used a writer nib, I’m rather impressed at how little time it took to do.
Here’s a link to that blog: Easter Chick tutorial
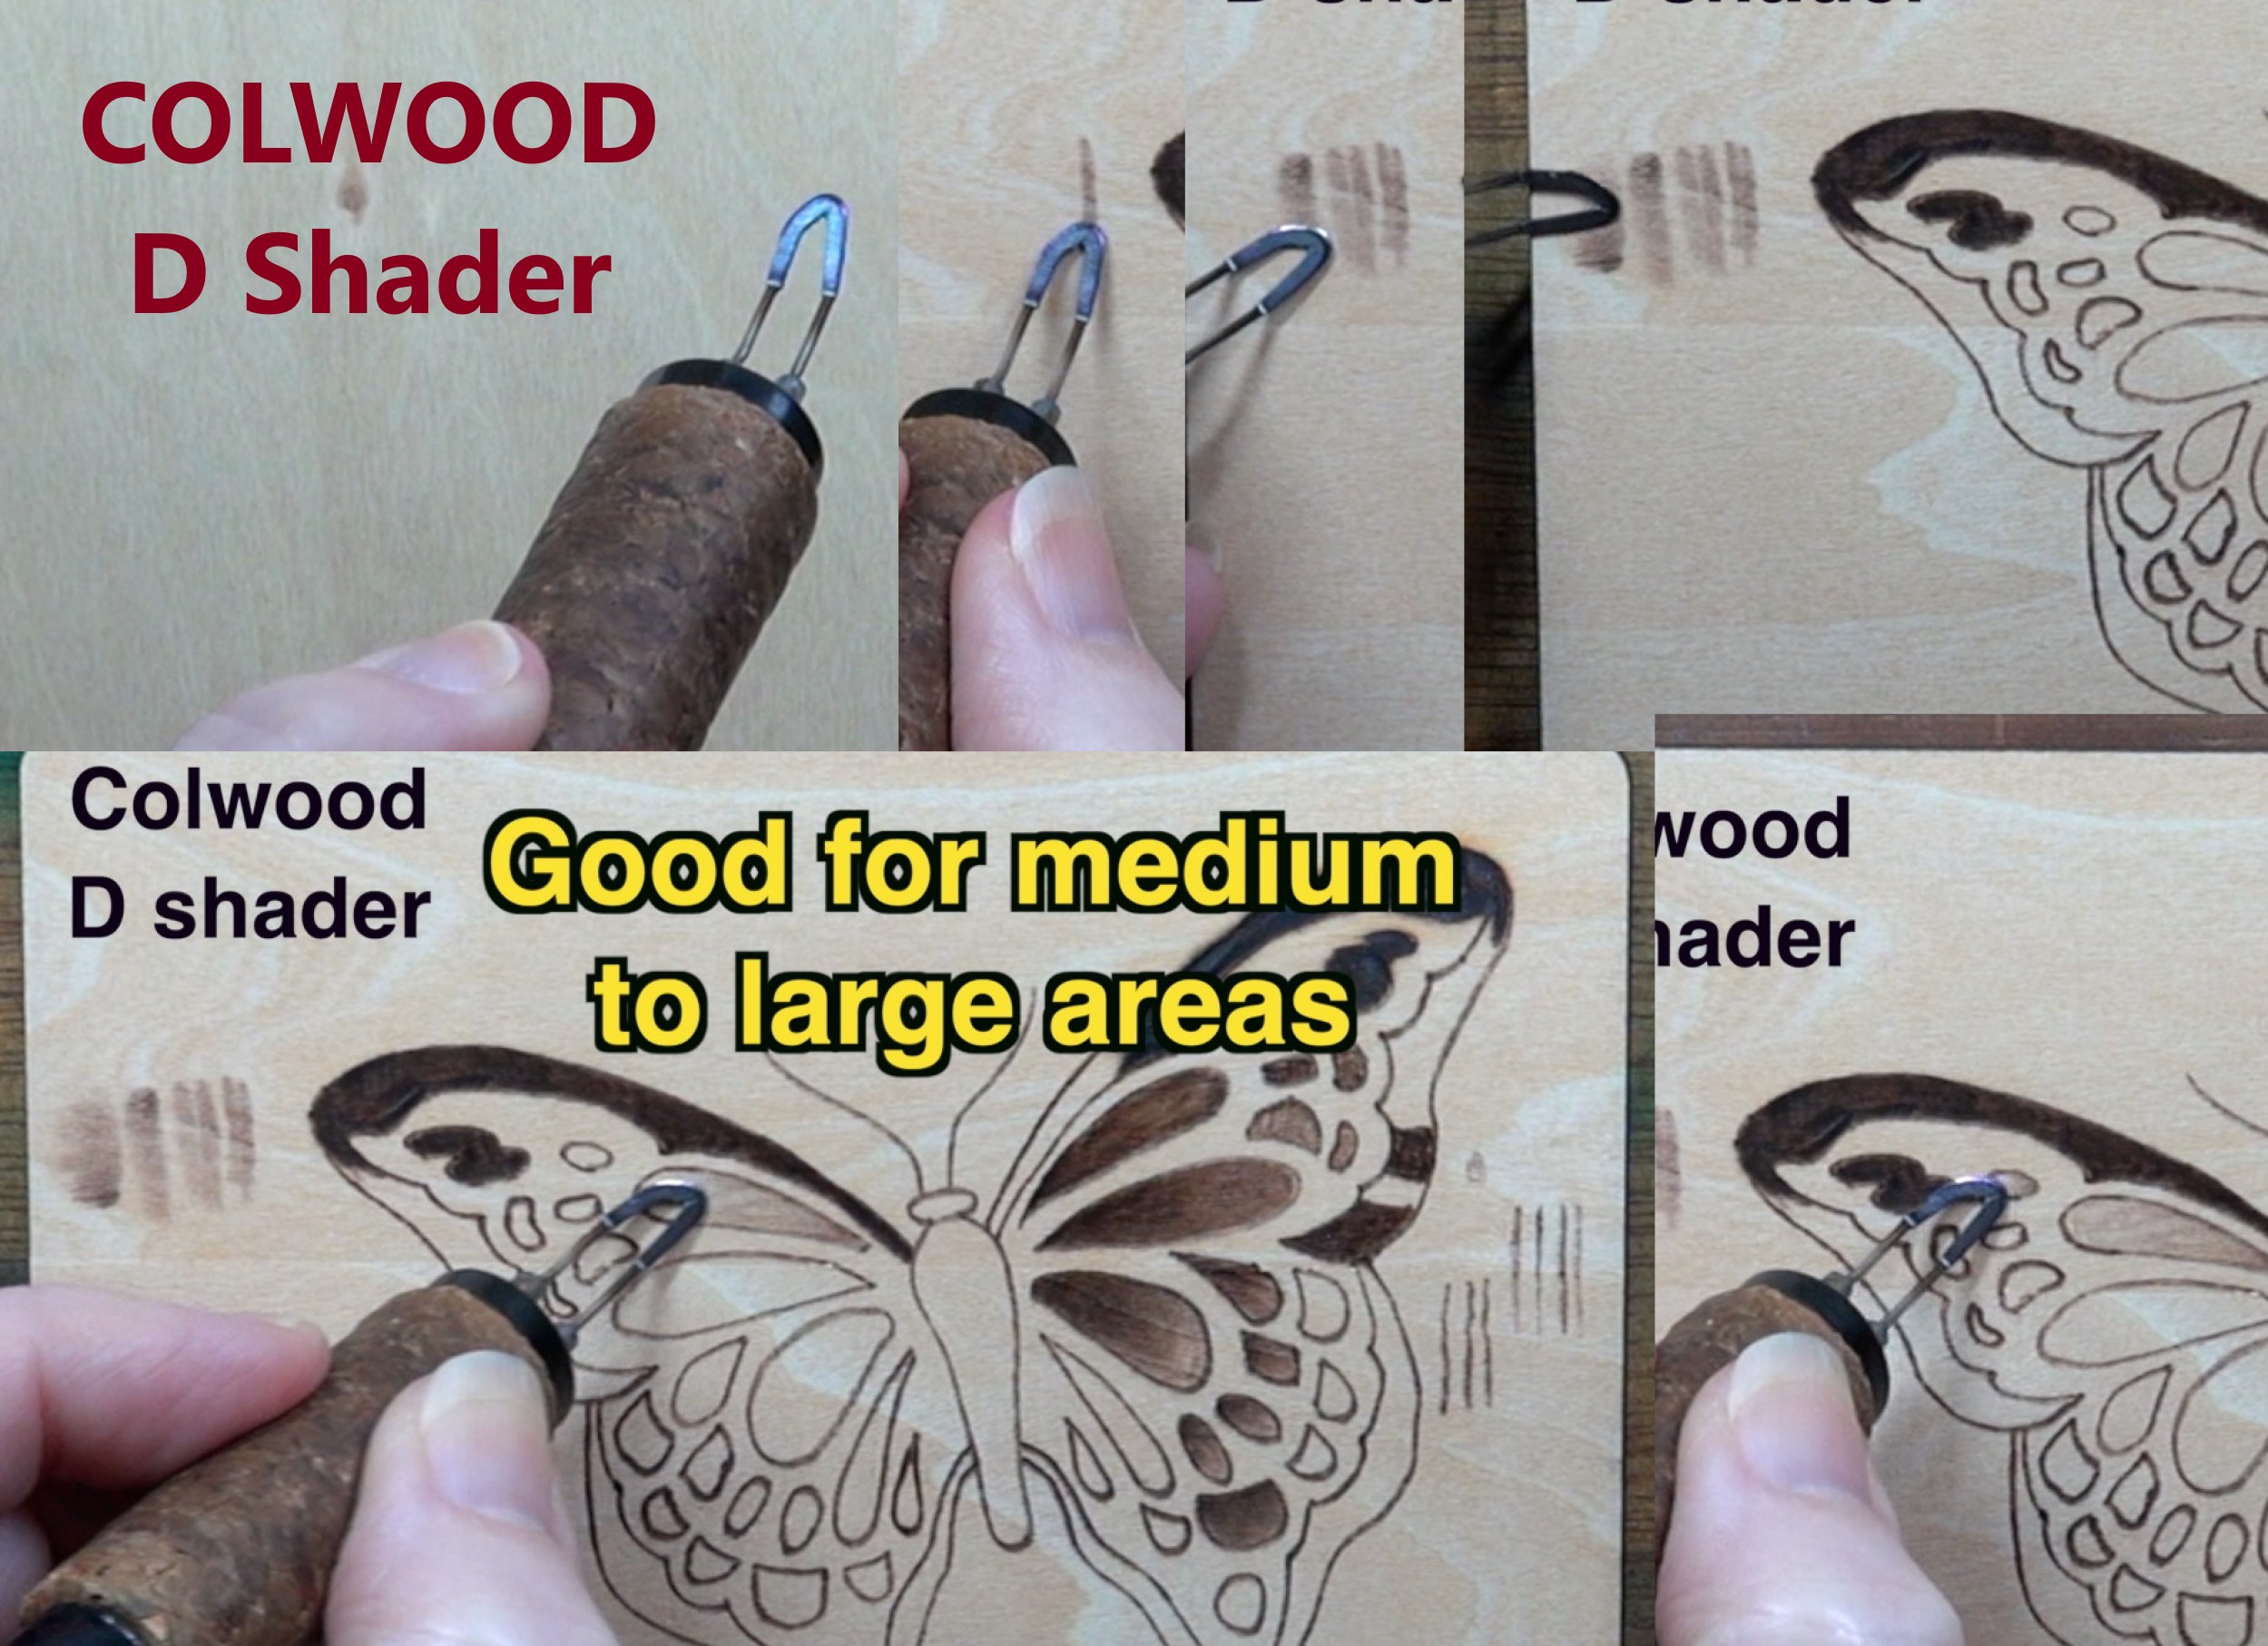 If you have a Colwood burner, I recommend the D shader. This shader has a 3 different sides that are different lengths, so you can create a large variety of burn widths.
If you are careful, you can use the shader in small spaces, but a writer nib would be easier. Where this shader shines is when you’re burning in medium to large spaces.
Here’s a link to Colwood’s website: https://woodburning.com
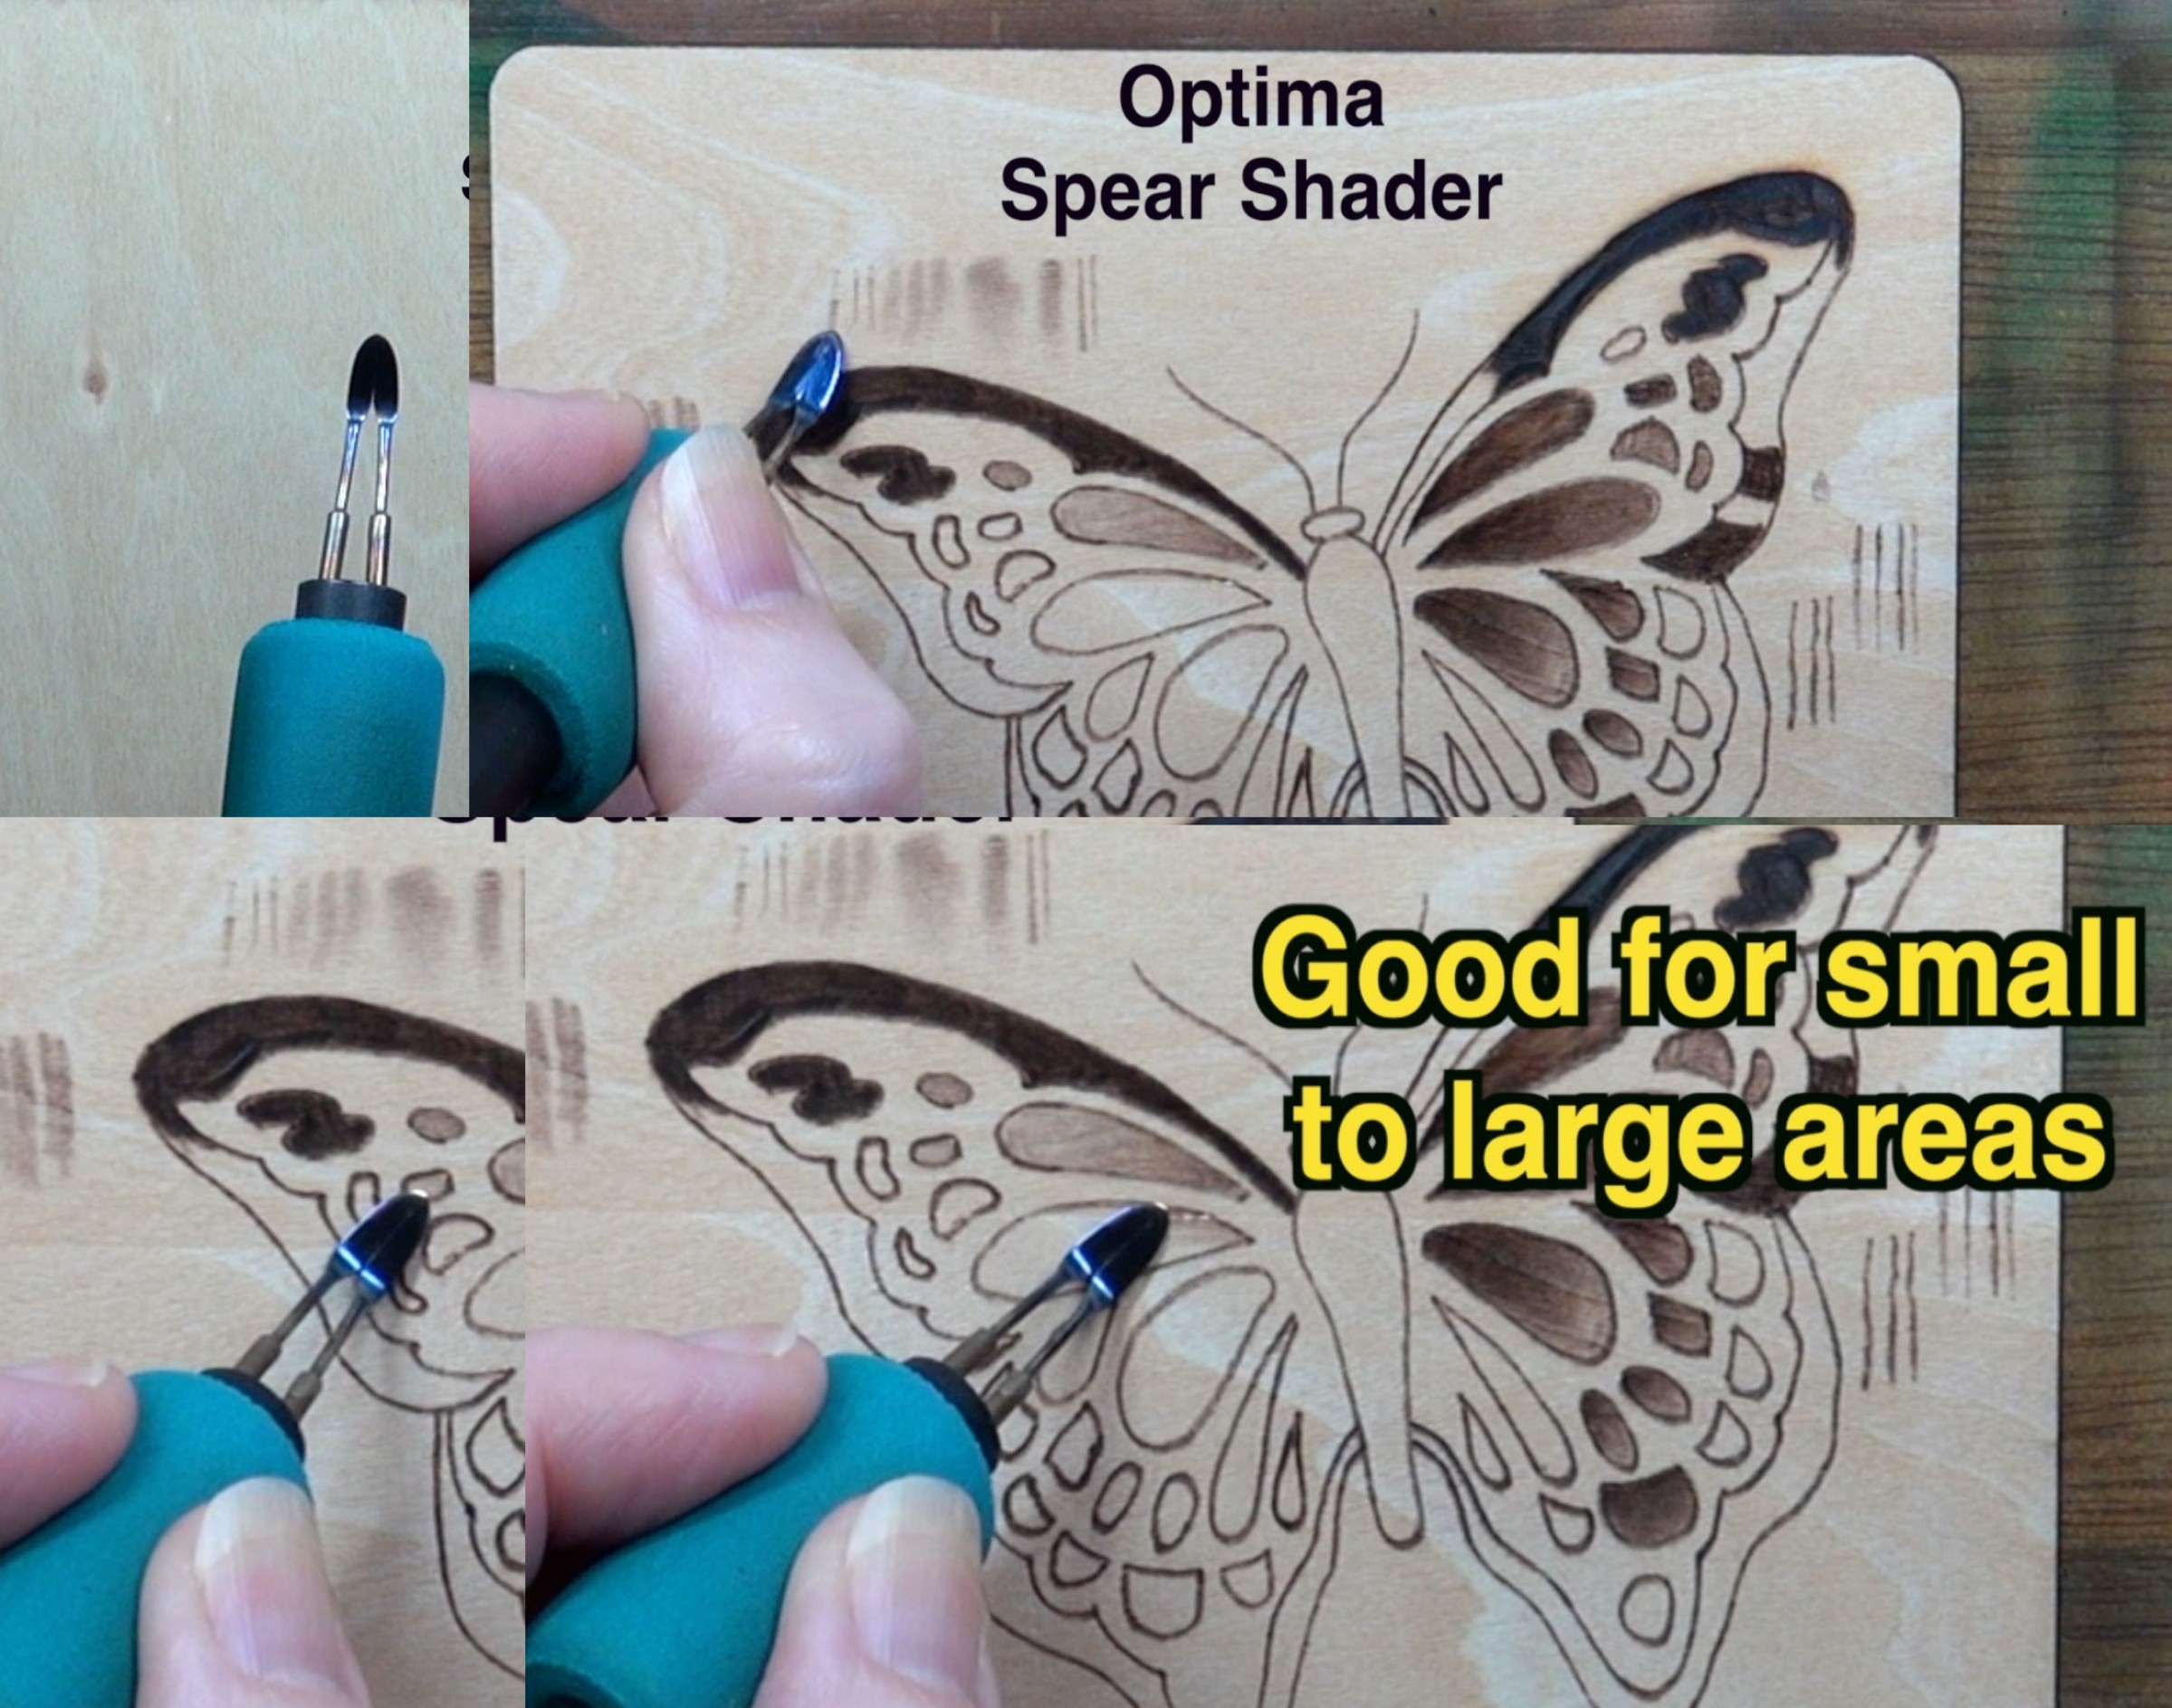 If you have an Optima burner, I recommend Optima’s spear shader. The point allows for really fine lines, and makes it easy to burn in small spaces. The side of the shader is good for medium to large spaces.
I should mention that this is the only Optima shader tip I own. There could be better options, so I do recommend checking their website or checking with other Pyrography artists who use Optima burners.
Here’s a link to Optima’s website: https://www.carvertools.com
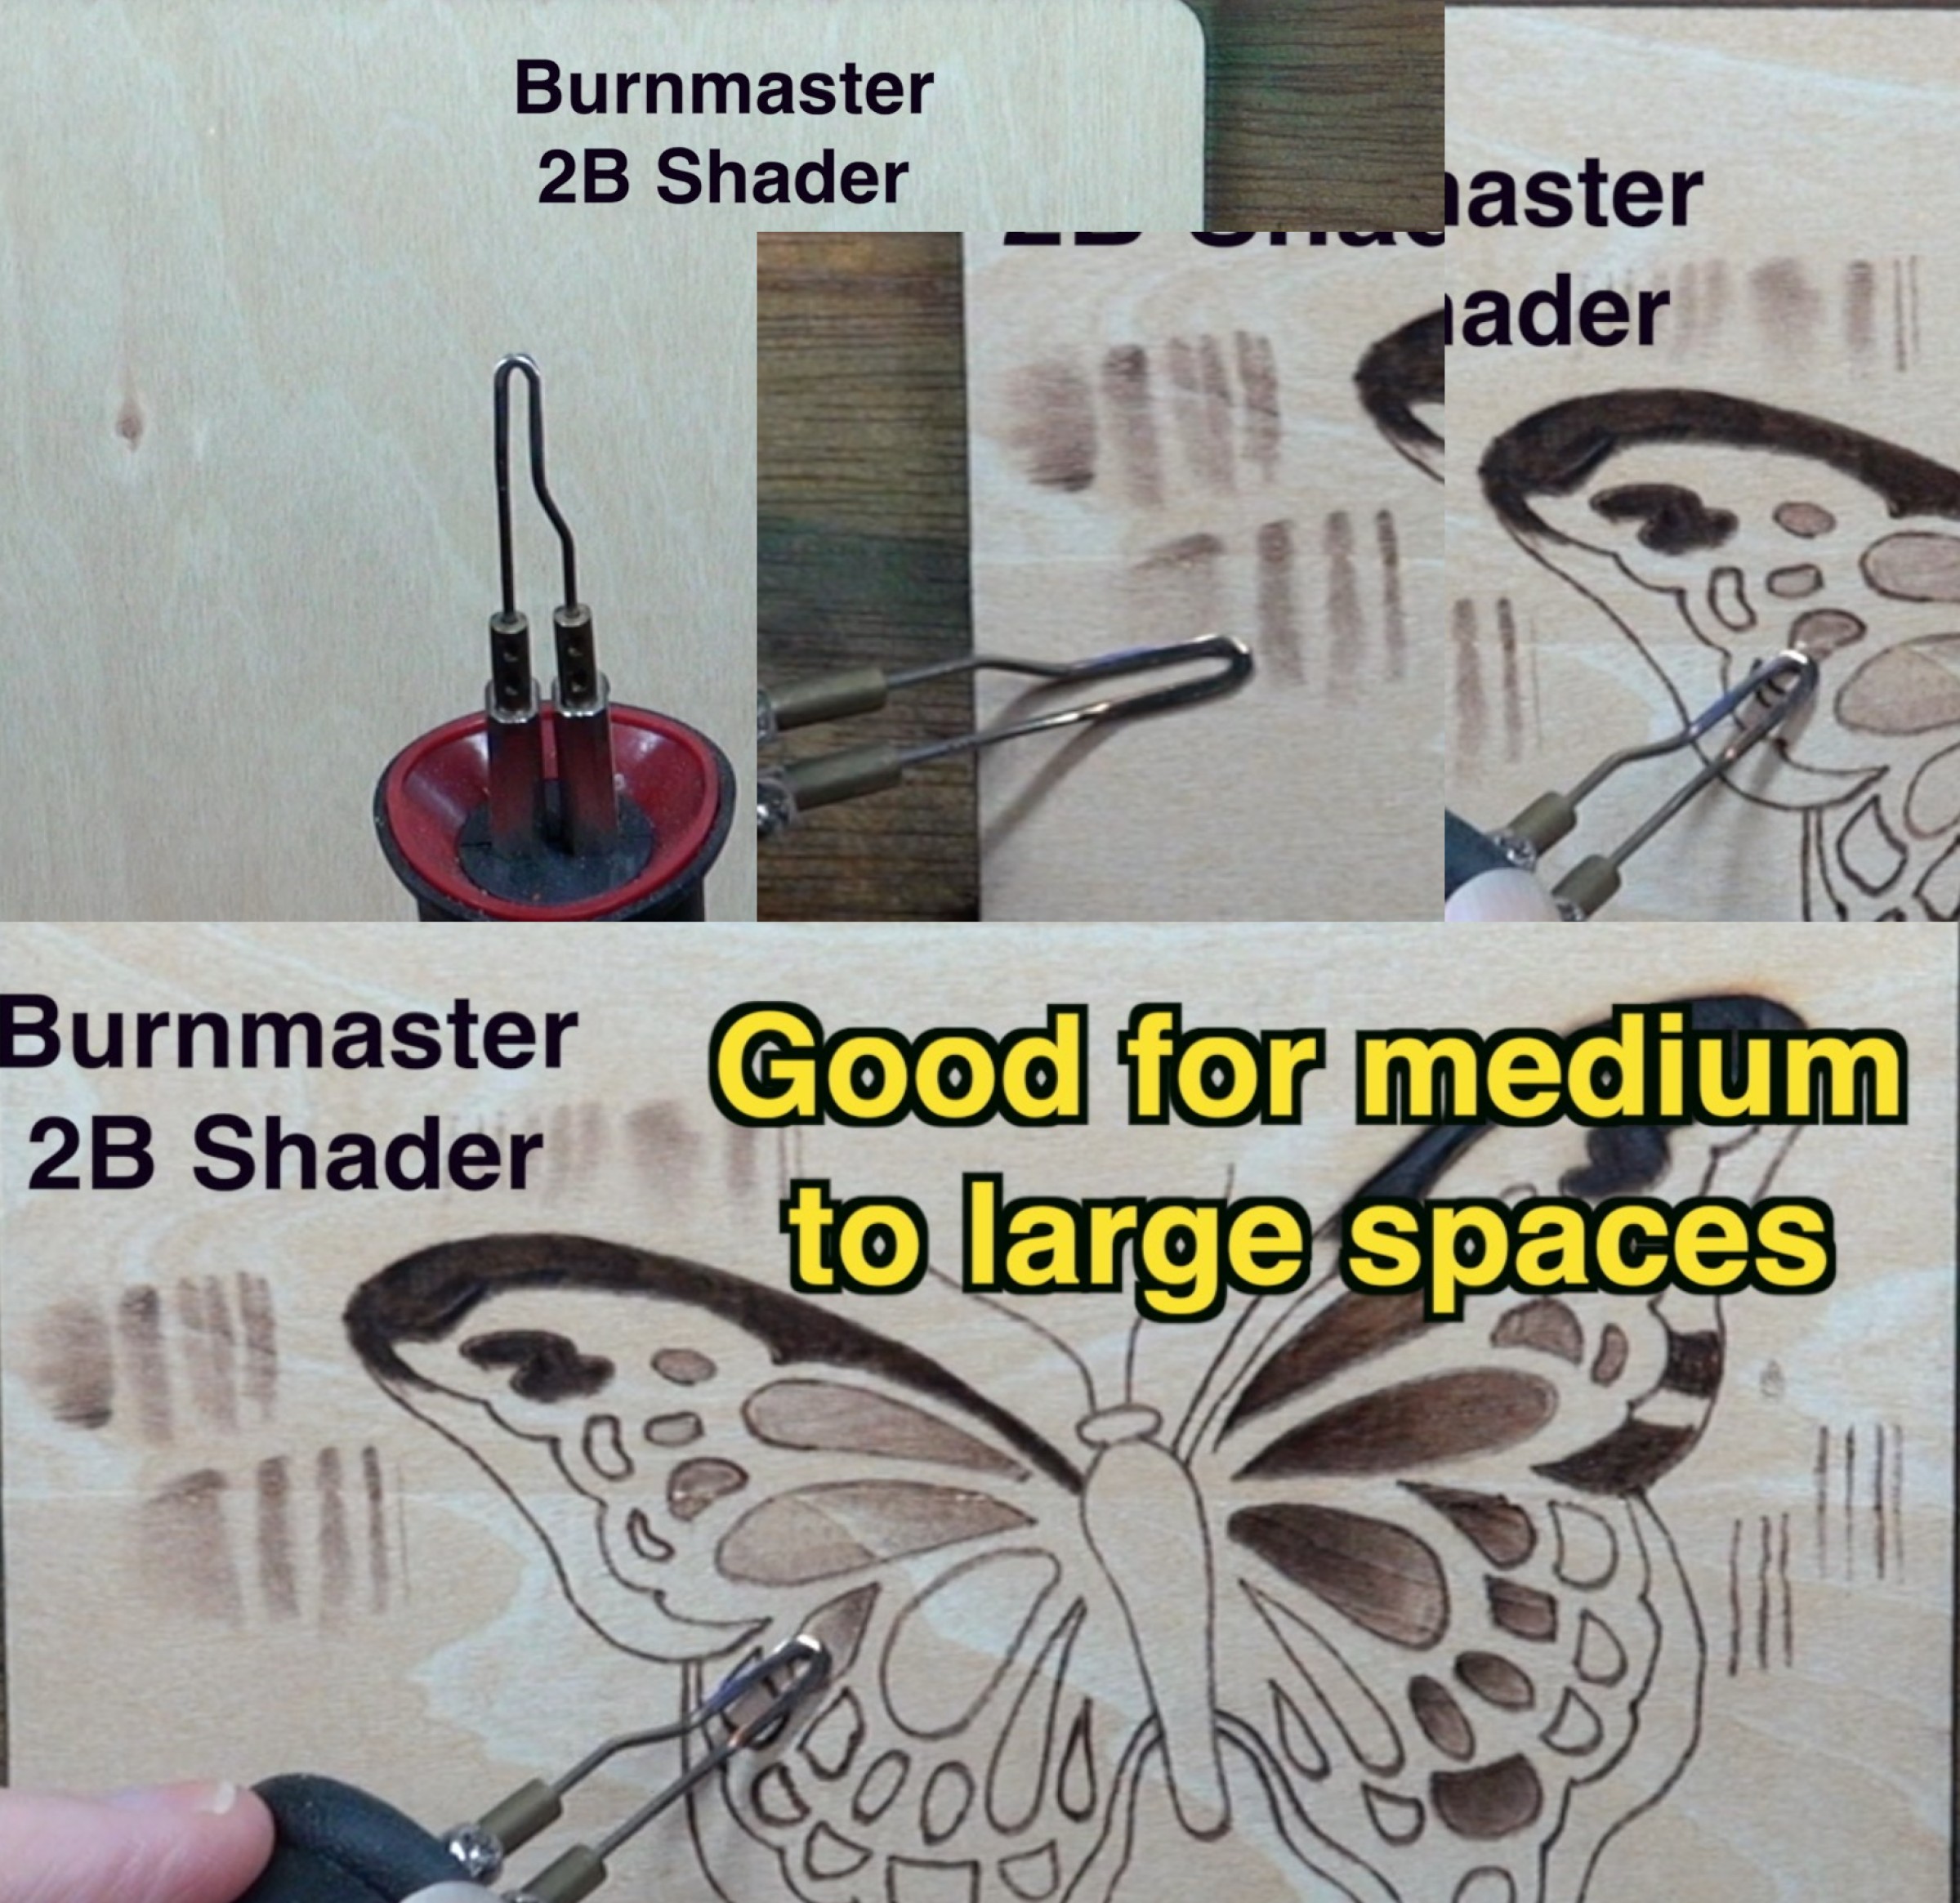 If you have a Burnmaster burner, I would recommend their 2B shader or their spear shader.
First, let’s talk about the 2B shader. This shader is capable of producing a variety of burn widths. It can be used in small areas, but only if you are really careful. I think this shader is easier to use in medium to large areas.
 Burnmaster’s 11A spear shader is the other one I would recommend. The point allows for fine lines, and the side can produce some really wide lines. This combination allows you to burn in small to large areas. What I don’t care for about this nib is how long it is. I find that I have to be very careful with how I hold it to prevent the entire nib from coming in contact with the board. If this were to happen, then the back end of the nib would burn beyond the boundaries of the marking I’m burning in.
Keep in mind I don’t use Burnmaster nibs very often, so I’m sure I would get better if I used them more often. That is true of everything. 🙂
Here’s a link to Burnmaster’s website: https://mastercarver.com
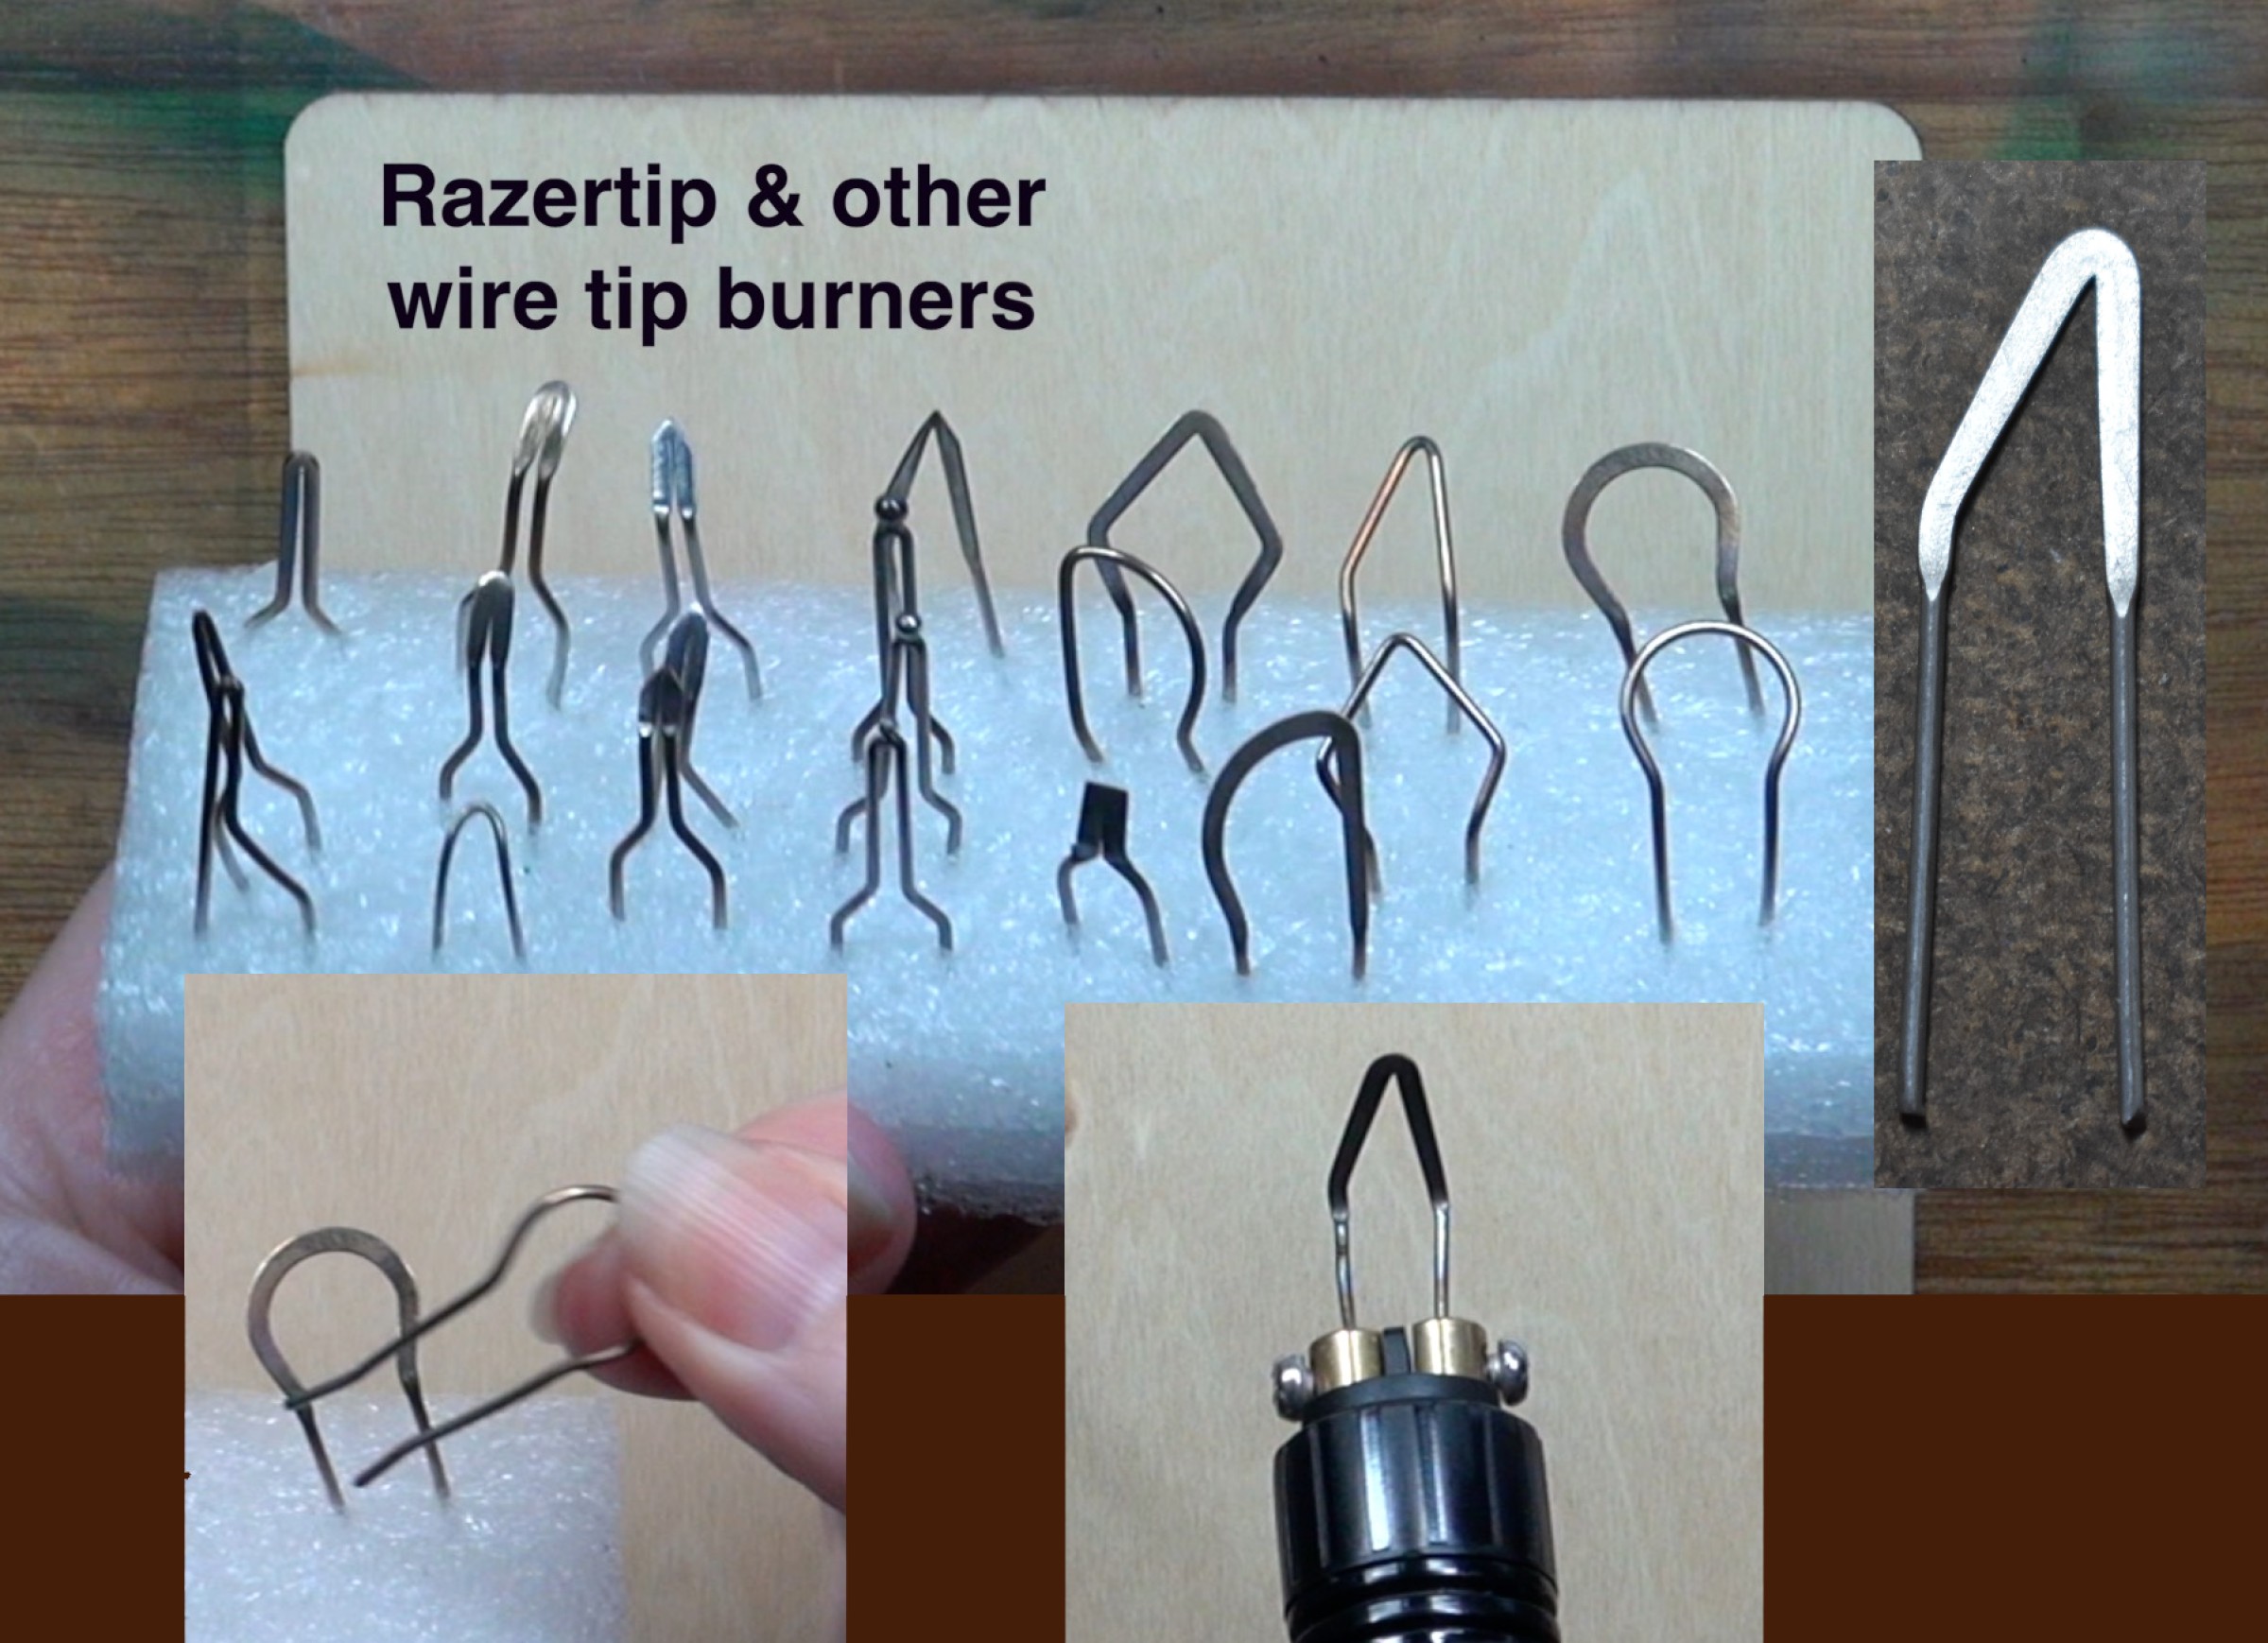 There are a number of burners, like Razertip, that use unmounted wire nibs.
You can get a set like the one shown in the photo on Amazon for under $15 dollars. I recommend the V shaped shader.
 This style of shader can produce a decent variety of line widths. If you’re careful you can use it in small areas.
I think it is easier to use in medium to large areas. I personally like to use this style of shade for large background work.
Be aware that the nib I’m recommending isn’t a ‘Razertip’ nib, but it will work in a Razertip handset.
Here’s a link to Razertip’s website: https://www.razertip.com
Here’s an affiliate link to a generic set of nibs on Amazon: https://amzn.to/3E1fY7K
I do want to mention that while all of the manufactures will sell direct, they never have sales. At least I’ve never known them to. I have seen sales offered at retailers like Mountain Woodcarvers and Treeline Usa.
Mountain Woodcarvers carries almost every brand of burner except Razertips. Here’s a link to their site: https://mountainwoodcarvers.com/collections/all-woodburners
Treeline USA only sells Razertip. Here’s a link to their site: https://treelineusa.com
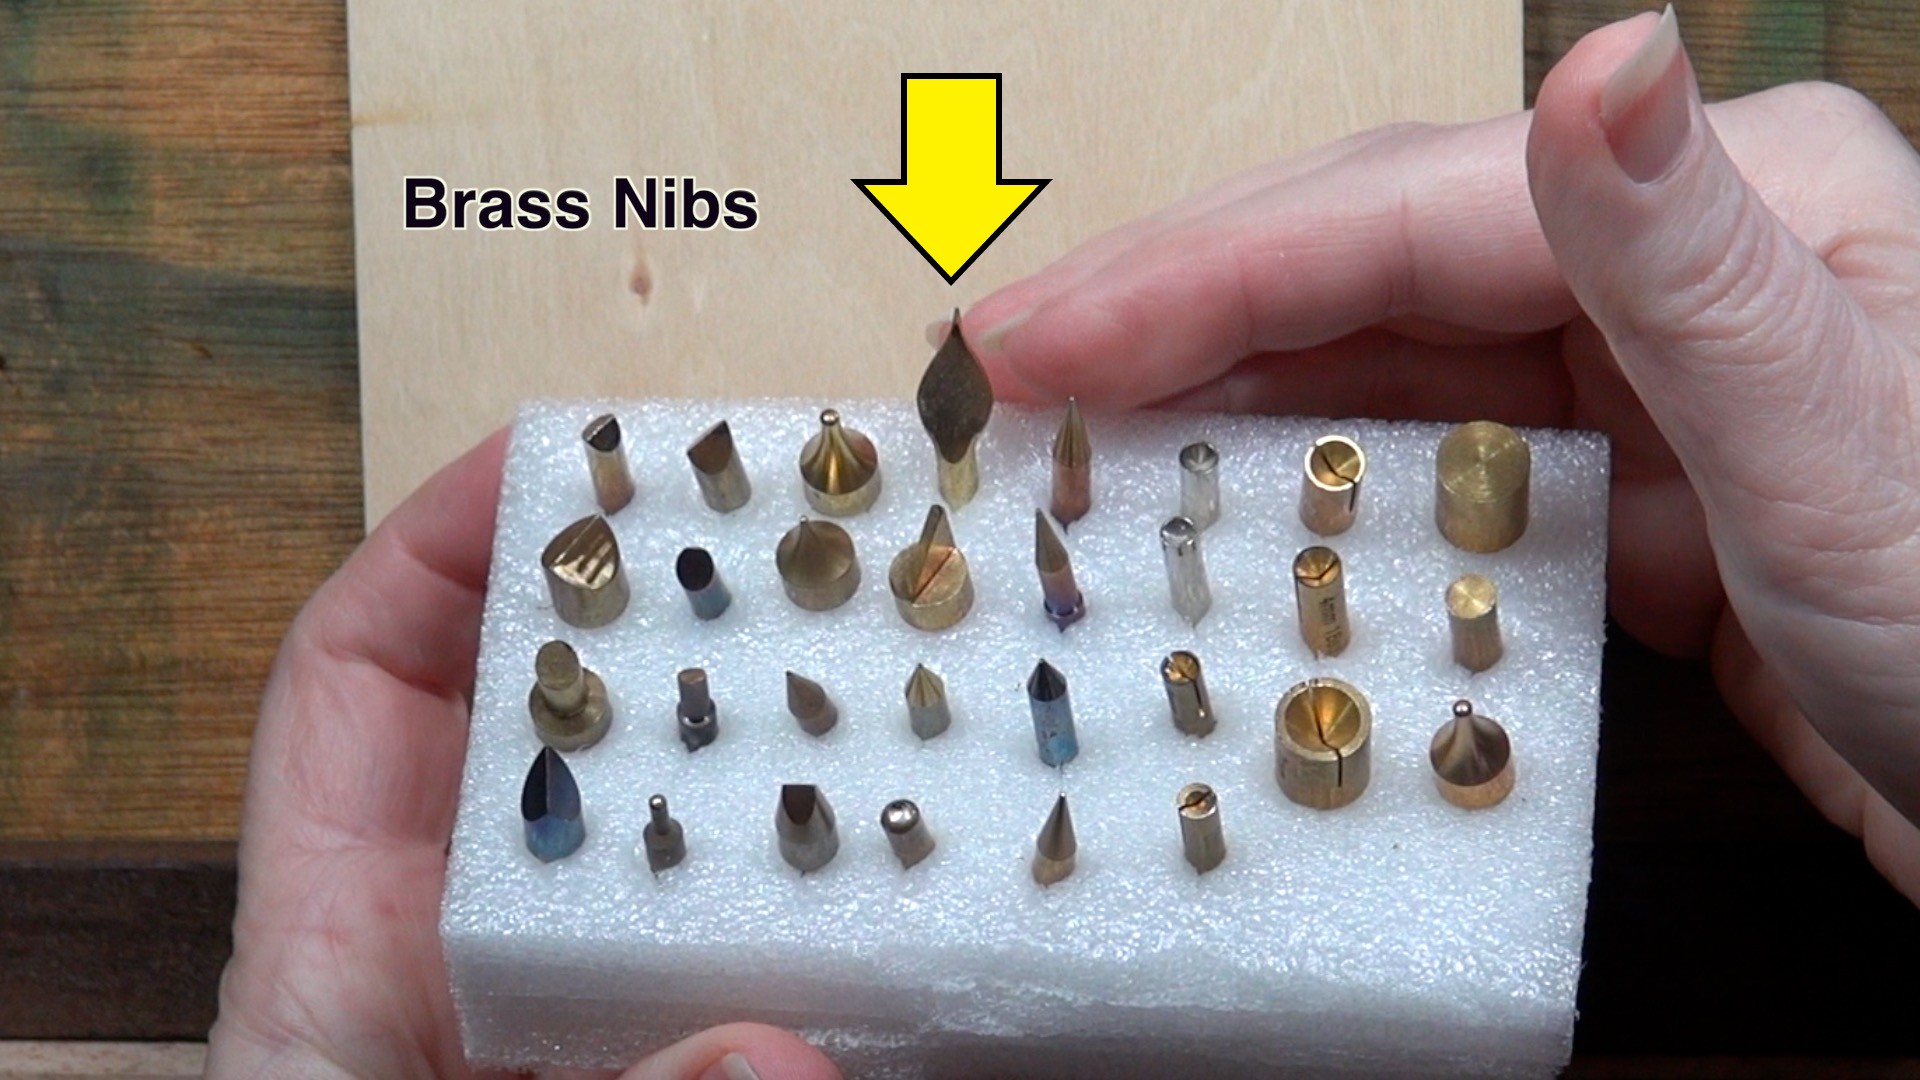 The last nib type to talk about are brass nibs. Let me state right up front that I have very little experience using them.
The Yellow arrow in the photo is pointing to a universal nib. While I hate this nib, it is the preferred nib of Minisa from Wood burning University.
 Minisa has created some absolutely amazing artwork using this nib. She had a tutorial that explains how she uses it.
Here’s a link to Minisa’s YouTube channel: https://www.youtube.com/@MinisaWoodBurningUniversity
Here’s a link to her universal nib tutorial: https://www.youtube.com/watch?v=ncdDTl_rivo
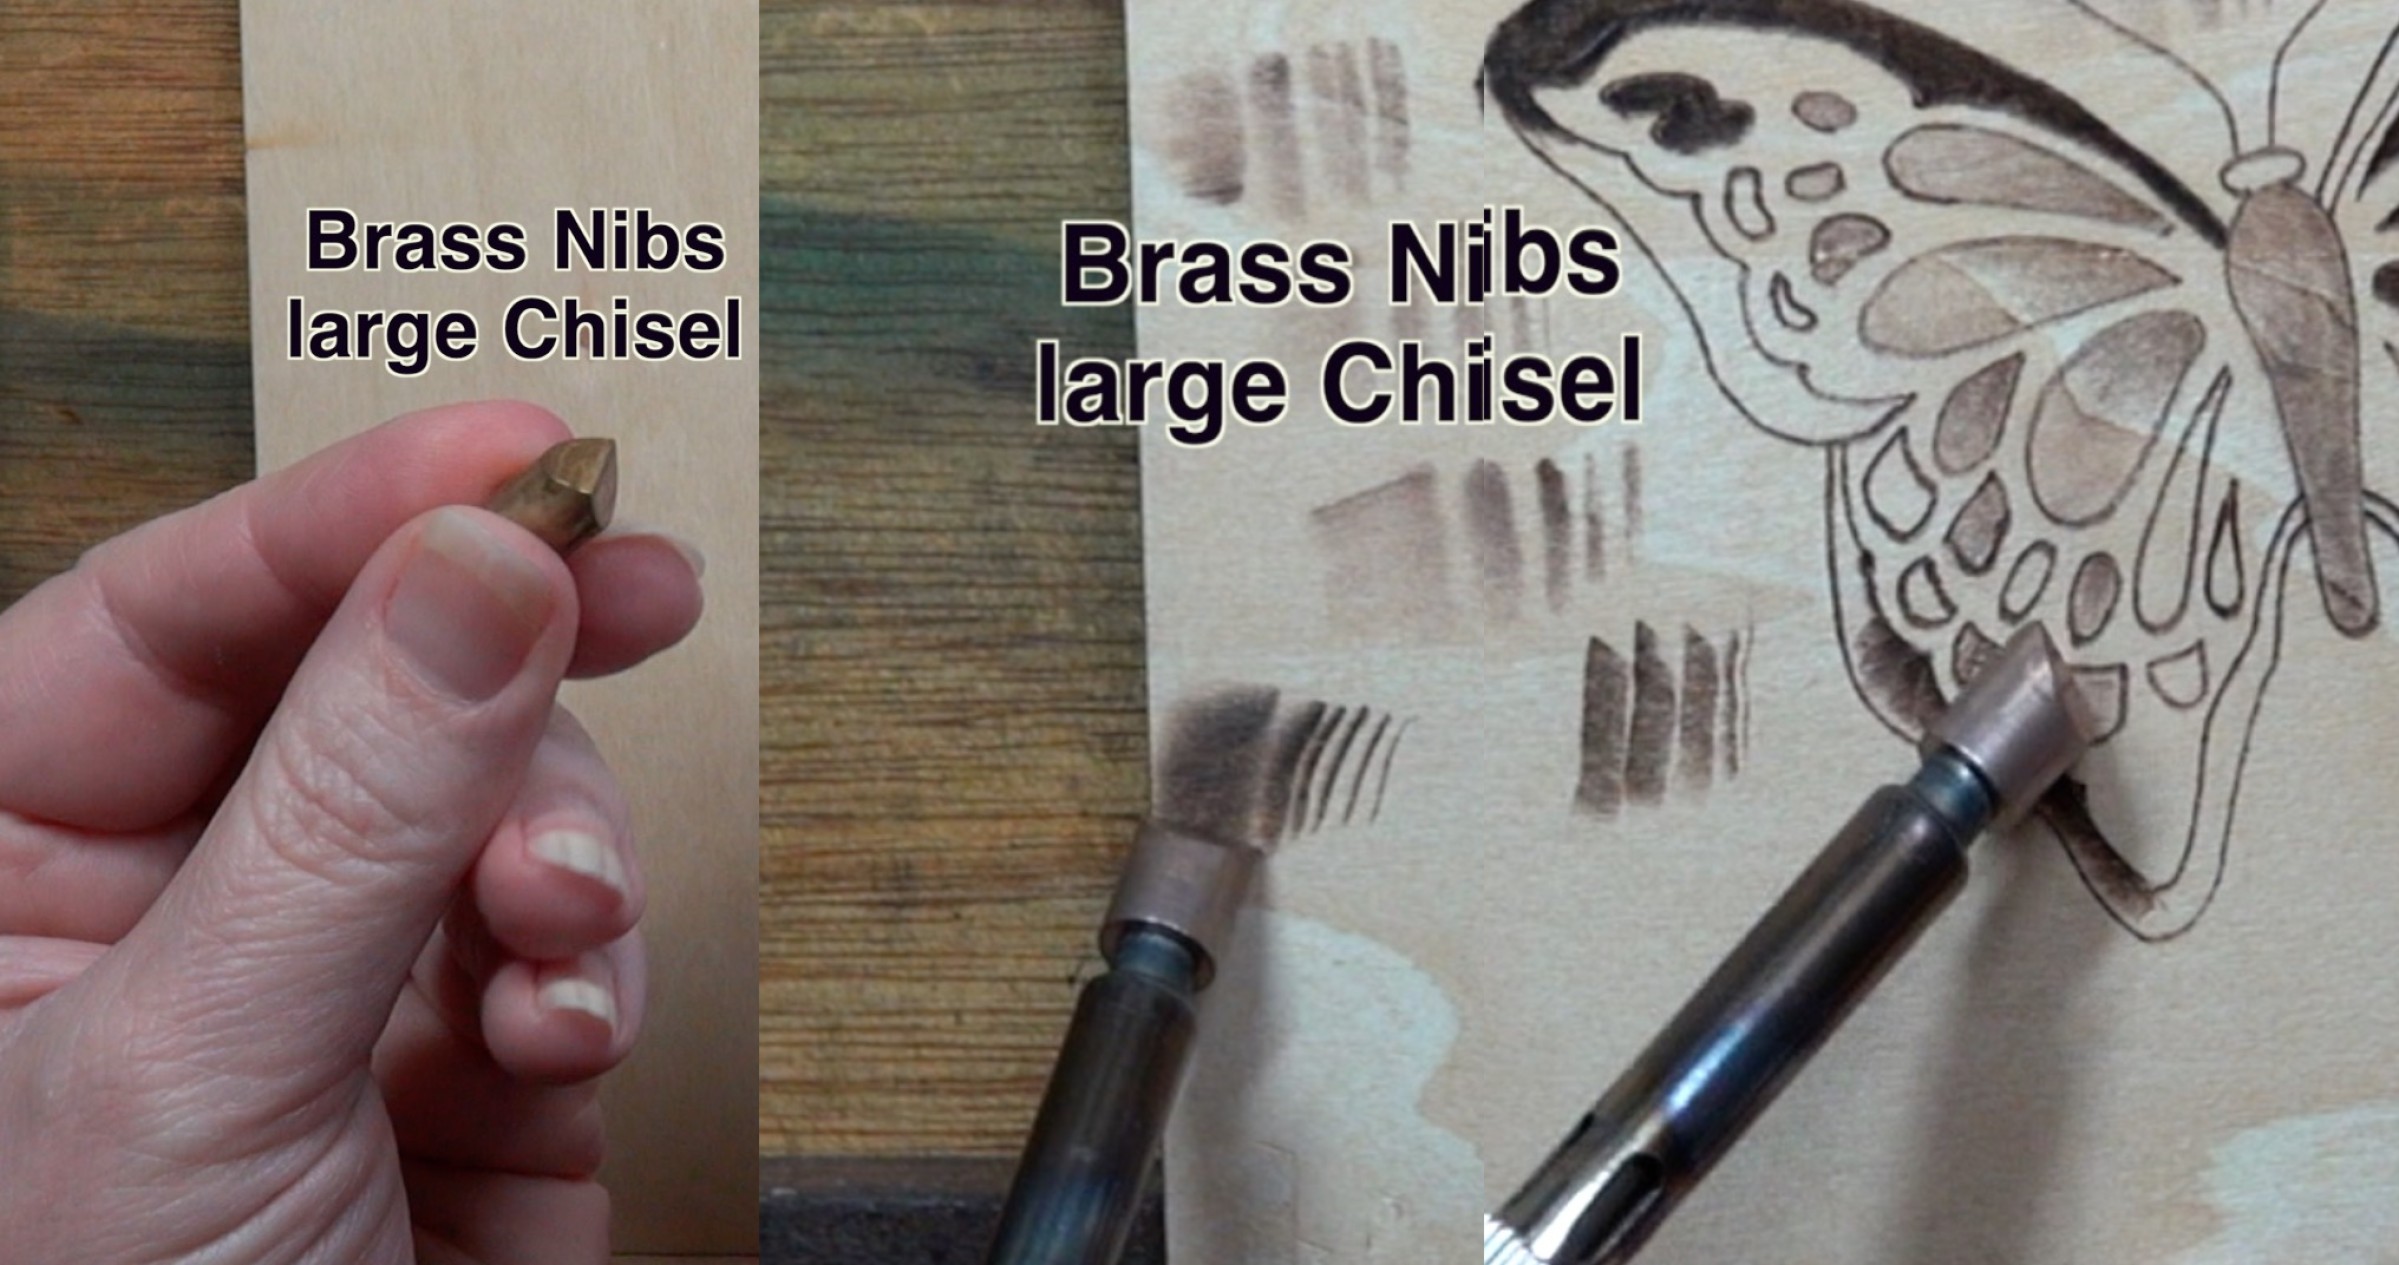 When using brass nibs, I lean more towards chisel tips.
This large chisel tip is terrible for work that needs precision, but it’s great for large background work. Most brass nib sets do have several different sized chisel tip nibs.
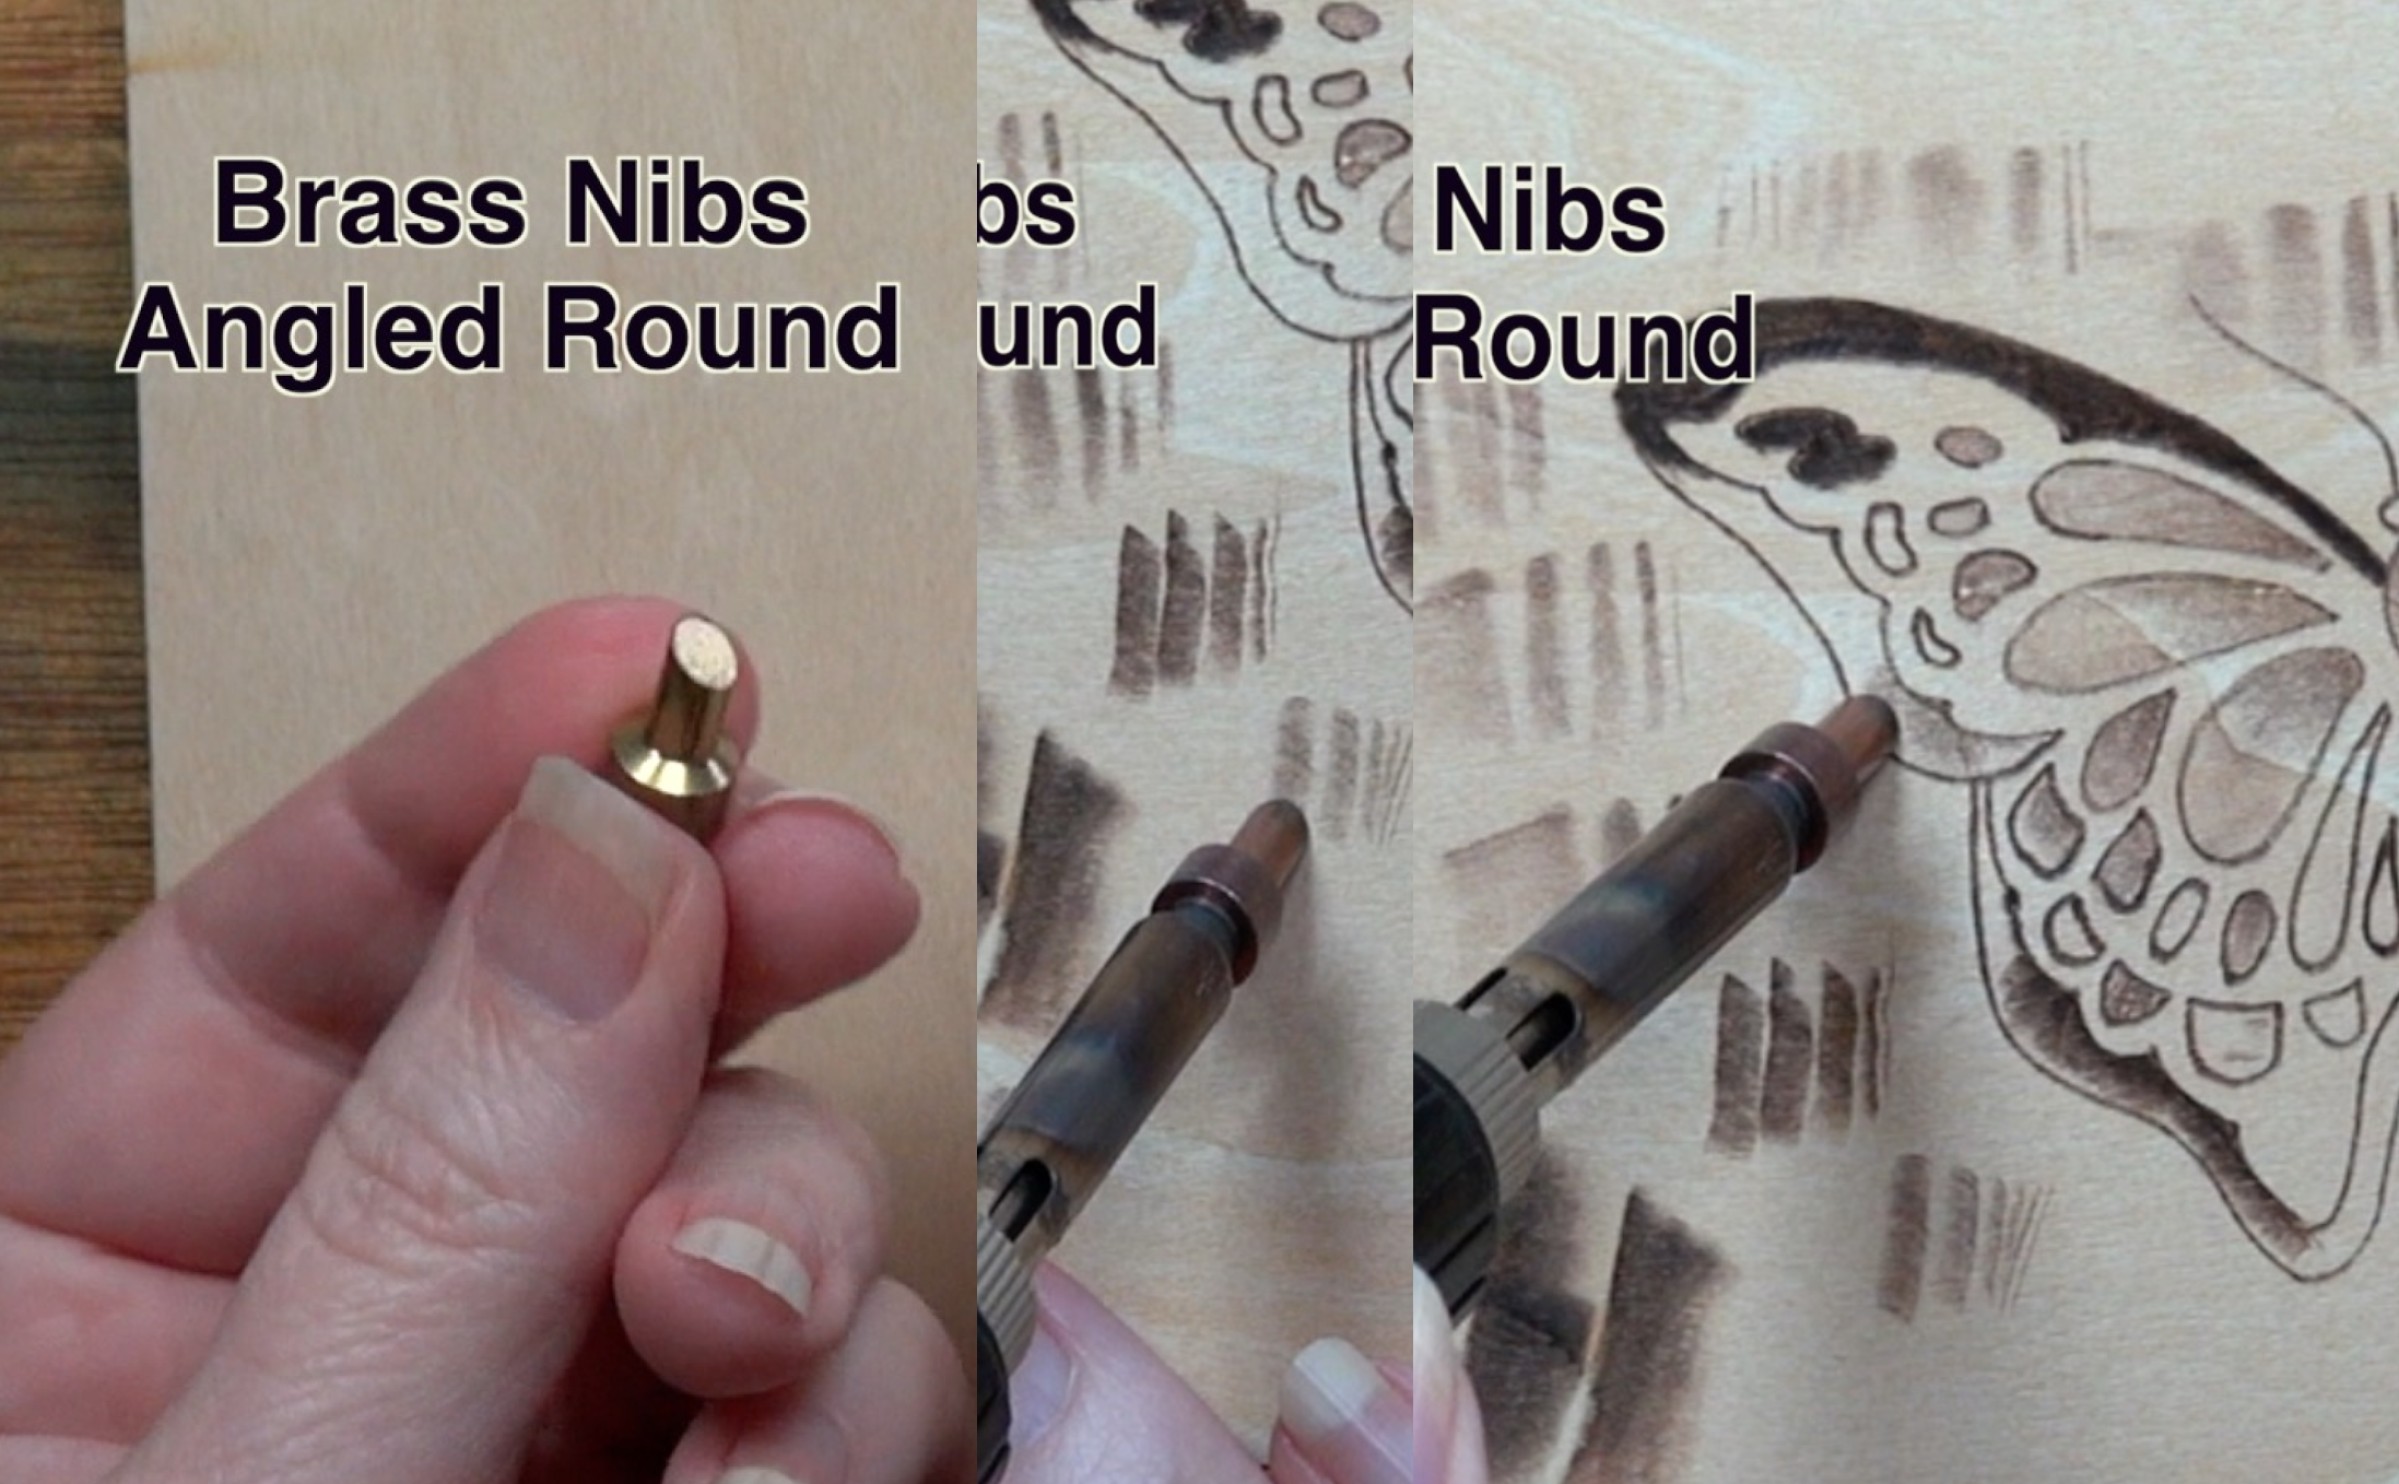 Angled rounds are another nib I reach for when using brass nibs. This one was easy to use in medium spaces, but I had a heck of a time using it in small areas.
 Of all the brass nibs, I find the calligraphy nib the easiest to use. I can’t write with it, but I can use it as a shader. This one is another nib that I find tough to use in small areas, but is great in medium spaces.
Again, I want to remind you that I seldom use brass nibs. I would highly recommend checking with channels that actually use them to get a better understanding of how to use them.
TIP 5 RECAP – Use minimal number of nibs
*Learn how to position the nib
*What temperature works best with the nib
*Concentrate on artwork instead of the mechanics of the burner
*Recommend a writer nib for small to large areas
*Shader for medium to large areas
RECYCLING A BOARD
Lastly, let’s recycle a board. Before you recycle a board, I highly recommend taking a picture of the artwork first. This is to provide you will visual documentation of your improvements. I know that I personally got very discouraged when I was first learning pyrography. It just seemed like I wasn’t making progress, and that my artwork wasn’t getting close to the amazing stuff I saw on the internet. When this happened, I looked through my photos and could see that I was improving and making good progress. This kept me motivated to continue with pyrography, and I think it would work for you too.
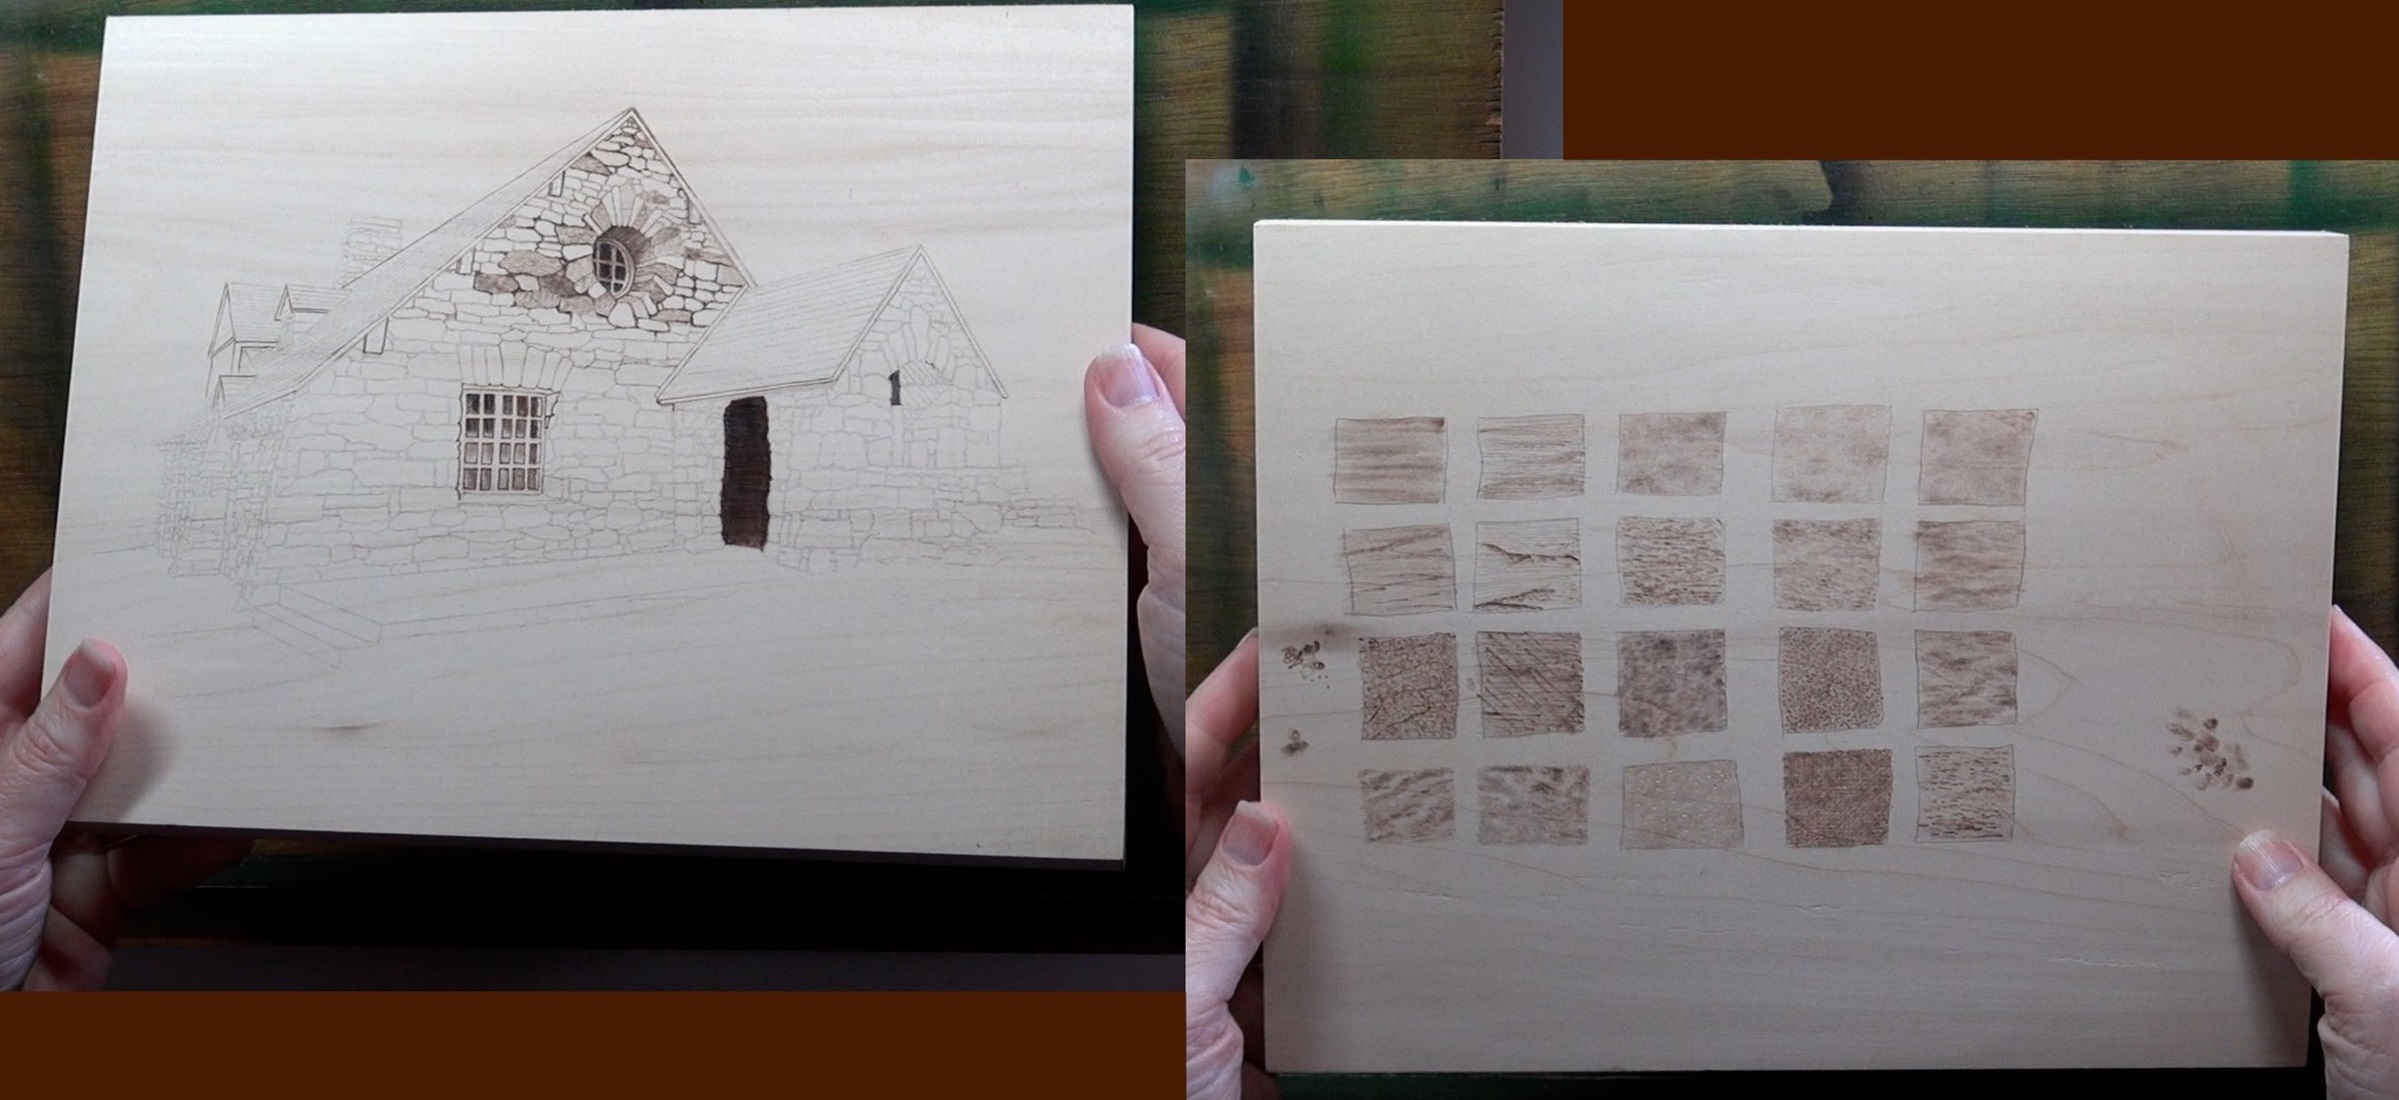 Here’s a board I’m going to recycle. The artwork I wanted to burn on it didn’t fit well. The artwork needed a much larger board. Since I was going to recycle the board, I used the backside of it to practiced some textures. You can artwork on the backside.
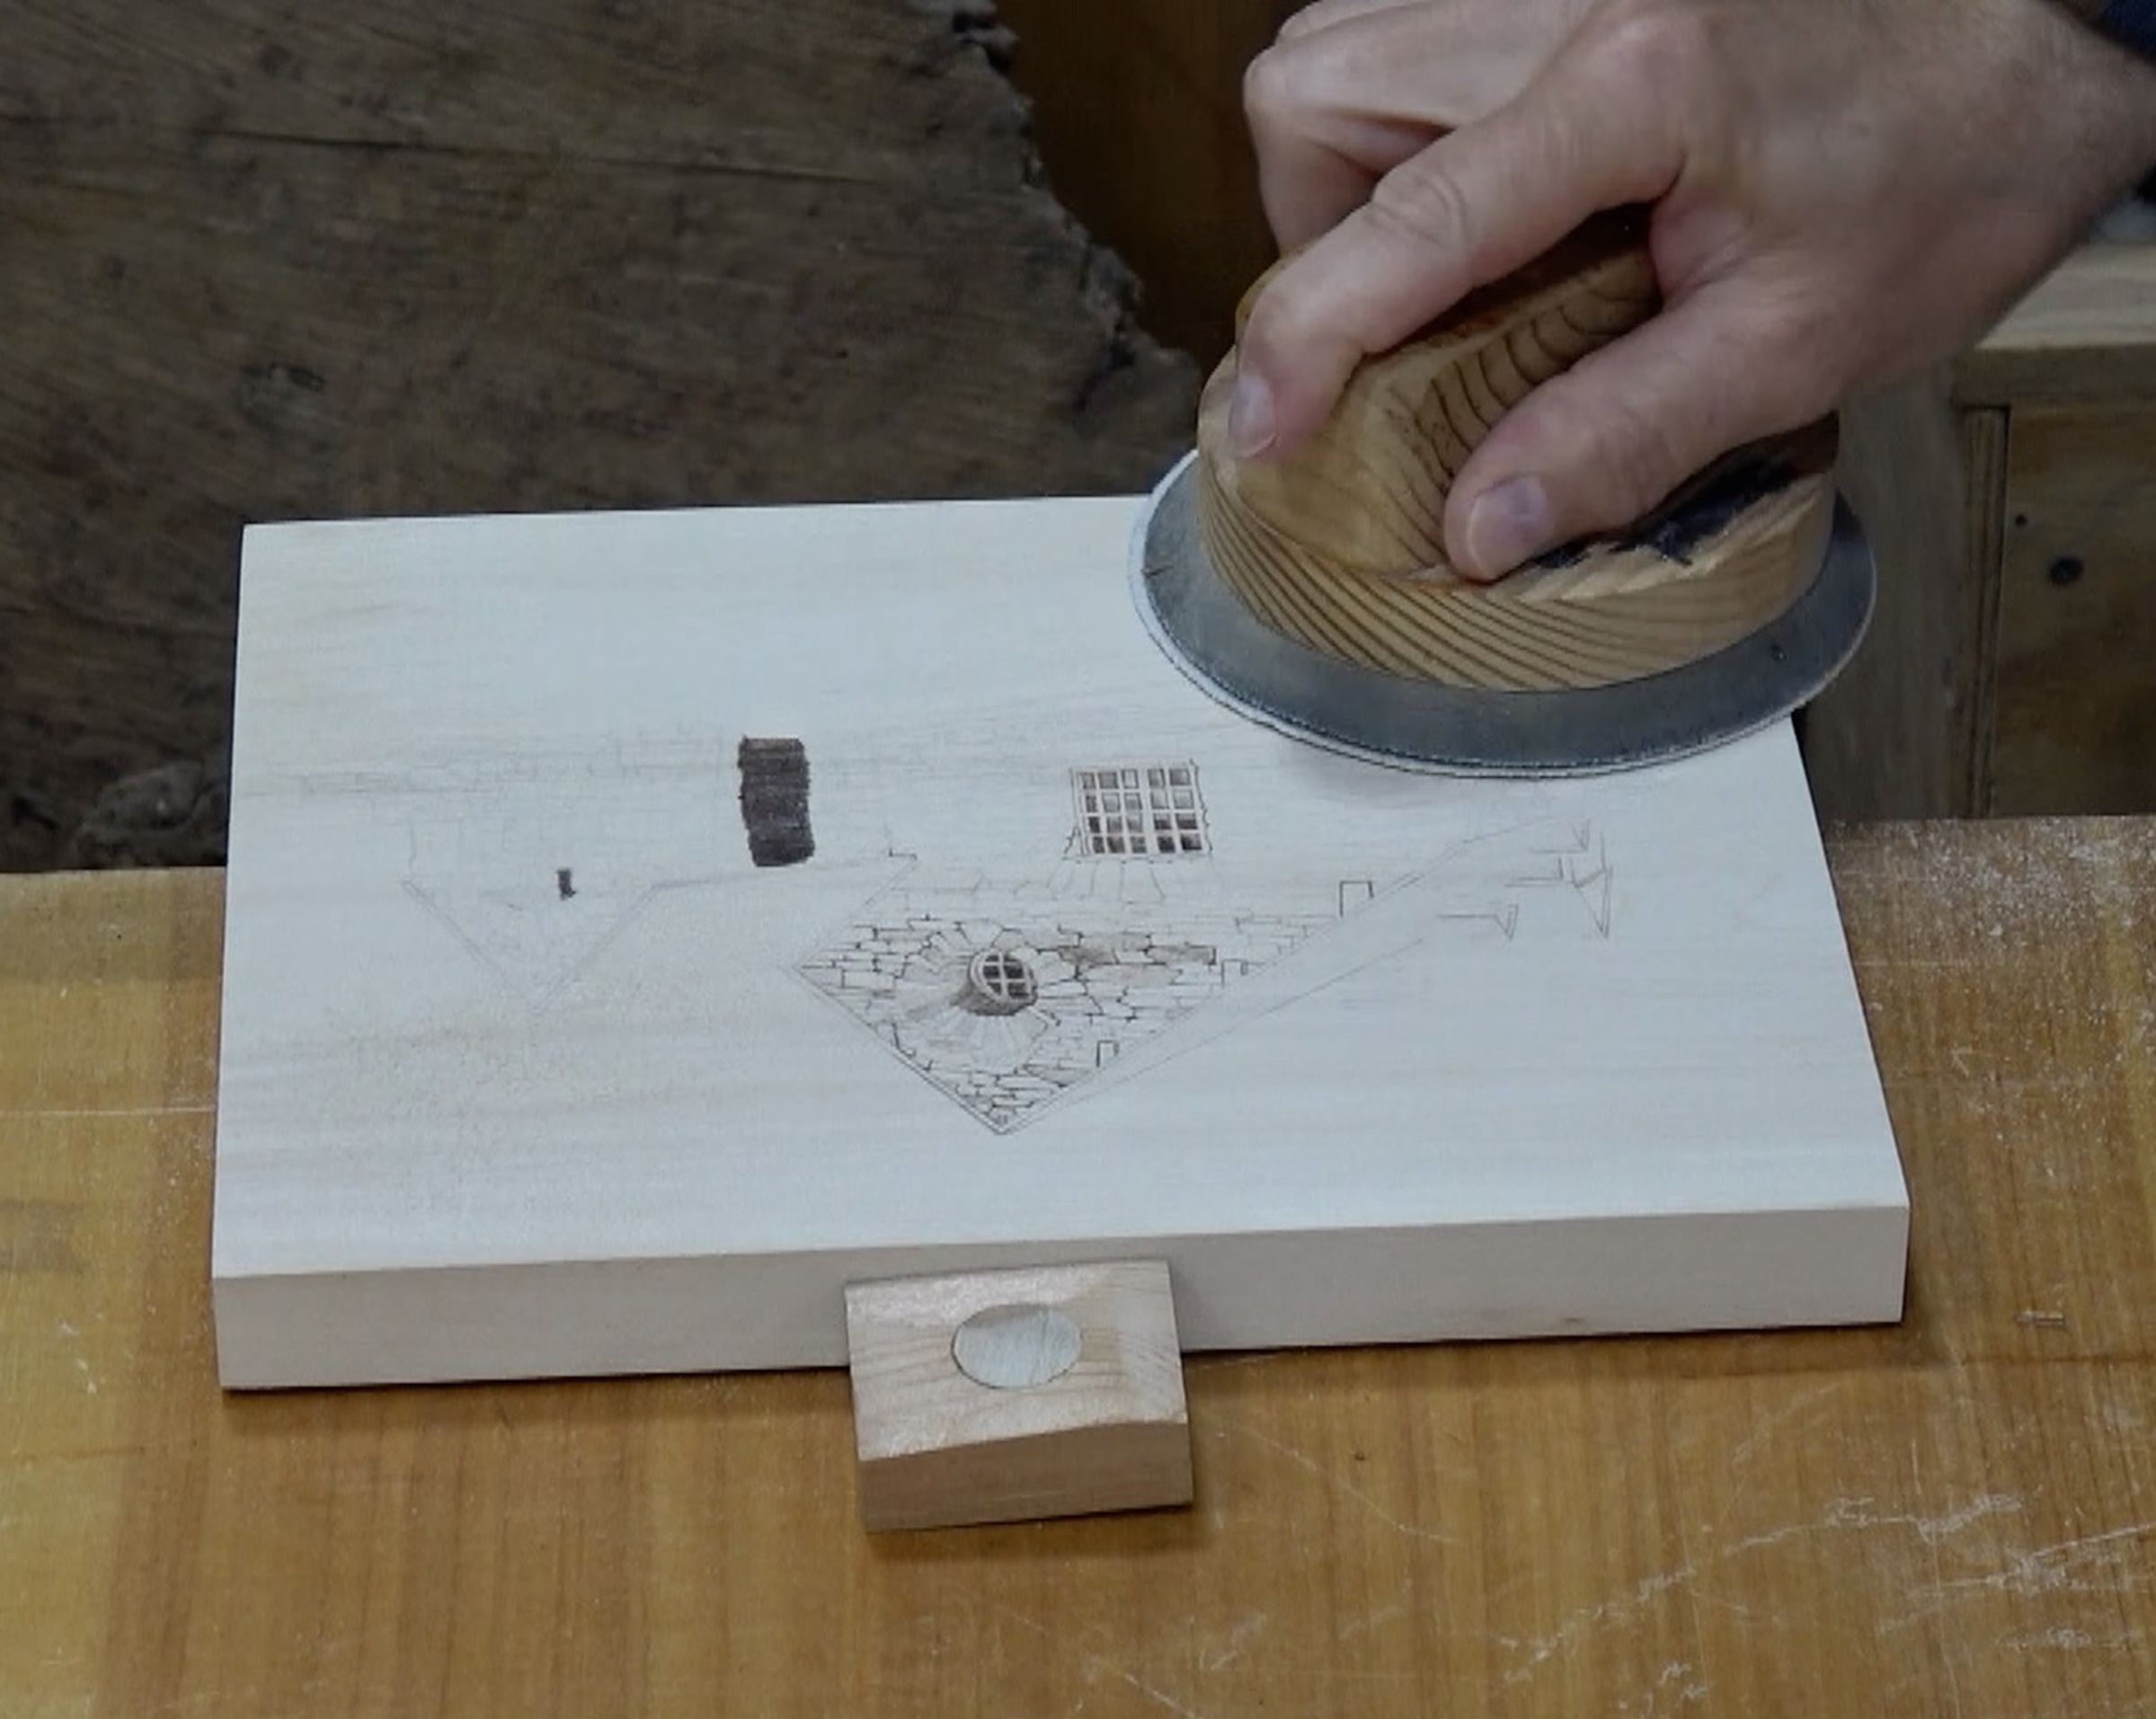 Recycling a board is done by simply sanding off the artwork. Todd uses 100 grit sand paper for this.
After the artwork has been sanded off, I do mist the board with water to raise the nap. I let it dry and sand again, but this time with 220 grit sandpaper.
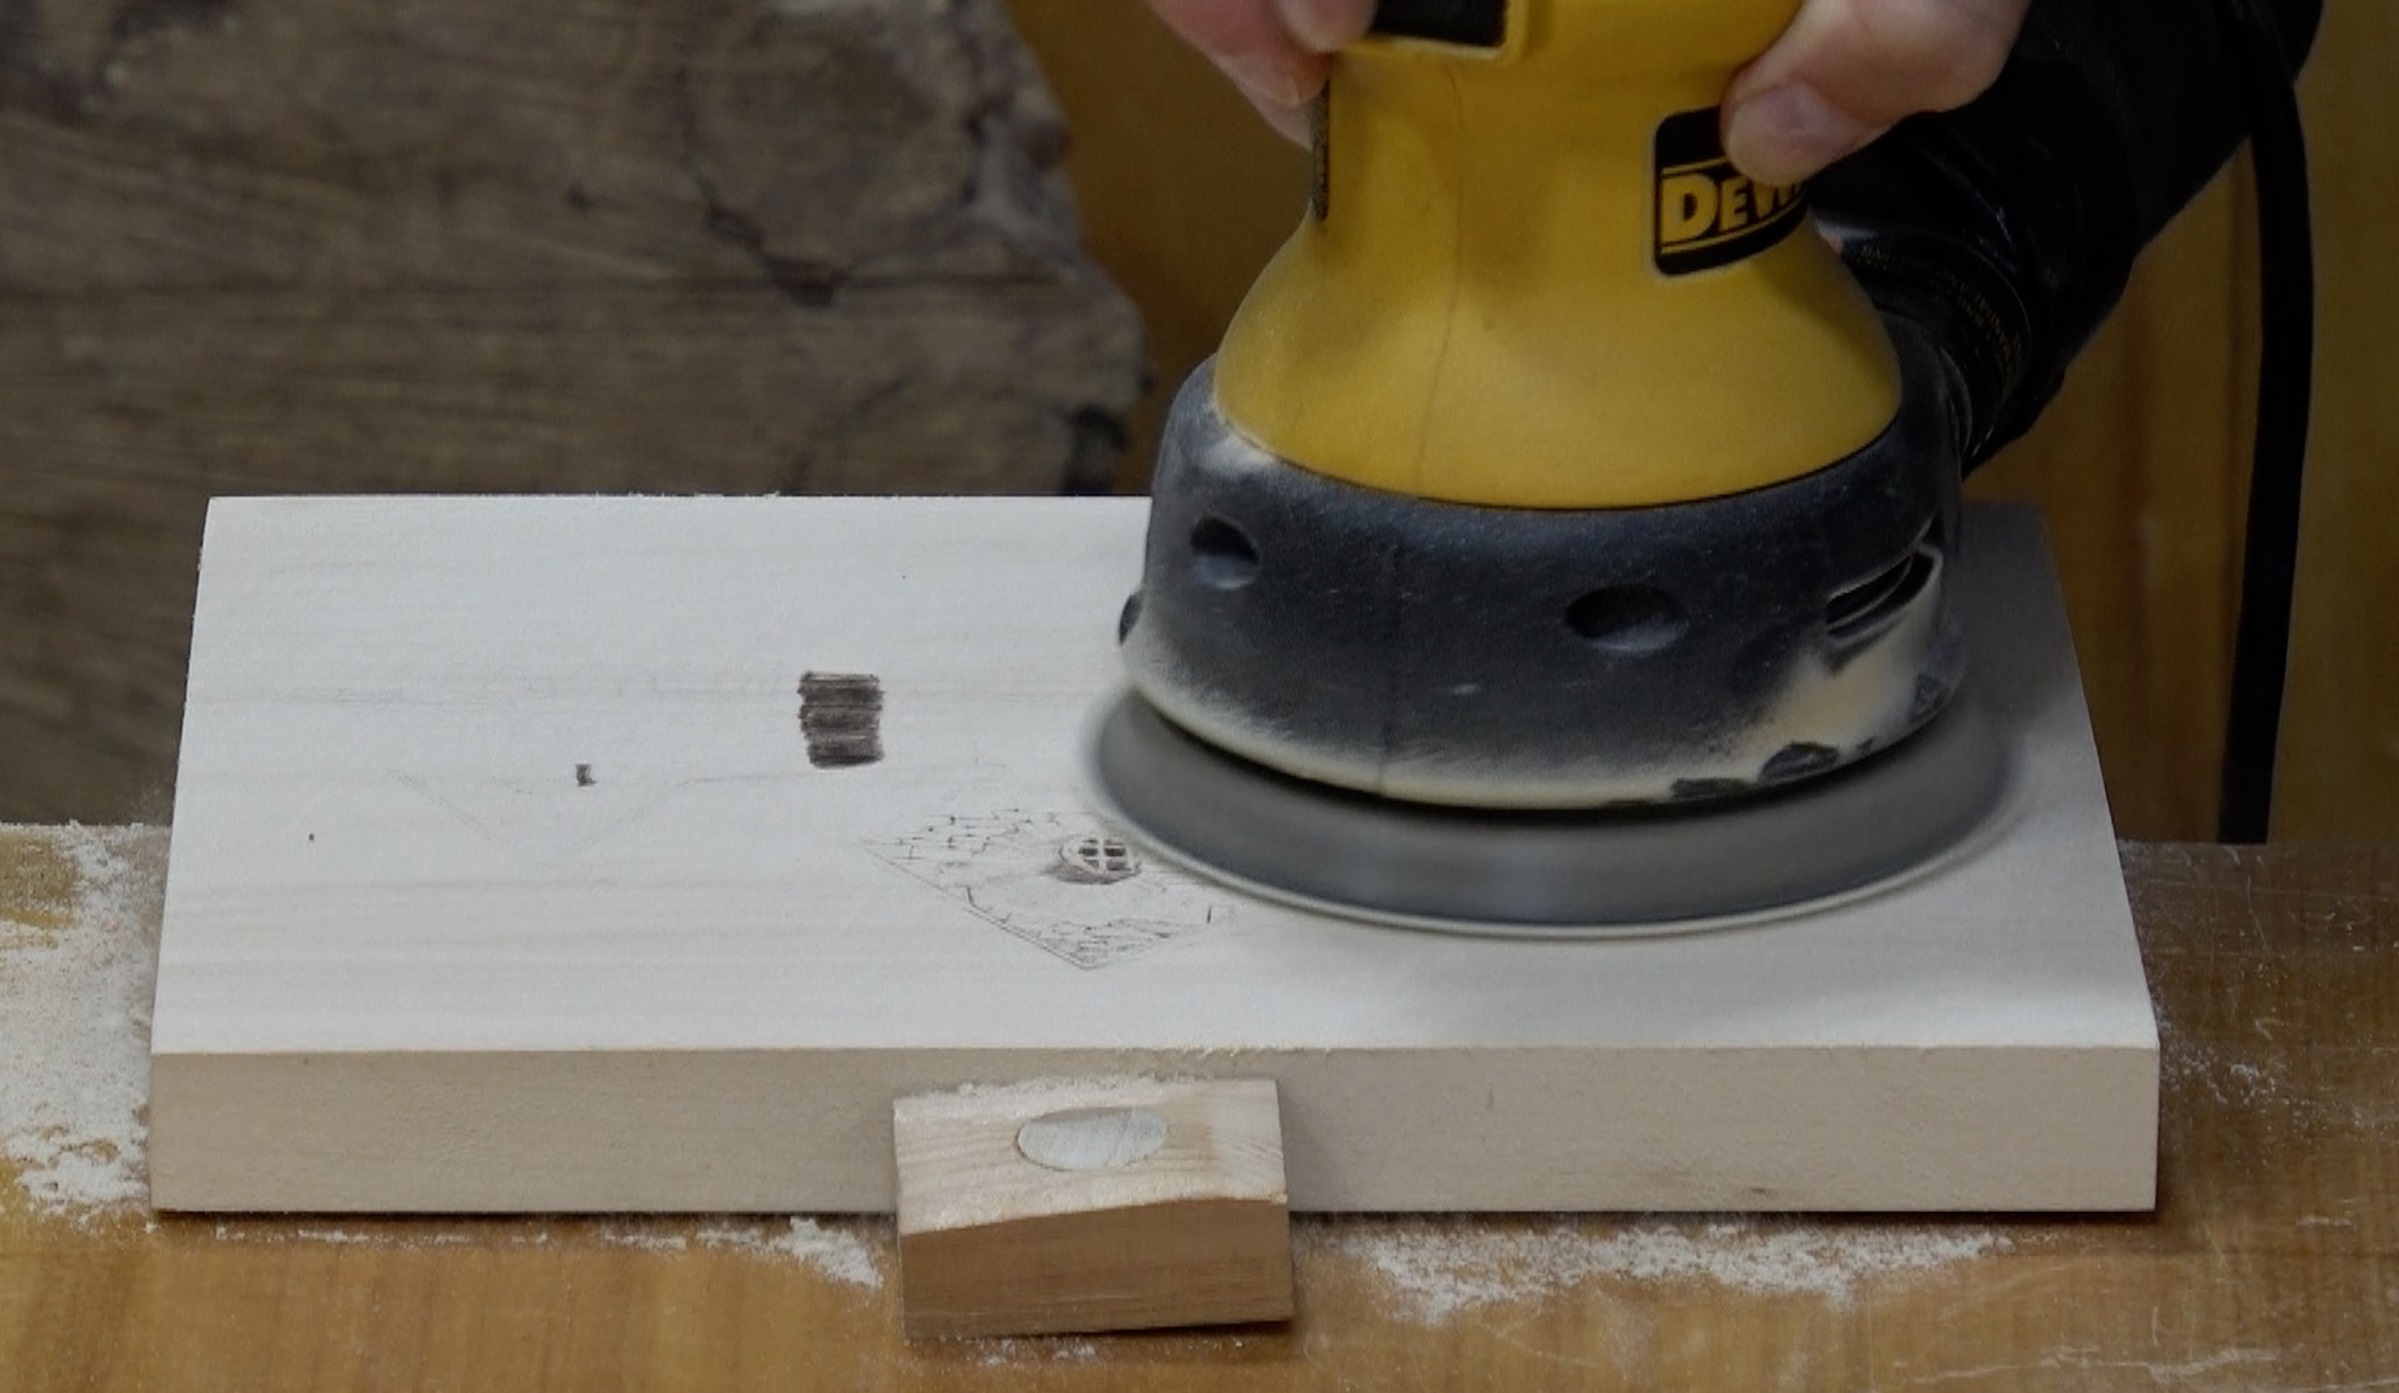 Depending on how dark and/or deep the burn are it will be quicker to use a power sander if you have one.
 Now the board has been recycled and is ready for use again.
Since this is a quality solid wood board, it can be recycled numerous times before it is too thin for further recycling. My guess is that by the time the board is too thin for recycling, you won’t need to recycle boards anymore.
 Imp. I do want to mention that you cannot recycle plywood.
 This image shows a side view comparison of plywood and basswood.
The plywood (top) is composed of layers of wood that are glued together.
The basswood board (bottom) is solid wood.
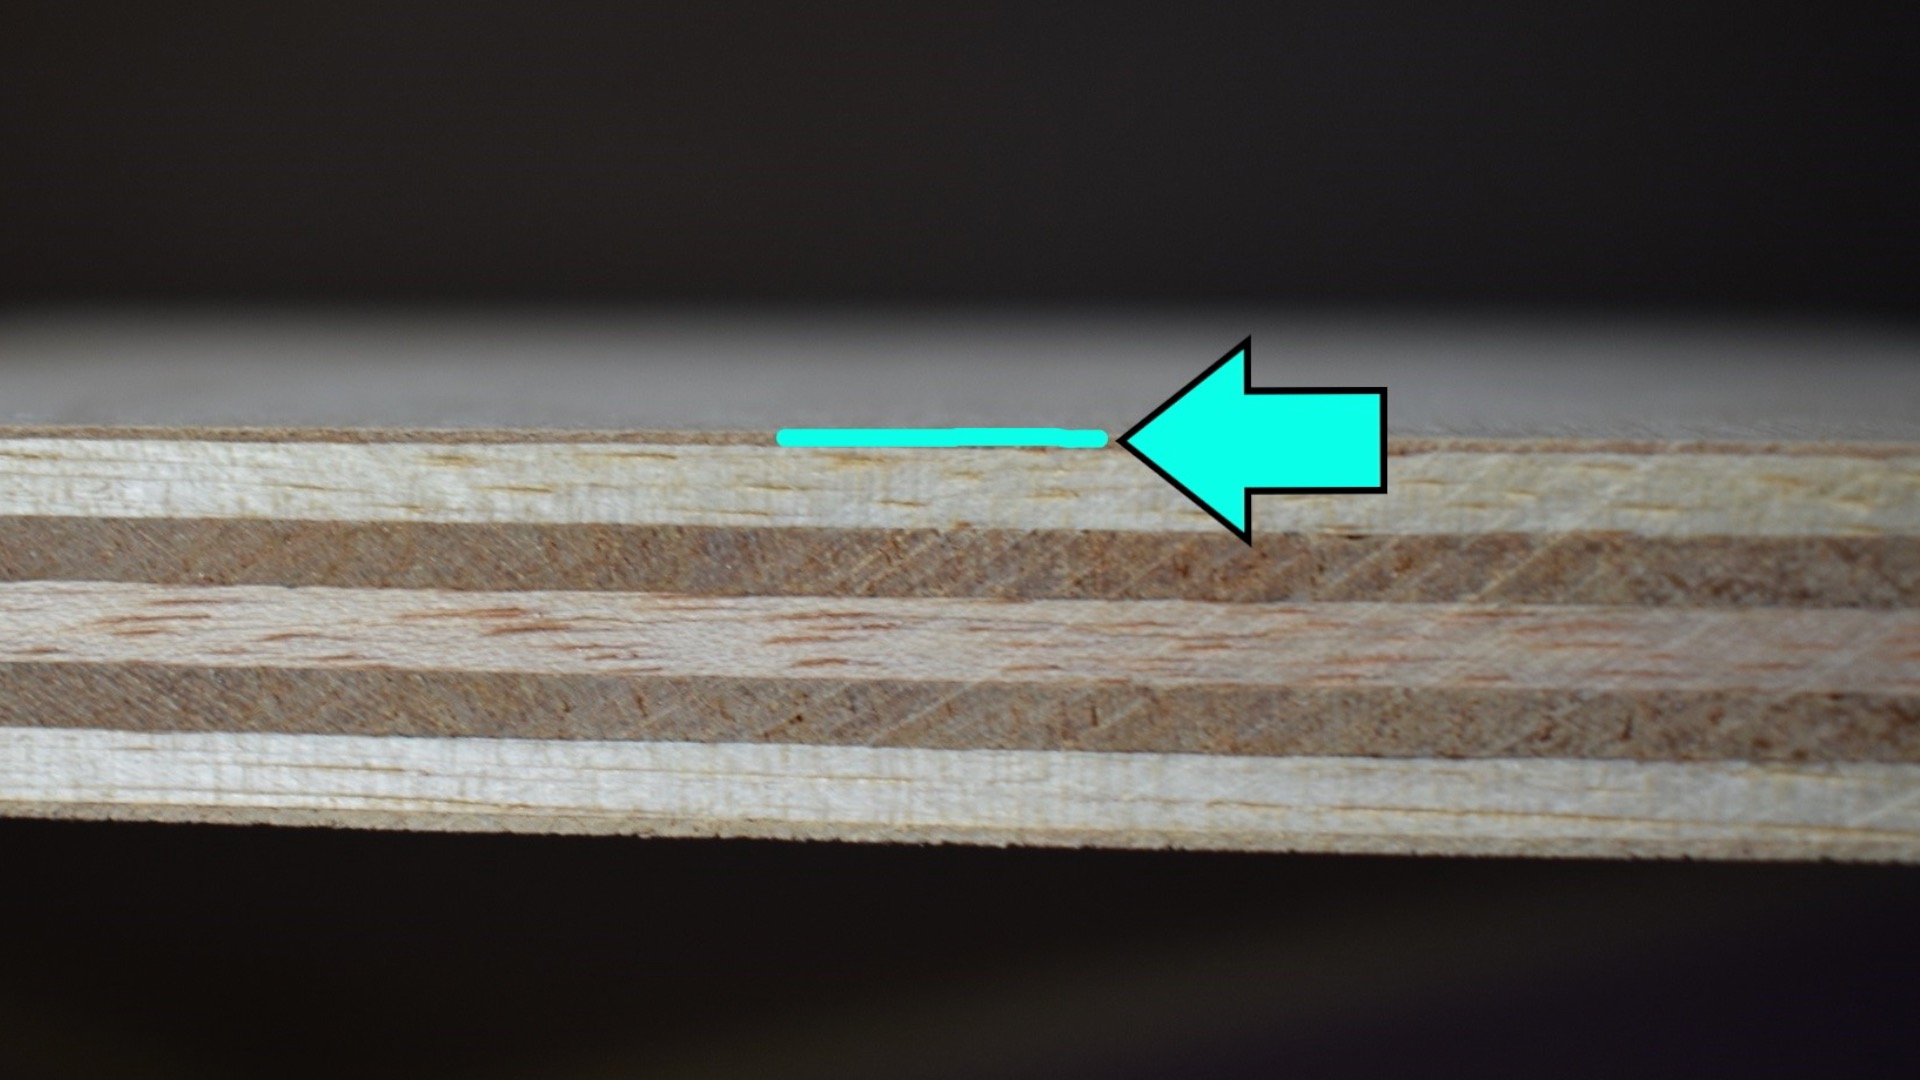 The reason plywood can’t be recycled is that the top burnable layer is very thin. The blue arrow is pointing to a blue line that shows how thin the top burnable layer of plywood is. All of the plywood I’ve seen has a a thin top layer.
When you sand off your artwork, you will also sand off most, of not all, of the burnable layer on plywood. When that happens the underlying glue layer is exposed and that is not safe to burn on!
Only recycle solid wood boards!
IN CONCLUSION
That is it for this blog. I hope you found the information in this blog helpful. I hope that I was able to answer some questions you might have had about pyrography.
Brenda
Feb 26, 2026
Want to subscribe?
- Click on the “Leave a Comment” field at the end of any post (blog) and a subscribe option will appear.
- Put something in the comment field. If you put “test” or “just subscribing” I won’t make your comment public.
- Fill in the sections for your email address and name, and then click on the “notify me of new posts via email.”
- You will get a confirmation email from WordPress confirming you want to subscribe.
- Click on the confirm button in that email and you’re done.
Please note that I do not send out emails. If you have a WordPress account there is a way to subscribe within the WordPress system, but I cannot provide specifics on how it works as I don’t know.
Thank you so much for all that you do for beginners 😊
I just hope that the information helps. Sometimes it hard to find good information about pyrography; especially when I was learning. I think things are getting better. There are more channels and websites devoted to pyrography.